
In part 4, we built the foundation of creating a chat app by adding UI screens that are focused on sending, receiving and displaying chat messages. We used react-native-gifted-chat an amazing open source library and dived deep to use its “out of the box” props to add features to the chat app.
In part 5, we are going to connect every chat functionality that we built so far with a real-time database service from Firebase, called Firestore. You are going to learn
- store chat messages of each thread/chat room in Firestore collection
- how to create sub collections inside a Firestore collection
- add a feature to display most recent message for each chat room on home screen
- fetch data from a Firestore collection
And few other things along the way. Let’s get started.
How to get current user information in the app?
Remember, in part 2, when configuring Email authentication between the chat app and the Firebase service, you set the following AuthProvider that gives access to the current user as well other methods that are already being used in components LoginScreen and SignupScreen. Here is the ode for src/navigation/AuthProvider.js for your reference.
import React, { createContext, useState } from 'react';
import auth from '@react-native-firebase/auth';

/**
 * This provider is created
 * to access user in whole app
 */

export const AuthContext = createContext({});

export const AuthProvider = ({ children }) => {
  const [user, setUser] = useState(null);

  return (
    <AuthContext.Provider
      value={{
        user,
        setUser,
        login: async (email, password) => {
          try {
            await auth().signInWithEmailAndPassword(email, password);
          } catch (e) {
            console.log(e);
          }
        },
        register: async (email, password) => {
          try {
            await auth().createUserWithEmailAndPassword(email, password);
          } catch (e) {
            console.log(e);
          }
        },
        logout: async () => {
          try {
            await auth().signOut();
          } catch (e) {
            console.error(e);
          }
        }
      }}
    >
      {children}
    </AuthContext.Provider>
  );
};
To fetch the logged in user information (aka the current user), start by importing AuthContext in the file RoomScreen.js.
// ... rest of the import statements
import React, { useContext, useEffect } from 'react';
import { AuthContext } from '../navigation/AuthProvider';
Next, to verify that the you are getting the current user information, inside the RoomScreen component, add the following two lines.
export default function RoomScreen({ route }) {
  const { user } = useContext(AuthContext);
  const currentUser = user.toJSON();

  // ...
}
You have to convert the user data being fetched in JSON object. To check that the user data is incoming, let us temporarily add a useEffect hook after the previous code snippet, as shown below.
useEffect(() => {
  console.log({ user });
}, []);
How to use Chrome Dev tools with a React Native app?
There are two ways to check the output of console statements in a React Native app. First, a console statement triggers, in the terminal window, the will be a LOG entry like below with desired result.

However, for better complete control over debugging, you can use Chrome dev tools. This can be done by opening the in-app developer menu, either by shaking the device or if you are using an iOS simulator press command + d. On Android, you have to press command + m on mac (for windows, press control + m).
A developer menu like below will popup.
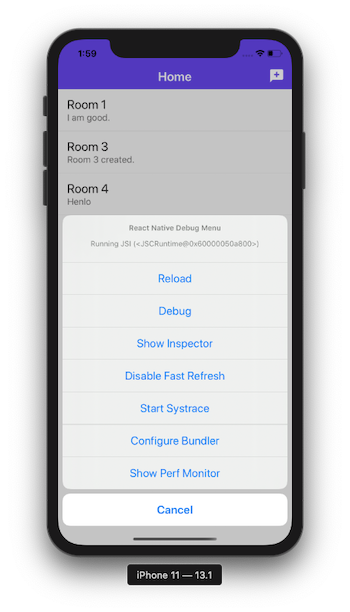
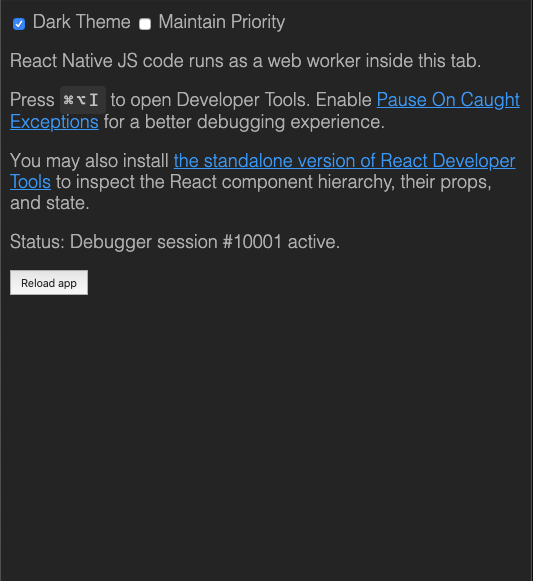
Select the option Debug. In your default Chrome browser, it is going to open like below.
Go to Console tab. Enter a chat room from the app. If you do not have to created a chat room yet, create one. On the Console tab, you are going to get the following result.
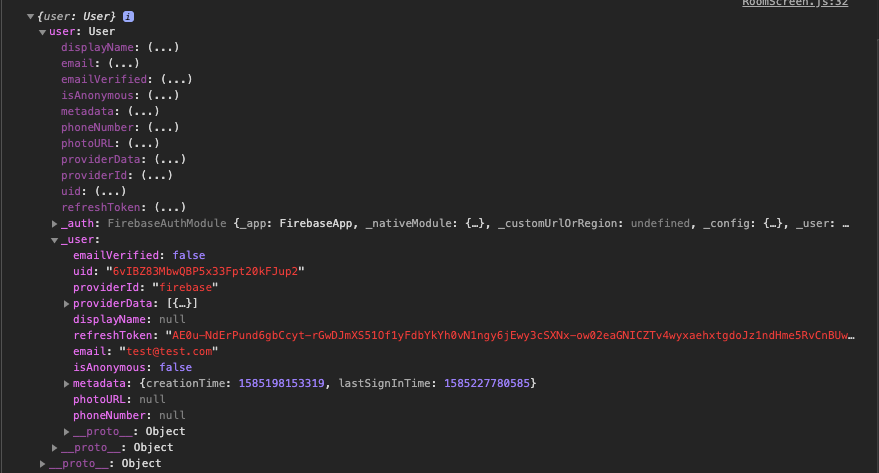
That’s it. Now, from the above image, you can definitely verify that a user is logged in and their email credentials can be verified.
How to store messages in Firestore?
In this section, you are going to add the business logic as well as the ability to store the chat conversation between multiple users in a chat room. These messages are going to be stored in a sub collection.
The main reason to create a sub collection is that when a new chat room is created, storing every data associated to that chat room in its own collection is a good idea. That said, when a new chat room is created, inside the collection THREADS a new document with a unique identifier is generated.
Inside that, you are going to add another collection called MESSAGES that is only going to store chat conversation that happens in that chat room. This will get clear as you proceed in this section.
Start by importing the some necessary React Hooks as shown below. Also, import firestore to make queries to create new sub-collection, and fetch data.
import React, { useState, useContext, useEffect } from 'react';
import firestore from '@react-native-firebase/firestore';
To get the id of the current chat room (this is important) you have to pass the route as a parameter to the RoomScreen functional component. Since, from the previous screen, a thread object is passed which gives the chat room id (or thread id) store in the Firebase collection THREADS. Using route.params you can get the whole thread object. This is possible because of react-navigation.
export default function RoomScreen({ route }) {
  // ... rest of the code
  const { thread } = route.params;
}
Next, modify the asynchronous helper method handleSend. This method is used to send a message as you might have already seen in part 4.
Inside this helper method, get the text of each message send by the user. Then, create the sub collection MESSAGES by referencing the correct id of the current thread the user is conversing in. Using add() you can add anew document with an auto-generated unique id for each message inside the sub collection.
Pass on an object with fields like text that represents the text of each message, the timestamp it is being send or created at, and the user information (such as user’s uid, and email).
async function handleSend(messages) {
  const text = messages[0].text;

  firestore()
    .collection('THREADS')
    .doc(thread._id)
    .collection('MESSAGES')
    .add({
      text,
      createdAt: new Date().getTime(),
      user: {
        _id: currentUser.uid,
        email: currentUser.email
      }
    });
}
Go back to the simulator, create a new room, and send a message.
In Firebase console, you are going to notice that the inside the THREADS collection, a sub-collection called MESSAGES is created as shown below.
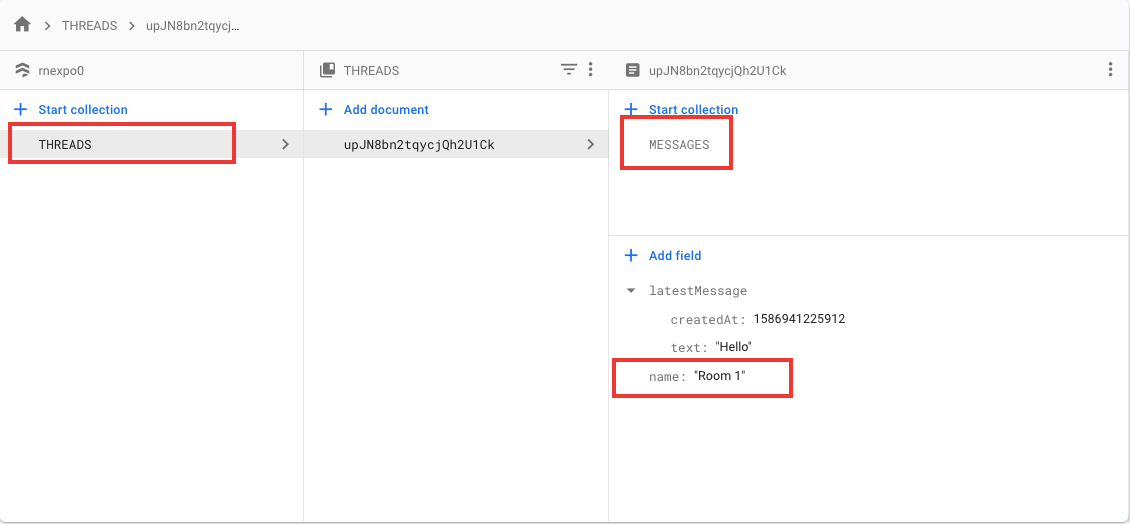
Ignore the latestMessage field, we will cover that in the next section. The image below displays that the messages are being stored with correct information.
Display the latest message for each chat room on home screen
In this section, you are going to update the THREADS collection with a new field called latestMessage that you have already seen in the previous section, in Firebase console.
The advantage this field is going to give us (which we will complete later) is to show the last or the latest message send in a particular chat room, to be displayed on the home screen where a room’s description field already exists. This will save the user time to glance at the last message without opening the room to see if there are any new messages or not.
To begin, all you have to do is refer the current thread using its id, then set an object that has field latestMessage with text and createdAt timestamp properties. Then pass on the second object that has a property of merge.
async function handleSend(messages) {
  // ...

  await firestore()
    .collection('THREADS')
    .doc(thread._id)
    .set(
      {
        latestMessage: {
          text,
          createdAt: new Date().getTime()
        }
      },
      { merge: true }
    );
}
In Firestore, when set is used with merge, it update fields in a document or create that document if it does not exists. If you use set here without merge, it will overwrite the whole document.
How to fetch messages from Firestore to display in chat room?
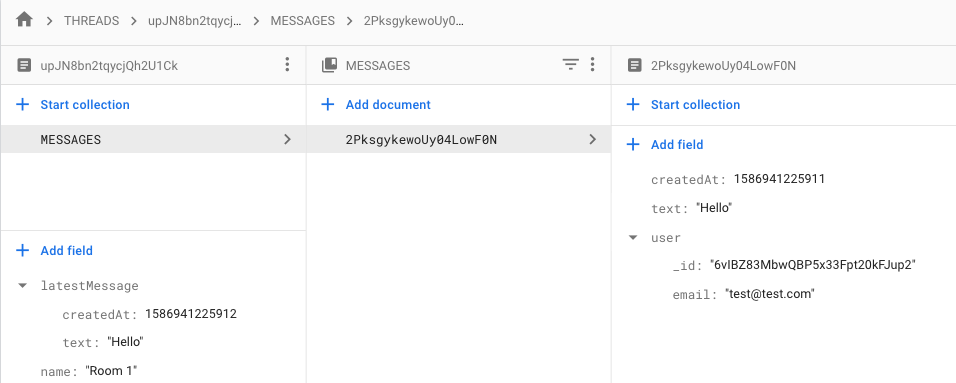
To display messages in a chat room once they send by a user, these messages have to be fetched from the Firestore sub-collection created previous sections, MESSAGES.
To fetch the data, let us use useEffect hook. The effect hook lets you add side-effects to functional components. In the previous versions of React and React Native, this could be done by using lifecycle methods such as componentDidMount() and other different methods in class components. The useEffect hook can perform multiple side-effects such as data fetching and more in different ways.
To fetch the messages, first you have to traverse inside the current thread using its id, then the sub-collection MESSAGES. When traversing the sub-collection, make sure to order the messages to display them in descending order according to the time they were sent.
Then using a querySnapshot you can map the messages array from the sub collection. A Query Snapshot in Firestore contains zero objects or more objects inside an array representing the results of a query.
Create a data object that is going to contain the id of the document being fetched, the text of the message and its timestamp, and any other data associated with the message or in the document. The last step is required to identify that if the message is send by the user or is system generated.
In part 4 you have seen how a system generated message looks like. This means, if the message is generated when the chat room was created or not.
If the message is not system generated, that means it is send by the user. You will have to add the user’s email (or any other details can be added such as user’s display name)to the data object. Add the following snippet.
async function handleSend(messages) {
// ...
useEffect(() => {
const messagesListener = firestore()
.collection('THREADS')
.doc(thread._id)
.collection('MESSAGES')
.orderBy('createdAt', 'desc')
.onSnapshot(querySnapshot => {
const messages = querySnapshot.docs.map(doc => {
const firebaseData = doc.data();
const data = {
_id: doc.id,
text: '',
createdAt: new Date().getTime(),
...firebaseData
};
if (!firebaseData.system) {
data.user = {
...firebaseData.user,
name: firebaseData.user.email
};
}
return data;
});
setMessages(messages);
});
return () => messagesListener();
}, []);
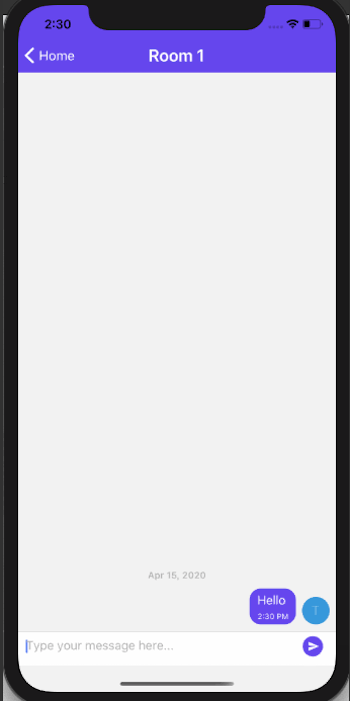
}The messages in chat room are going to be displayed as the following.
In order to make all this work, make sure to modify the following two props in return statement.
<GiftedChat
      messages={messages}
      // Modify the following
      onSend={handleSend}
      user={{ _id: currentUser.uid }}
      // ...rest remains same
    />
  );
How to set a system message as latest message in a chat room?
Right now the THREADS collection for each chat room can display the latest message sent by the user but when a thread is created, you might want to display a system, generated message to convey the same message to the user entering the chat room. To do this, open AddRoomScreen.js file and modify its its helper method handleButtonPress to add the following snippet.
First you are going to add the latestMessage object with its text field saying that a room is created. Do not forget to add a timestamp field along with the text field.
Second step is to add a docRef or a document reference to the sub-collection MESSAGES. Note that, at this point, when the user creates a new room, this sub-collection will be created for each chat room.
A document reference in Firestore is used to write, read or listen to a particular location or a sub-collection inside a Firestore collection.
The document or in the current case, the collection MESSAGES might not exist but adding this step will create the collection. This first message in a chat room is also going to be the system generated message.
function handleButtonPress() {
if (roomName.length > 0) {
firestore()
.collection('THREADS')
.add({
name: roomName,
latestMessage: {
text: `You have joined the room ${roomName}.`,
createdAt: new Date().getTime()
}
})
.then(docRef => {
docRef.collection('MESSAGES').add({
text: `You have joined the room ${roomName}.`,
createdAt: new Date().getTime(),
system: true
});
navigation.navigate('Home');
});
}
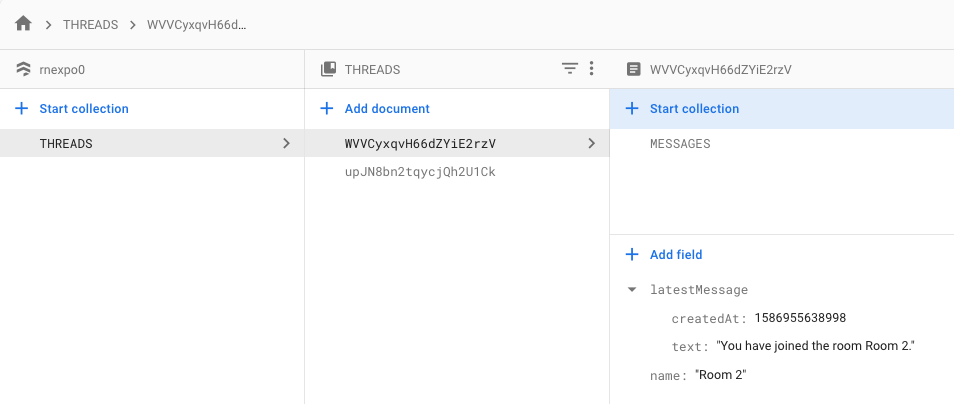
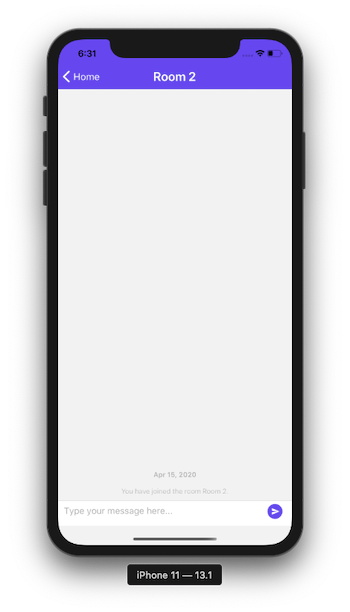
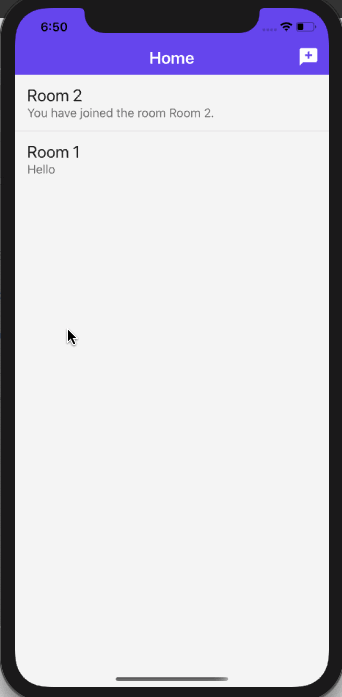
}Now, when you create a new room through the app, here is the complete overview of how it gets reflected in Firestore.
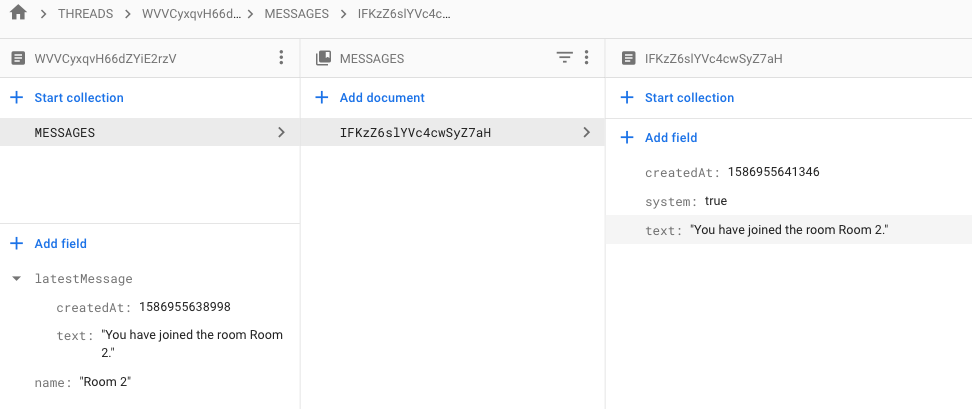
And here is the system message displayed in the new chat room.
Customizing the system message in react-native-gifted-chat
Right now the system message generated is not as appealing and conveying inside a chat room. In this short section, let us learn how to customize that in react-native-gifted-chat.
Start by importing SystemMessage component from react-native-gifted-chat inside RoomScreen.js file.
import {
  GiftedChat,
  Bubble,
  Send,
  // Add this
  SystemMessage
} from 'react-native-gifted-chat';
Create a new helper method called renderSystemMessage inside the screen component with the following snippet. In the current scenario, you are going to change the background of the system message display as well as the text styles. For that you need to edit the props wrapperStyle and textStyle of SystemMessage component.
Do modify the StyleSheet object to add styles as shown below.
function renderSystemMessage(props) {
  return (
    <SystemMessage
      {...props}
      wrapperStyle={styles.systemMessageWrapper}
      textStyle={styles.systemMessageText}
    />
  );
}

// appropriate styles

const styles = StyleSheet.create({
  // ... rest of the styles remain unchanged
  systemMessageText: {
    fontSize: 14,
    color: '#fff',
    fontWeight: 'bold'
  }
});
Lastly, add the prop renderSystemMessage to GiftedChat component.
return (
<GiftedChat
// rest of the props remain same
renderSystemMessage={renderSystemMessage}
/>
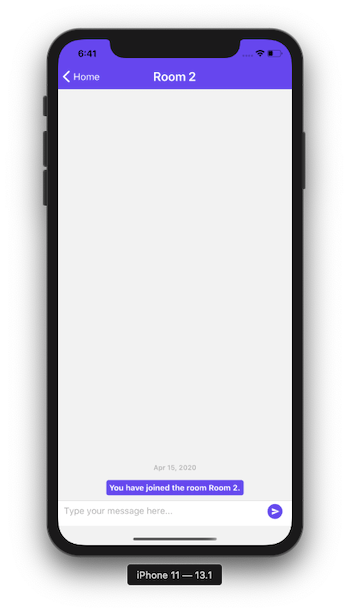
);Here is the output you are going to get after this step.
How to display latest message on home screen?
For every chat room on home screen there is description field that says a static message Item description. In this section let us change that to dynamically display the real-time latest message fetched from the Firestore collection.
Open HomeScreen.js and orderBy() when fetching name of chat rooms in the Effect hook. Then, when returning the documentSnapShot data, there is an object that contain fields like _id and name. Add another object as a field called latestMessage as shown below.
useEffect(() => {
  const unsubscribe = firestore()
    .collection('THREADS')
    // add this
    .orderBy('latestMessage.createdAt', 'desc')
    .onSnapshot(querySnapshot => {
      const threads = querySnapshot.docs.map(documentSnapshot => {
        return {
          _id: documentSnapshot.id,
          name: '',
          // add this
          latestMessage: {
            text: ''
          },
          // ---
          ...documentSnapshot.data()
        };
      });

      setThreads(threads);

      if (loading) {
        setLoading(false);
      }
    });

  return () => unsubscribe();
}, []);
Next, go to the List.Item inside the FlatList component and modify the description field as shown below.
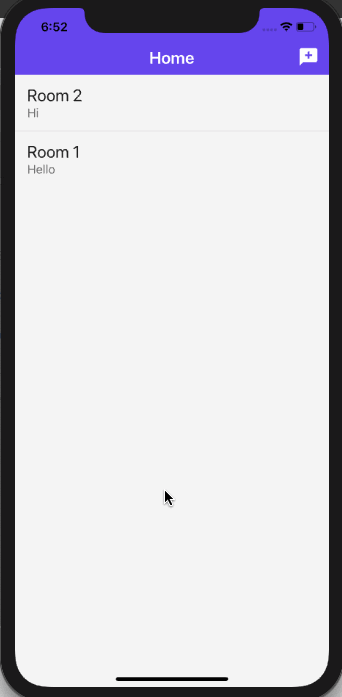
description={item.latestMessage.text}Go back to the simulator and you are going to see the latest message displayed.
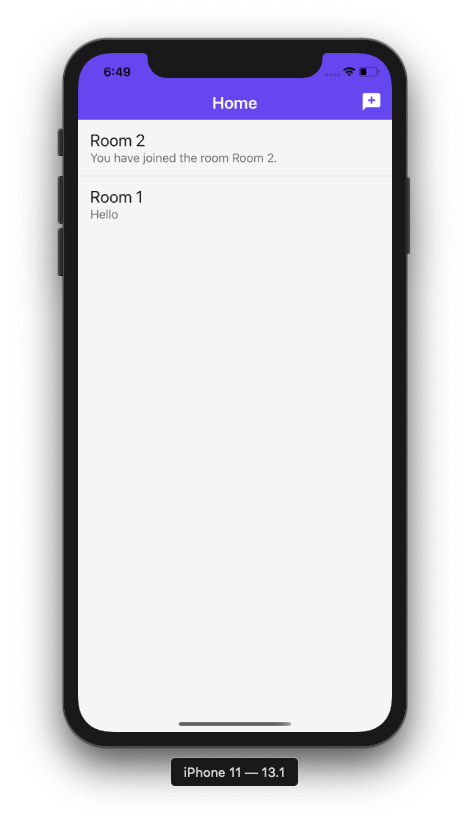
Try sending a new message and that is going to be the latest message displayed on the home screen for the chat room.
There is a benefit of ordering the chat rooms according to the latest message for each room. Now the home screen is going to display that chat room on top which received it the most recent message according the timestamp (createdAt)that is associated with the message.
What’s Next?
In the next part of the series we are going to fix a small bug related of status bar styles for every screen component in the current app. This is going to be done by creating a custom hook and using react-navigation.
😺 You can find the complete code here at this GitHub repo.