
In part 5, we successfully connected real-time database service Firestore to store chat messages in a collection where each collection would represent a separate chat room. Further, we built sub-collections in each chat room collection to store and identify latest messages from all other messages in a chat room.
This part is going to be a bit different. Instead of writing code to communicate with any real-time service, we are going to fix a bug by creating a custom hook.
Here is a screen shot of the type of bug I am talking about it. Notice how the status bar remains dark in color on both lighter and darker backgrounds.

Do notice that the status bar looks fine when the background is light in colour. This happens when the modal screen to create a new chat room is displayed. But on rest of the screens, when chat rooms are displayed or inside a chat room, the status bar does not matches well with the coloured background of header on both of these screens.
React Native has a core component in its API called StatusBar that is used to control the app status bar behavior and its styles. However, manually adding StatusBar to each screen is not our goal in this tutorial.
The navigation library react-navigation is going to help us to solve this. We are going to create a custom hook that is going to track the status bar color and change it accordingly whenever a screen changes. That is, on the lighter background, a dark status bar is displayed and on a darker background of the screen, a light status bar is displayed.
To begin you need react-navigation library to be installed. Since we have already done that in part 1 of this chat app series. If you just came across this tutorial, please have a look at part 1 and instructions mentioned on how to install and configure react-navigation library.
Otherwise, you can follow the instructions from react-navigation library official docs here.
Create a custom Status bar hook
The react-navigation library provides a hook called useFocusEffect that helps to run side-effects when a specific screen is focused. A side effect can be described as fetching data, updating a title, running an event listener and so on. This hooks is similar to useEffect hook from React with the difference being between the two is that side-effects in useFocusEffect run only when a screen component is focused.
Let us begin to develop this custom hook. Create a new file called useStatusBar.js inside src/utils/ directory. Import the following statements.
import React, { useCallback } from 'react';
import { StatusBar } from 'react-native';
import { useFocusEffect } from '@react-navigation/native';
Export a custom function called useStatusBar. This function is going to be act as a custom hook that is going to provide a simple way to change the color of the status bar when applied. Pass the style as the only parameter for now. The value of the style is going to be determined on the screen component this hook is used.
export default function useStatusBar(style) {
  useFocusEffect(
    useCallback(() => {
      StatusBar.setBarStyle(style);
    }, [])
  );
}
It is important to wrap the StatusBar with React.useCallback hook to avoid triggering the side-effect after every render when the screen is focused.
Application of the custom hook
To apply this hook for the first time, open screen/HomeScreen.js file, import the custom hook and apply it as shown below.
// rest of the import statements
import useStatsBar from '../utils/useStatusBar';

export default function HomeScreen({ navigation }) {
  useStatsBar('light-content');
  // rest of the code remains same
}
Go back to the simulator and you are going to notice the changes now.
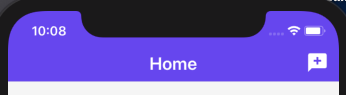
It works. If you look closely at the header bar of the Home screen, you are going to see that the status bar has the value of light styles applied. However, this style is also applied to all of the other screens, even on those screens such as AddRoomScreen where a darker status bar would be preferred.
To fix this, you have to explicitly mention the styles of the status bar for each component using the custom hook we created in the previous section.
/**
 * screens/AddRoomScreen.js
 */

// rest of the import statements
import useStatsBar from '../utils/useStatusBar';

export default function AddRoomScreen({ navigation }) {
  useStatsBar('dark-content');
  // rest of the code remains same
}

/**
 * screens/RoomScreen.js
 */

// rest of the import statements
import useStatsBar from '../utils/useStatusBar';

export default function RoomScreen({ route }) {
  useStatsBar('light-content');
  // rest of the code remains same
}
Now, go back to the simulator and you are going to find everything is in order and works as expected.
Animate the value for smoother transitions
For better transitions between different screens in a stack navigator, you can pass the second parameter to the useStatusBar. This second parameter is going to be called animated. Passing a default value of boolean true is going to help and avoid any explicit mentions. Otherwise you can explicitly pass the value of the parameter as well.
export default function useStatusBar(style, animated = true) {
  useFocusEffect(
    useCallback(() => {
      StatusBar.setBarStyle(style, animated);
    }, [])
  );
}
The animation used by the hook itself is going to the default transition of native platform the app is currently being run since the hook useFocusEffect is imported from @react-navigation/native.
Now you can go back to the simulator (the below demo is using iOS simulator) and notice the difference between the previous section and this one.
A last challenge
The purpose of this series is to make yourself familiar with integration process of Firebase in a React Native app and implementing a navigation flow with react-navigation library and how to use components from react-native-paper UI library. This purpose is now complete with this part.
Though I leave you with a small challenge. Implement the logout button in the header bar of the Home screen. Just like you have used the IconButton component from react-native-paper to open a modal screen. Hint, changes are to be done in the HomeStack.js file and we have already written the logout function in AuthProvider.js file.
Here is a little demo showcasing what has to be implement:

Try to do it yourself and try to think other ways you can implement log out functionality in this app. If you feel stuck or want to jump ahead to the the GitHub commit here.
Otherwise, you can find the complete code at this GitHub repo.
👉 Here is a list of resources used in this tutorial:
