Navigation plays an important role in mobile applications. Without navigation, there will be little use of an application. In this tutorial, we are going to learn how to implement Navigation in a React Native application from scratch. If you are familiar with web, or Reactjs as library, overall concept of navigation is same. It is used to navigate to different pages or screens (in our case). However, the implementation of a navigation library here is different from the web.
Getting Started
Before building a mobile application it is recommended that one spends an amount of time strategize how the application will handle navigation and routing. In this module, we will be covering different navigation techniques available to us. First, let us setup our project. We will use react native CLI tool for this. If you haven’t installed it, type the first line otherwise if you already installed, you can skip the first command.
Next, we will navigate into the new project directory and will run the project to see if everything is working fine by running the following command.
After that, we will install the dependency we need to implement navigation in our application.
yarn add react-navigationNow that we have created our bare minimum application and have the required dependencies installed, we can start by creating our components and look at different navigation techniques.
Stack Navigation
Stack Navigation is exactly what the word stack refers to. It is a pile of screens or app pages that can be removed from the top. It follows a simple mechanism, last in, first out. It stack navigator, it means, adding screens on top of each other. To implement this we will create three screens inside the directory src/. If the directory name is not available to you, do create one. These three screens are .js files: ScreenOne, ScreenTwo and ScreenThree.
// ScreenOne.js
import React, { Component } from 'react';
import { View, StyleSheet, TouchableHighlight, Text } from 'react-native';

class ScreenOne extends Component {
	static navigationOptions = {
		title: 'Welcome'
	};
	render() {
		const { navigate } = this.props.navigation;
		return (
			<View style={styles.container}>
				<TouchableHighlight
					onPress={() => navigate('ScreenTwo', { screen: 'Screen Two' })}
					style={styles.button}
				>
					<Text style={styles.buttonText}>Screen One </Text>
				</TouchableHighlight>
			</View>
		);
	}
}

const styles = StyleSheet.create({
	container: {
		flex: 1,
		justifyContent: 'center',
		alignItems: 'center'
	},
	button: {
		alignSelf: 'stretch',
		marginLeft: 10,
		marginRight: 10,
		borderRadius: 5,
		height: 40,
		justifyContent: 'center'
	},
	buttonText: {
		color: 'teal',
		fontSize: 22,
		alignSelf: 'center'
	}
});
export default ScreenOne;

// ScreenTwo.js
import React, { Component } from 'react';
import { View, StyleSheet, TouchableHighlight, Text } from 'react-native';

class ScreenTwo extends Component {
	static navigationOptions = ({ navigation }) => {
		return {
			title: `Welcome ${navigation.state.params.screen}`
		};
	};

	render() {
		const { state, navigate } = this.props.navigation;
		return (
			<View style={styles.container}>
				<Text style={styles.titleText}>{state.params.screen}</Text>

				<View style={styles.buttonContainer}>
					<TouchableHighlight
						onPress={() => this.props.navigation.goBack()}
						style={[styles.button, { backgroundColor: '#3b3b3b' }]}
					>
						<Text style={styles.buttonText}>Go Back</Text>
					</TouchableHighlight>

					<TouchableHighlight
						onPress={() => navigate('ScreenThree', { screen: 'Screen Three' })}
						style={[styles.button, { backgroundColor: '#4b4bff' }]}
					>
						<Text style={styles.buttonText}>Next</Text>
					</TouchableHighlight>
				</View>
			</View>
		);
	}
}

const styles = StyleSheet.create({
	container: {
		flex: 1,
		justifyContent: 'center',
		alignItems: 'center'
	},
	button: {
		alignSelf: 'stretch',
		marginLeft: 10,
		marginRight: 10,
		borderRadius: 5,
		height: 40,
		justifyContent: 'center'
	},
	buttonText: {
		color: 'white',
		fontSize: 22,
		alignSelf: 'center'
	}
});
export default ScreenTwo;

// ScreenThree.js
import React, { Component } from 'react';
import { StyleSheet, View, Text, TouchableHighlight } from 'react-native';

class ScreenThree extends Component {
	static navigationOptions = ({ navigation }) => ({
		title: `Welcome ${navigation.state.params.screen}`
	});

	render() {
		const { params } = this.props.navigation.state;
		return (
			<View style={styles.container}>
				<Text style={styles.titleText}>{params.screen}</Text>
				<TouchableHighlight
					style={styles.button}
					onPress={() => this.props.navigation.goBack()}
				>
					<Text style={styles.buttonText}>Go Back</Text>
				</TouchableHighlight>
			</View>
		);
	}
}

const styles = StyleSheet.create({
	container: {
		flex: 1,
		justifyContent: 'center',
		alignItems: 'center'
	},
	titleText: {
		fontSize: 22
	},
	button: {
		alignSelf: 'stretch',
		marginRight: 25,
		marginLeft: 25,
		marginTop: 20,
		borderRadius: 20,
		backgroundColor: '#ff0044',
		height: 50,
		justifyContent: 'center'
	},
	buttonText: {
		color: 'white',
		fontSize: 18,
		alignSelf: 'center'
	}
});

export default ScreenThree;
Notice, in all three screens we have access navigation.state as props and navigationOptions as a static object. The navigationOptions takes header options for the screen title Welcome. In the application screen above, you will see the Welcome text in the toolbar. Other header options include headerTitle, headerStyle and many more. This is made available to us by react-navigation dependency.
this.props.navigation object also different properties that we can directly access in our component. The first, navigate is used to specify screen to navigate. Next, goBack() is the method that helps us navigate back to the previous screen, if available. Lastly, the state object help us keep track of the previous and the new state.
Using onPress() handler we can also access the screen directly as we are doing in ScreenOne.js. Just pass the component and the screen name as an argument.
onPress={() => navigate('ScreenTwo', { screen: 'Screen Two' })}All of these methods and objects are made available to our components because of below configuration. To make use of these three screens, and see how Stack Navigation works in action, we will modify our App.js as:
import React from 'react';

import { StackNavigator } from 'react-navigation';
import ScreenOne from './src/stack/ScreenOne';
import ScreenTwo from './src/stack/ScreenTwo';
import ScreenThree from './src/stack/ScreenThree';

const App = StackNavigator({
  ScreenOne: { screen: ScreenOne },
  ScreenTwo: { screen: ScreenTwo },
  ScreenThree: { screen: ScreenThree }
});

export default App;
We are importing StackNavigator from react-navigation and all other screens we created inside the source directory.
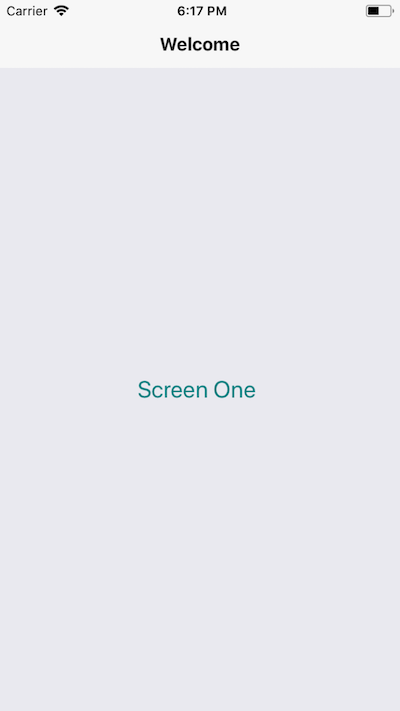
Screen One
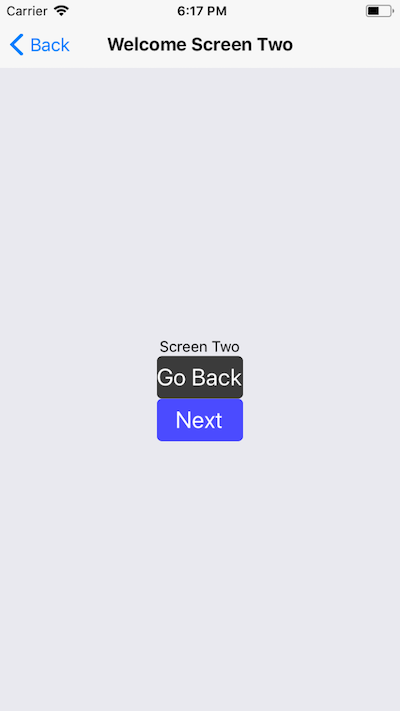
Screen Two
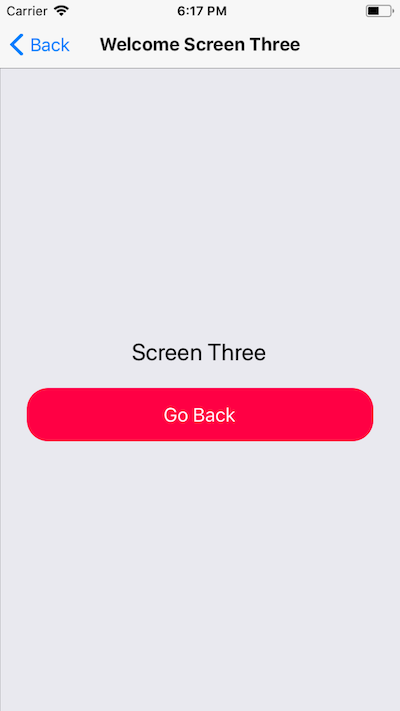
Screen Three
Tab Navigation
The way Tab Navigation work is different from Stack Navigator. The different screens will be available to the UI at one point and there is no first or next screen. The user can access each tab from the Tab Menu. To create a Tab Navigation menu, we need to import createBottomTabNavigator. Let us see how it works. This time, we will edit the App.js code.
// App.js
import React from 'react';
import { Text, View } from 'react-native';
import { createBottomTabNavigator } from 'react-navigation';

class HomeScreen extends React.Component {
  render() {
    return (
      <View style={{ flex: 1, justifyContent: 'center', alignItems: 'center' }}>
        <Text>Home!</Text>
      </View>
    );
  }
}

class SettingsScreen extends React.Component {
  render() {
    return (
      <View style={{ flex: 1, justifyContent: 'center', alignItems: 'center' }}>
        <Text>Settings!</Text>
      </View>
    );
  }
}

export default createBottomTabNavigator({
  Home: HomeScreen,
  Settings: SettingsScreen
});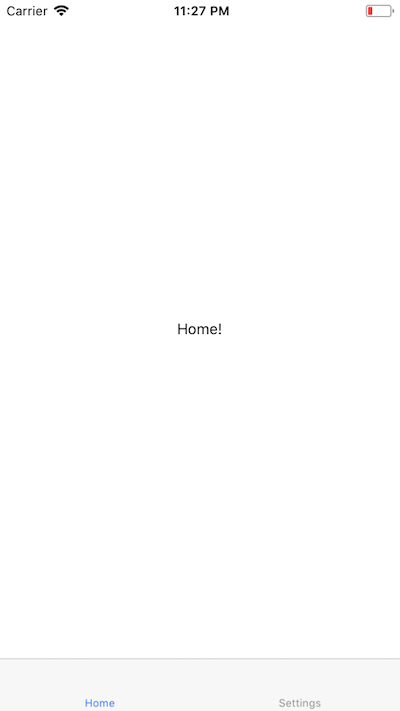
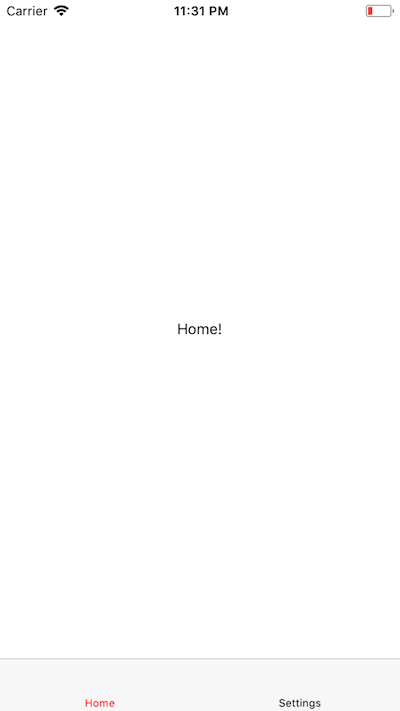
Of course, you can modularize it a bit by separating Home and Setting screen in different components of their own. For our demo application, the above example serves the purpose. You can add tabBarOptions to modify its look and feel.
export default createBottomTabNavigator(
  {
    Home: HomeScreen,
    Settings: SettingsScreen
  },
  {
    tabBarOptions: {
      activeTintColor: 'red',
      inactiveTintColor: 'black'
    }
  }
);
Conclusion
It might take a while to grasp them and use them for your application but once you get the whole of the basic concept, you can do wonders with it. You can even integrate Stack and Tab Navigators for complex scenarios. react-navigation has a good documentation.