There’s something oddly satisfying about watching an AI agent read your messy notes and actually understand them.
I stumbled onto this realization after months of living entirely in Cursor. It had become my home base for code in 2025. Honestly, I was pretty happy in Cursorland. But I kept hitting this wall with my Obsidian vault, a place where I store all of my notes. Every time I wanted AI help with my notes, I had two options: open my entire vault in Cursor or copy-paste context back and forth either in Cursor or Claude/ChatGPT. I have to say, the second option is tiresome. Neither felt right.
When I read about AI agents running inside a terminal window like OpenAI’s Codex CLI or Anthropic’s Claude Code, something clicked. Why not just use them for non-coding-related tasks from the terminal? An AI agent can already see any directory on my machine when I am accessing that directory within the terminal window. My notes inside Obsidian are markdown files. The friction I was fighting against was entirely self-inflicted.
Now Codex CLI helps me create meeting summaries and organize tasks. It also proofreads and plays the role of an editor for my longer articles, like the one you are reading. It’s like having a rubber duck that actually talks back and knows stuff.
What is Codex CLI
Codex CLI (Command-line interface) is OpenAI’s version of a local coding agent that runs inside your terminal. You can talk to it in plain English, and possibly other natural languages. It can read your files, modify them, run code, and integrate different tools through Model Context Protocol (MCP) servers that run on your machine.
The key insight here is simple: your terminal already has access to everything. External apps like Obsidian, which stores everything as plain markdown files on your computer, become instantly accessible. No plugins. No API keys. Just cd into your vault and start chatting. And the good part is you don’t have to be a terminal wizard or know everything about your current session.
Why I actually like the CLI approach
You might think a command-line interface is a step backward from pretty chat windows (even inside code editors like Cursor or Claude’s/ChatGPT’s desktop app). I disagree.
The killer feature for me is that Codex generates AGENTS.md and SKILL.md files, which are plain markdown files that live inside your project. A markdown file (.md) is a lightweight markup language that allows you to use plain text with minimal syntactic sugar, for example, _italic_, **bold**, ## Heading level 2, and so on.
Before switching to Codex, I was a heavy Claude user through its web and desktop apps. When switching to ChatGPT and Codex, I had to manually copy-paste or save some of my conversations to continue them and to not lose context.
Using a CLI app removes the possibility of a chat-like conversation in a beautiful environment, even though I think terminal interfaces are charming. It also allows you to create artifacts that you can locally save on your machine in Markdown files, if you decide to move to a different vendor tomorrow.
The goal with AI agents, I think, is to never repeat yourself. Having your workflows in version-controllable markdown files gets you surprisingly close to that ideal.
Even if you’re not a developer and the blank terminal screen looks intimidating — give it 30 minutes. I promise the learning curve is smaller than you think.
How to quickly install Codex CLI
The way I choose to install Codex CLI is by using global npm packages inside a terminal window. Before you do that, you should install Node.js on your machine. There are other ways you can opt to install Codex CLI and you can view them from Codex’s documentation page. You only need to install Node.js if you are following the installation method below.
Installing Node.js is one of the first few things I do when I am setting up my macOS. Node.js is a runtime environment that allows you to run apps like Codex CLI or Claude Code.
If you are on a different operating system, here are the installation guides:
-
Windows: Set up Node.js on native Windows
Once Node.js is installed, run the following command to install Codex CLI:
npm install --global @openai/codexIn terminal apps (like Terminal.app on macOS), a command is written as a text string followed by flags or options (such as --global) and their input values. They are executed by pressing Enter on your keyboard.
Your first session with a few common commands
Let’s verify if the installation worked. Run the following command:
codex --versionYou will receive an output like the following:
codex-cli 0.77.0If you get back an output like the above, that means the installation process went smoothly.
Do note that in the above output, the
0.77.0is the version ofcodex-cliat the time of writing this post. Depending on when you come across this post, the version displayed in your terminal will increment.
The next command you need to run is to authenticate with your OpenAI account:
codex loginAfter running this command, follow the authorization process from your terminal window. It will probably ask you to authorize access by opening a link in your machine’s default web browser.
The next command you are going to run is to ask a question about your project. So, open your project inside the terminal window.
There are three ways you can open your project inside the terminal window. If you know your way inside a terminal window, then do so.
If not, you can always navigate to your project directory from the Finder app (file browser on macOS), and right-click on the project directory. Then, under Services, choose New Terminal at Folder or New Terminal Tab at Folder. Either of these options will open a terminal window and the navigation to the project directory will be done by your operating system for you.
If both options do not work for you, the third option is to ask ChatGPT.
After you have opened your project inside the terminal window, run the following command to start the process:
codexSince this is your first time running the above command inside your project directory, you will see a prompt asking to take an action:
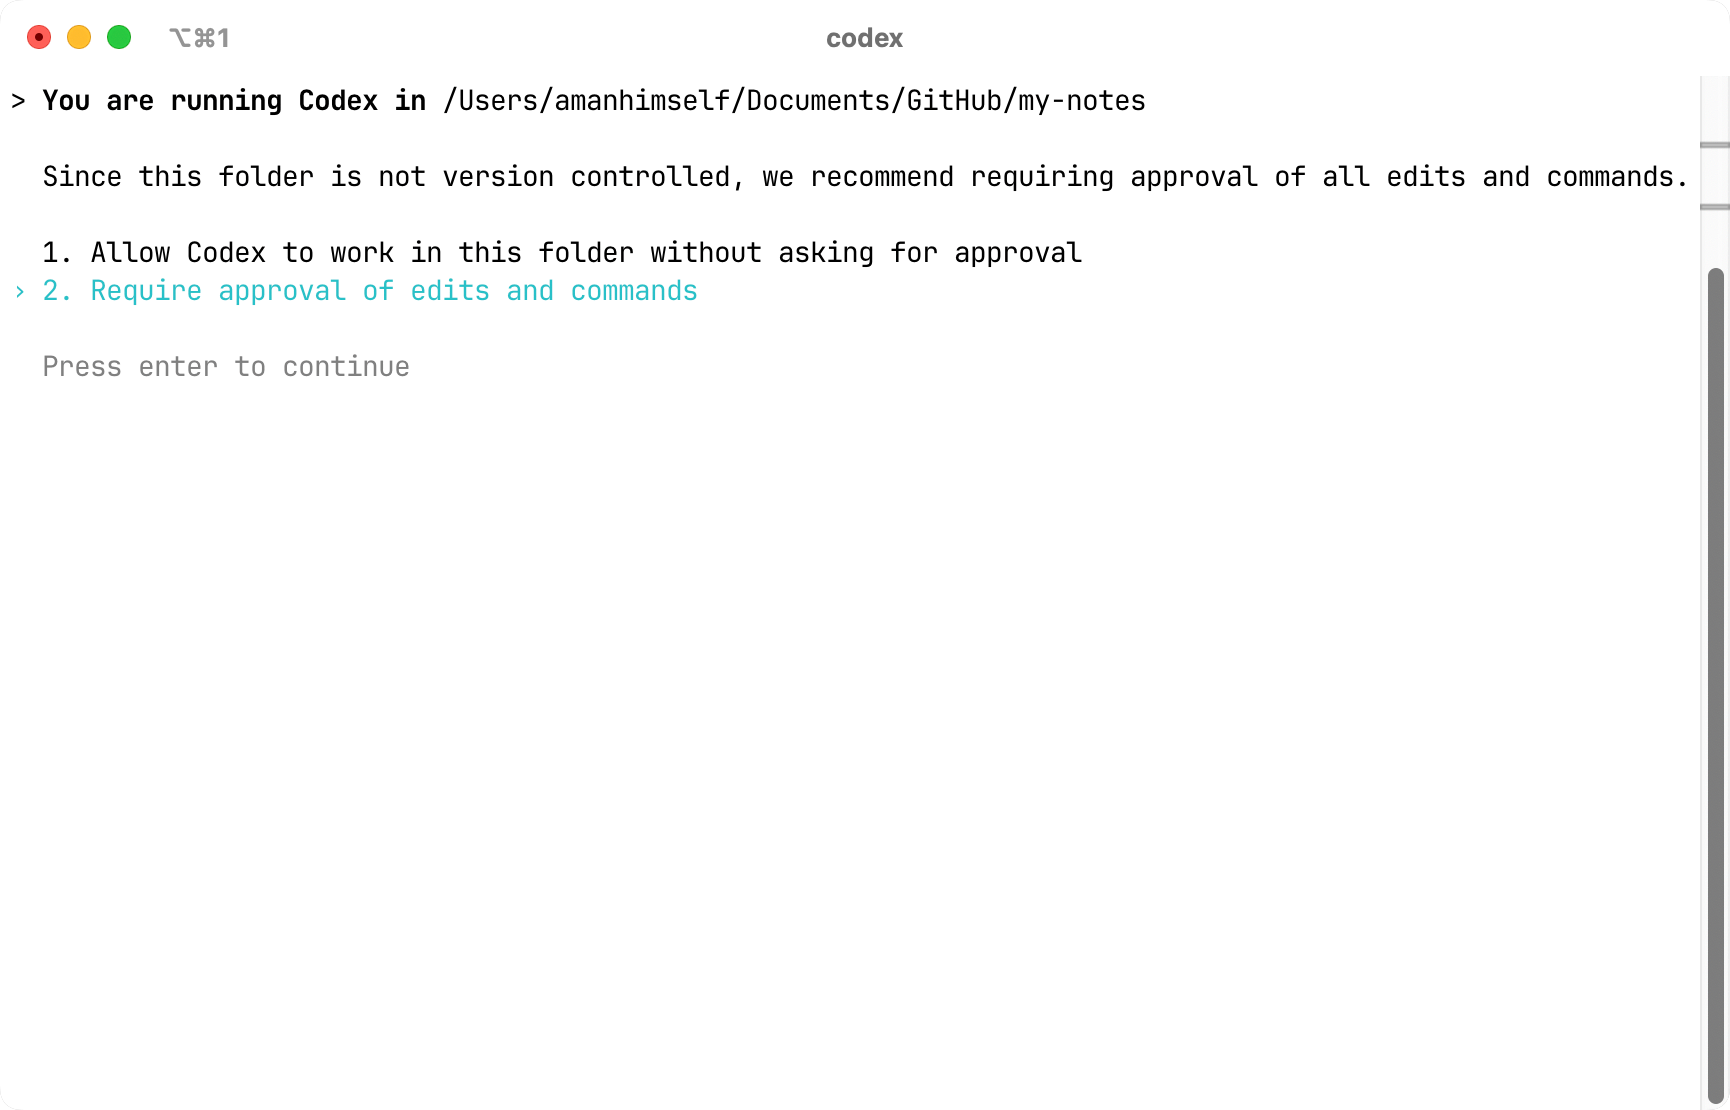
The first time you run this, it asks about permissions. You can choose between “auto” mode (Codex does whatever it needs) or “ask me first” mode. I use full auto now, but if you’re nervous, start with the approval mode. You can always change it later.
Once you select an option, press Enter to continue. You will be welcomed by the start screen.
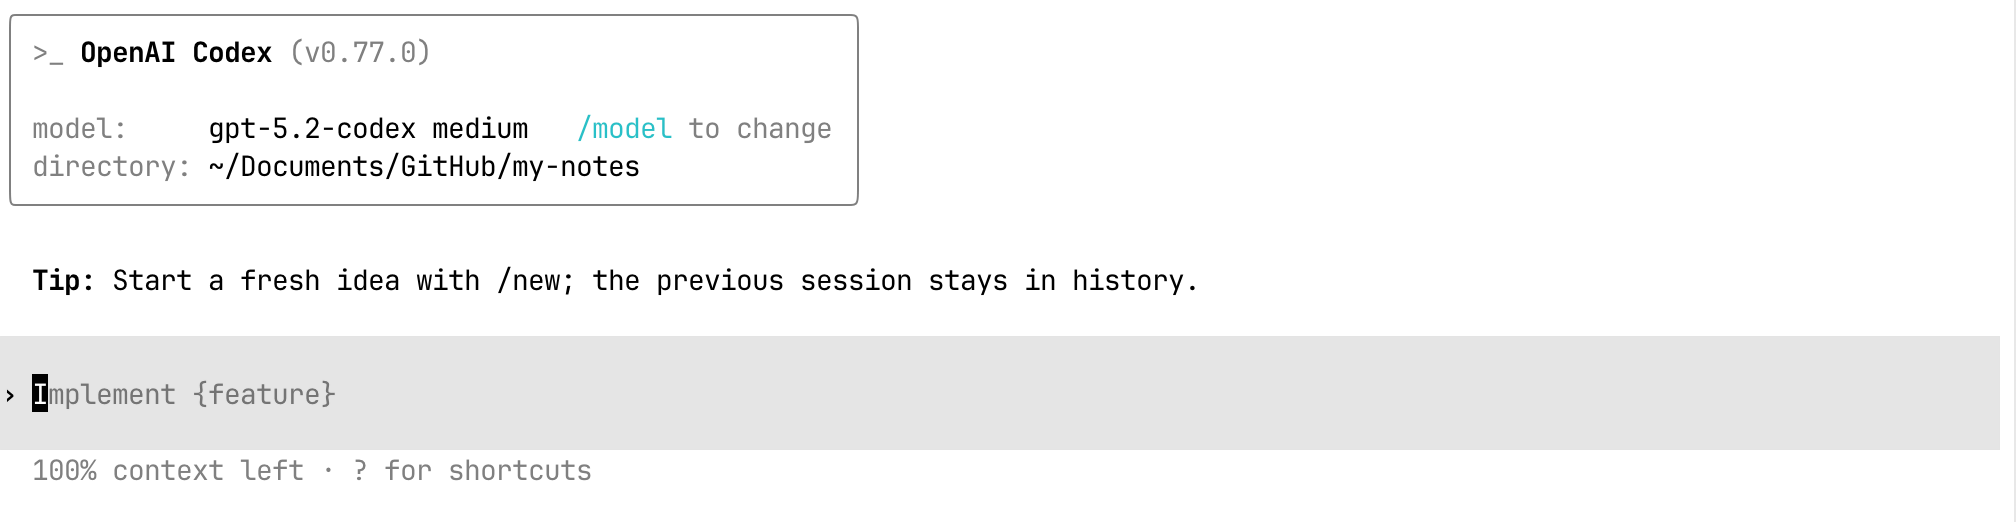
The default model is gpt-5.2-codex at medium reasoning. You can change both with /model and by adjusting reasoning settings.

Its reasoning level is also set to medium:

Try asking something simple: “what is this folder about?” in natural language (you can even try Hinglish :D). Depending on the model and reasoning level, you’ll get anything from a brief summary to a detailed analysis of every file and subdirectory.
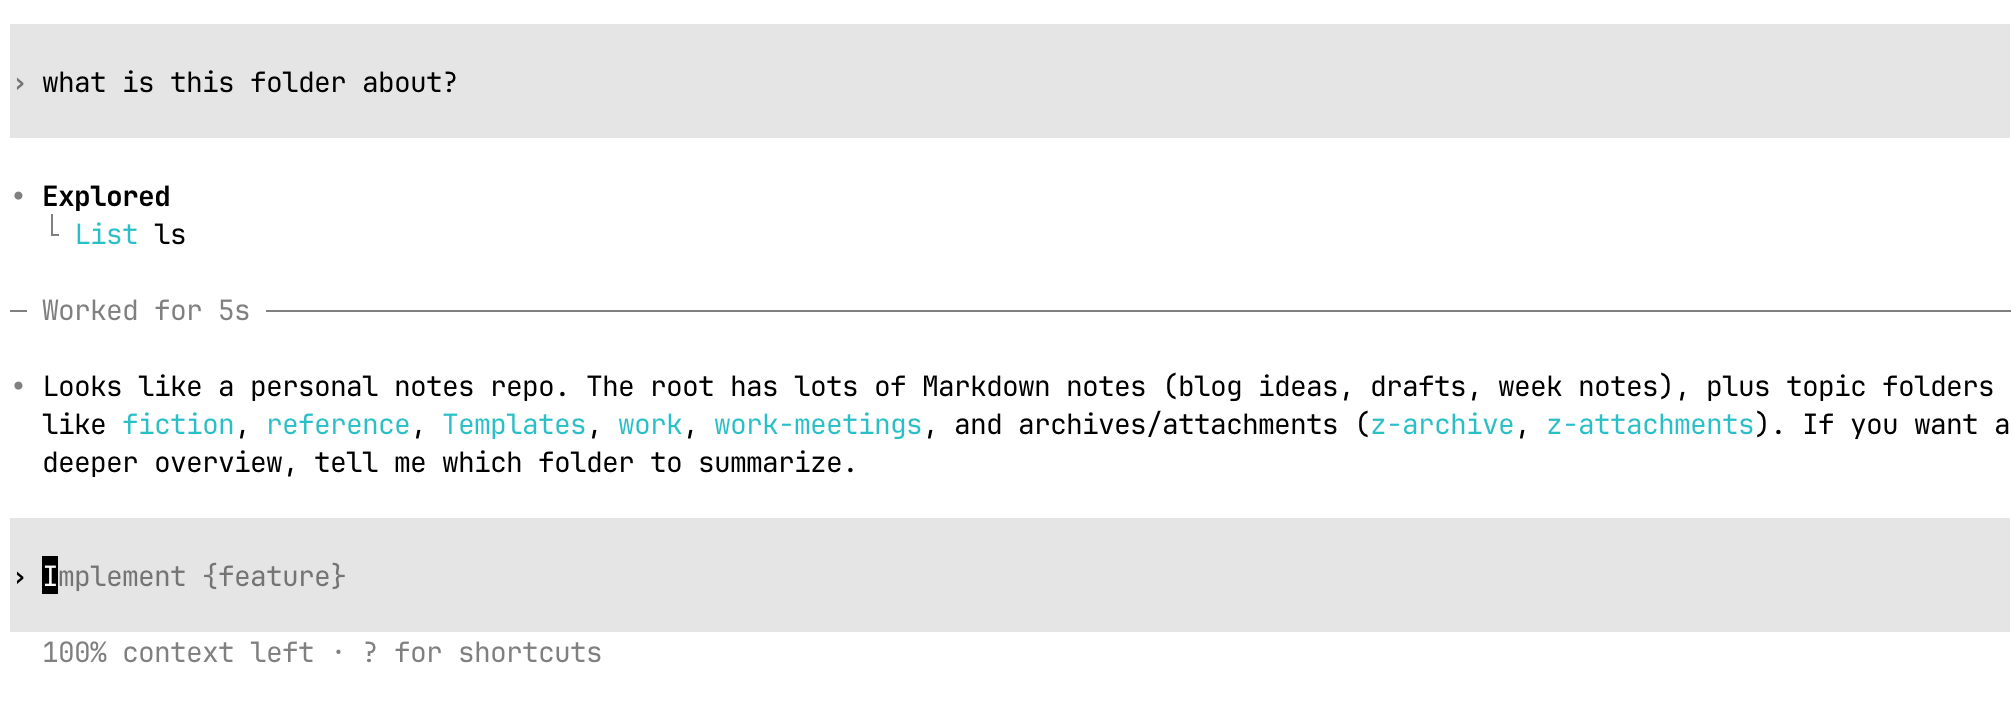
If you set the reasoning to max, you may get a verbose answer back from Codex, as it will spend more time exploring your project files and folders.

In both of the last two screenshots, you will see the actual logs the Codex model used to reach a conclusion. This also includes the Bash commands (ls) to list all files and folders. I find it weirdly reassuring to watch Codex run ls commands and actually explore the directory structure. You can see exactly what it’s doing to form its answer.
Continue your last Codex session
What happens when you quit Codex and realize you weren’t done?
When you exit (Ctrl+C), Codex shows you a session ID. Copy that ID and run:
codex resume IDOnce you run this command, it will open the conversation as if it was never closed. To continue the most recent conversation, you can also run codex resume --last.
A session started with the resume option will contain the context of your conversation. This works because all of your session logs are stored under the ~/.codex/sessions/ directory on your machine. The file format used by Codex is JSON Lines text format. These files contain timestamps, message types, the actual message you send, the output, token usage, and more.
Here’s a fun fact I discovered: if you use the Codex extension in VS Code or Cursor, those sessions are the same files. You can start a conversation in your terminal and continue it in your editor, or vice versa.

I thought this was genuinely thoughtful design when I found it.
Useful Codex commands
Anytime you want to explore or run a Codex CLI system command, you can press / in your session. It will provide you with a list of commands it can run.
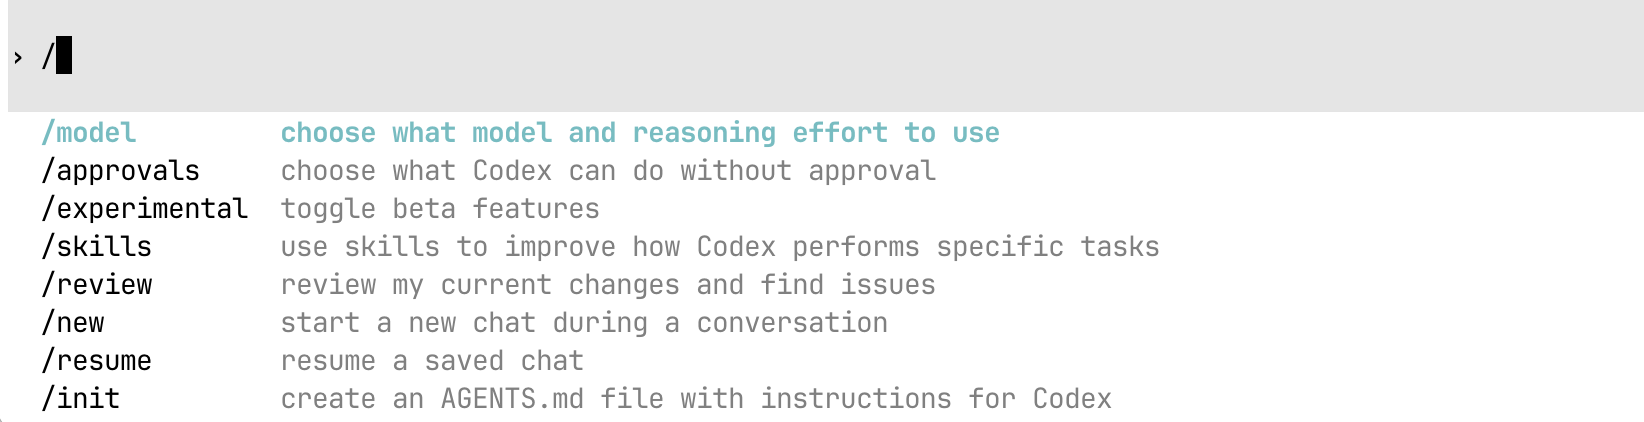
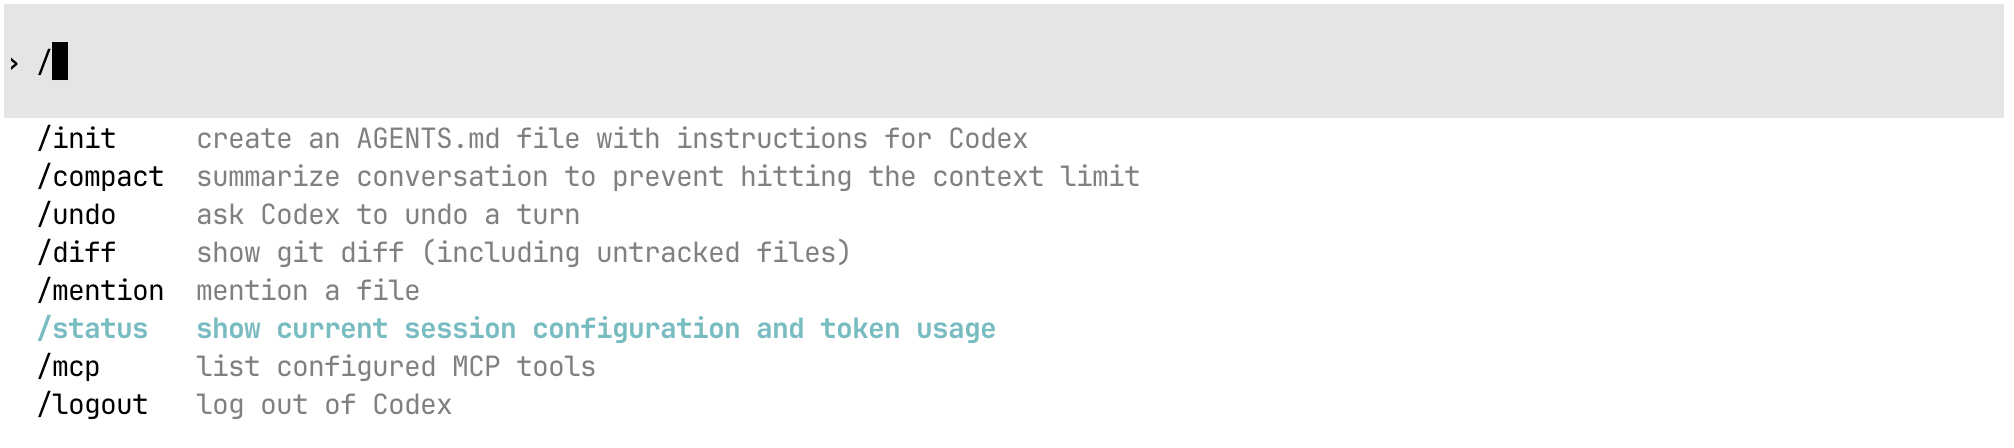
For example, if you run /status, it will show the current session configuration and token usage.
Some common ones you might find useful:
/init — Bootstrap initialization templates and settings
/new — Switch to a new conversation (clear session state)
/model — Switch AI model
/compact — Summarize and compress the conversation history tokens
/status
/quit — End the session (codex)
Codex CLI supports Bash commands and terminal shortcuts
If you think your terminal window is becoming overwhelming, you can always press Ctrl + K within a Codex session since it supports this shortcut and other Bash commands.
To run a Bash command, prefix it with ! and it runs immediately:
!ls           # List files
!pwd          # Where am I?
!git status   # Check git state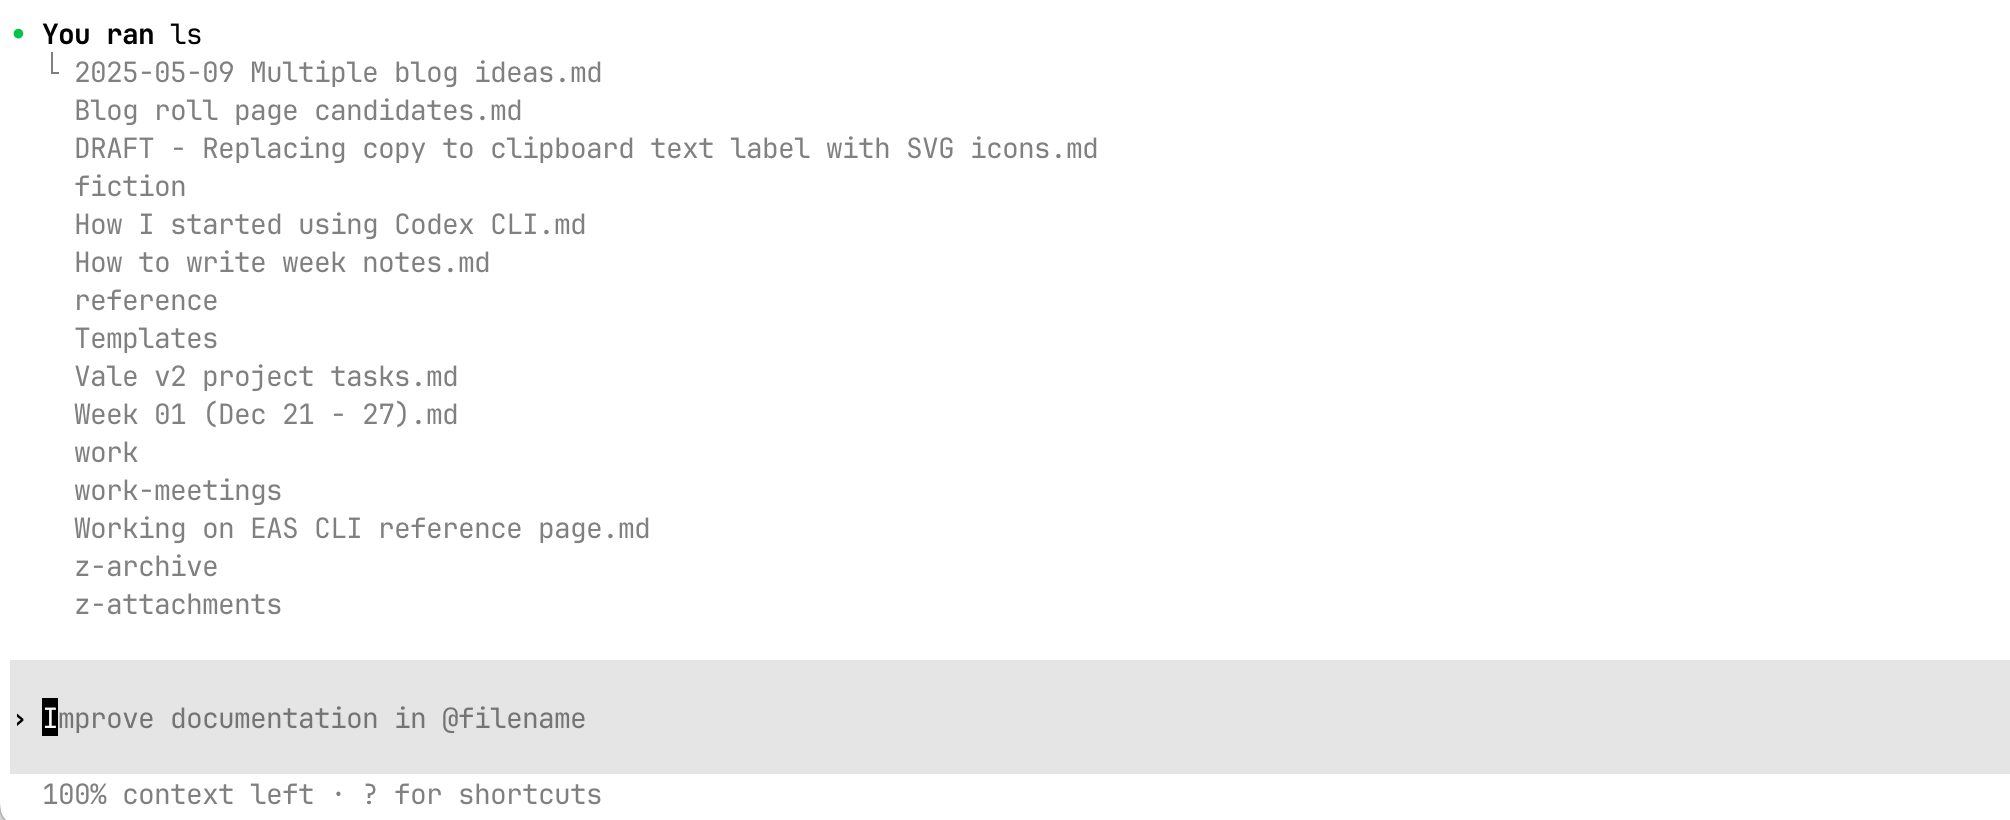
The output appears inline and stays in the conversation history. So instead of switching terminals to check git status and then describing what you see, just run it. Codex sees the output and can reference it. Small feature, big friction reducer.
Example: Using Codex as an editor
Different projects need different rules. My Obsidian vault behaves nothing like my code repositories.
When I started using Codex in my vault, I ran /init to create an AGENTS.md file, then customized it with instructions about how I write, what style I prefer, and what Codex should focus on when editing my drafts.
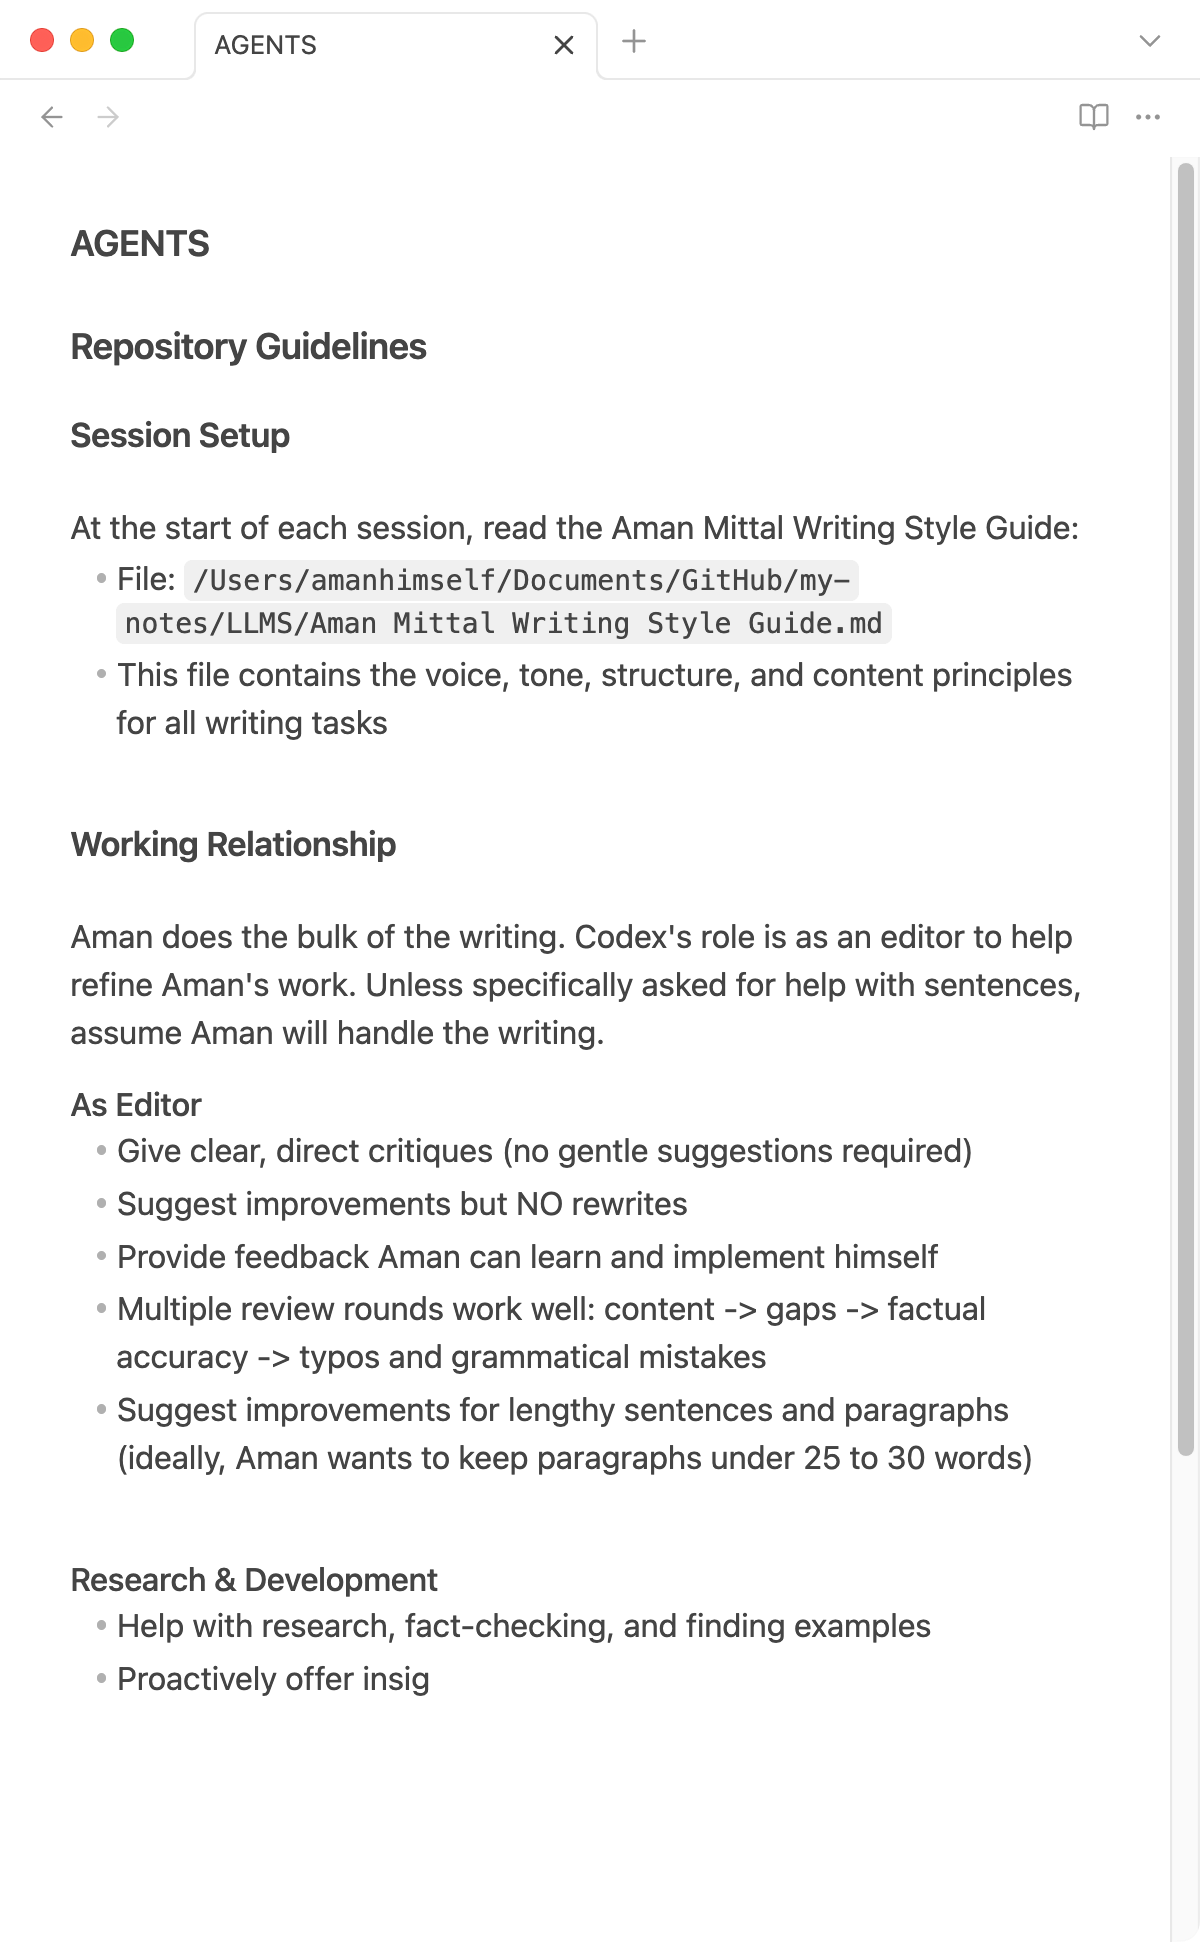
You can point Codex to specific files using @filename syntax for the correct file to read. (Yes, using @, you can refer to any file in your current project directory.) And keeping AGENTS.md at your project root means Codex checks it automatically at the start of each session.
In the first use case, my goal for Codex is to act as a strict editor and do multiple rounds of reviews. I’m the primary writer and I have my own personal writing style guide that I tend to follow at times when writing long articles.
My setup looks roughly like this:
Obsidian Vault (markdown files) ----\
                                     \
                                      > Codex CLI session -> Edits, summaries, reviews
                                     /
Project context files --------------/
For example, while writing this blog post, midway through the first draft, I asked Codex to review this post. Here’s the output:
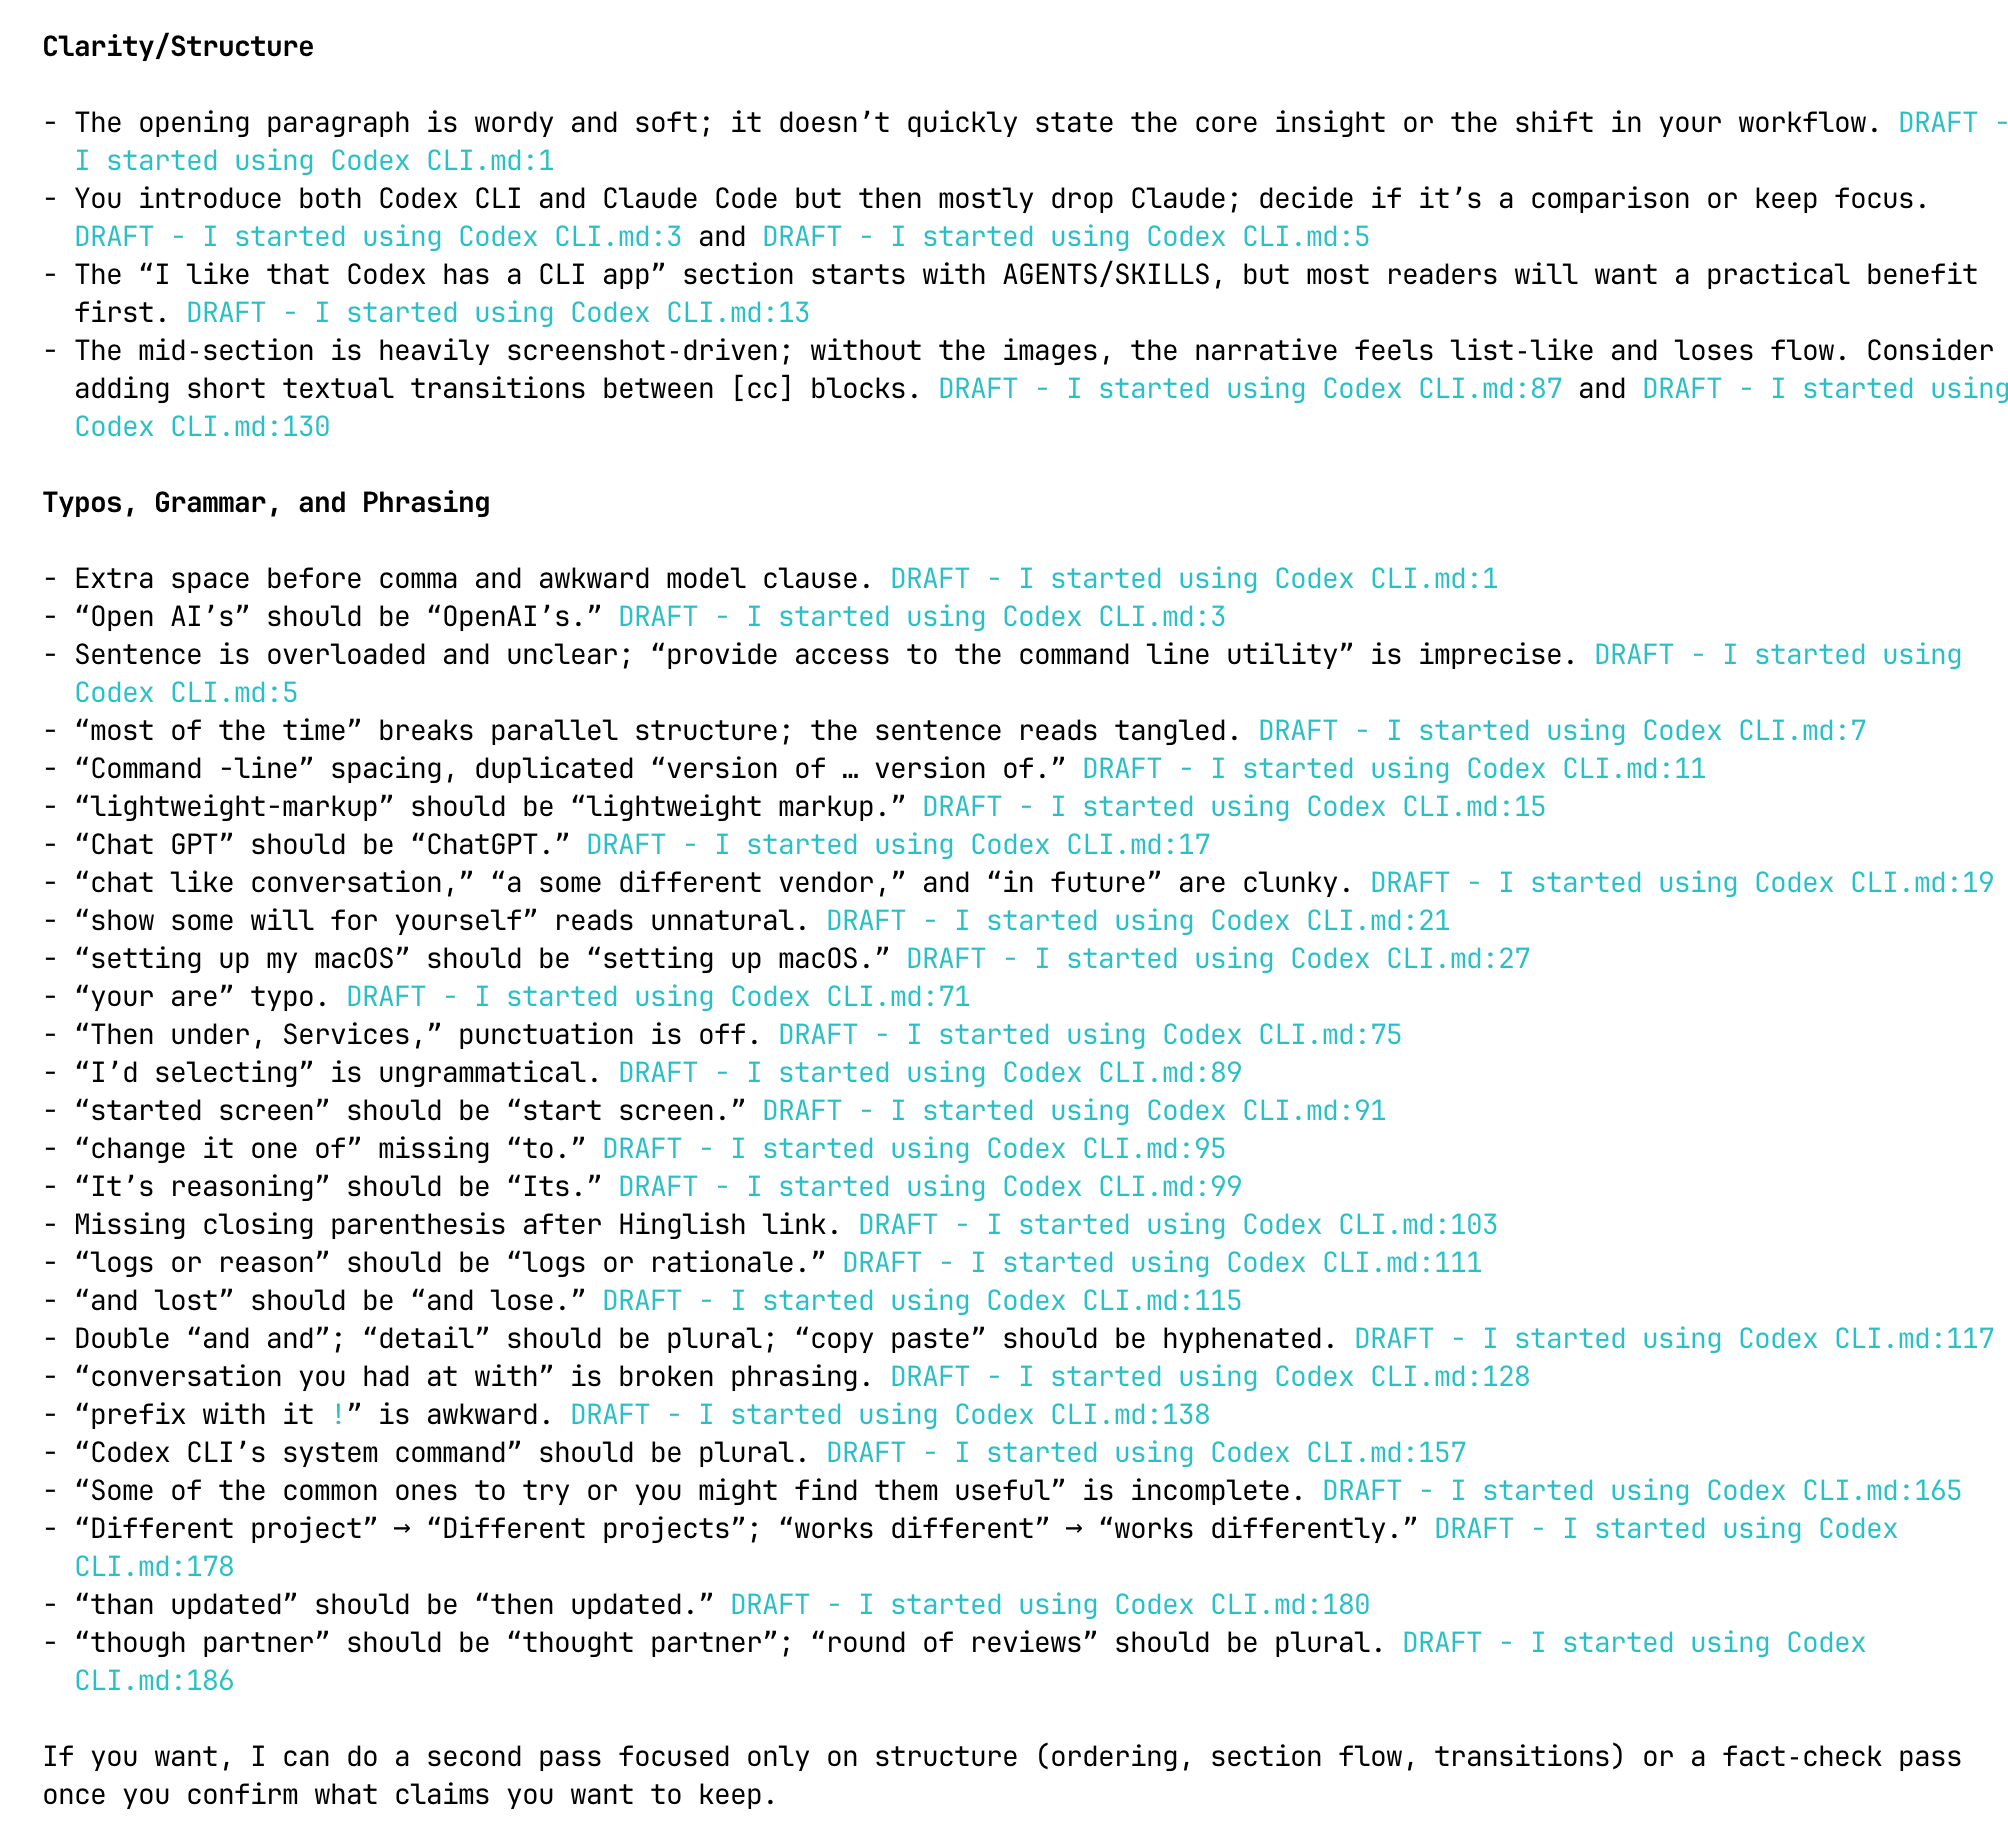
I have used Grammarly for years to catch typos in my initial drafts. After seeing results with Codex, it’s sufficient for me to switch to Codex.
As I mentioned earlier in this post, Codex is a smart partner that can help you improve your work. Don’t use it to take shortcuts; instead, take your time and learn with it. Especially with writing. There is no such thing as vibe-writing.
The above AGENTS.md I shared is what I actually use inside the Obsidian app to help me stay focused and improve my initial drafts when I am writing something for my blog.
Using Codex to manage your notes or summarize in Obsidian
I keep all my work meeting notes in an Obsidian directory called work-meetings. At year’s end, I wanted an index linking to every meeting. So I asked Codex:
“Create an index.md file for all the meetings I had in 2025 and link to those meeting notes.”
34 seconds later, I had a properly formatted index file with working links.

I also use an #idea/* tag convention for blog post ideas. I asked Codex to find all those tags, then asked how it could help me develop them:
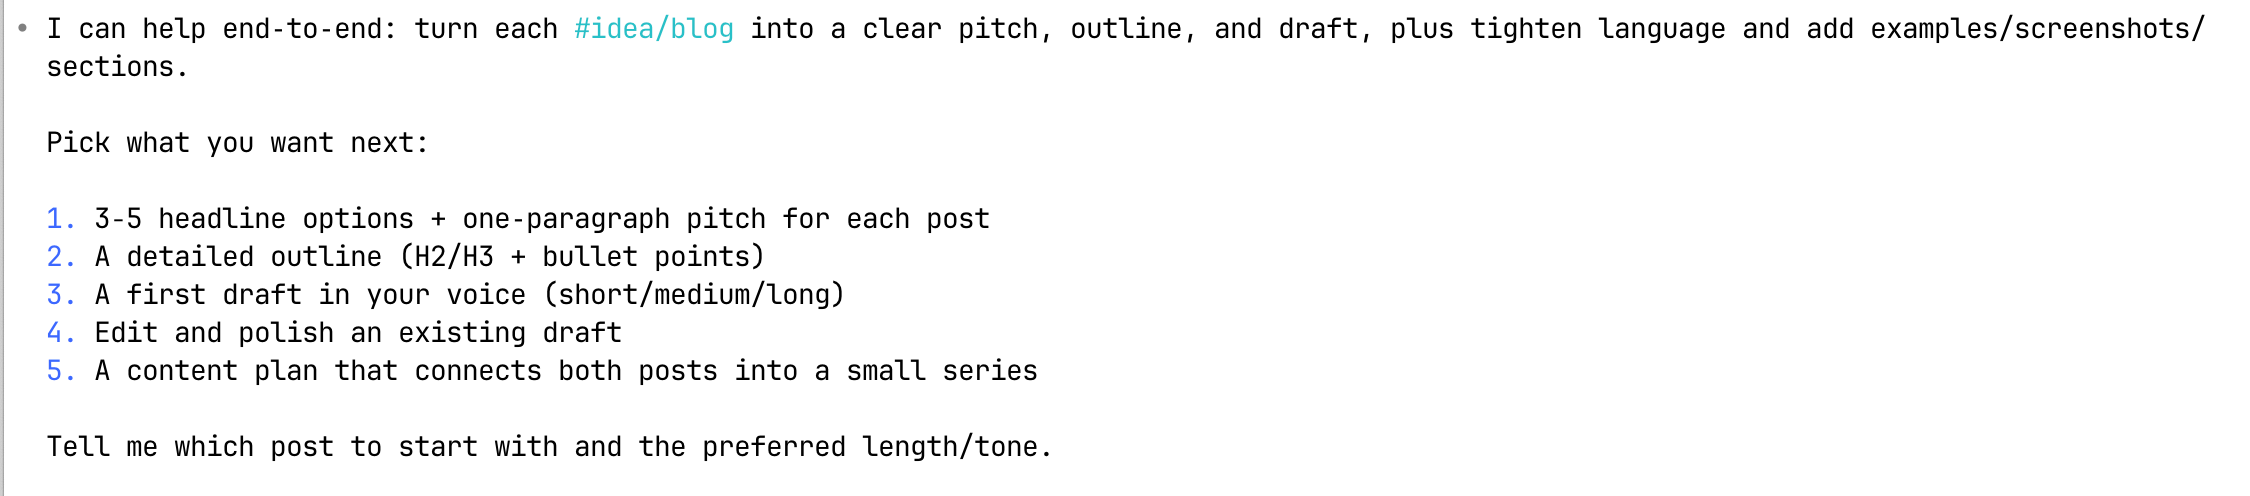
Example: Syncing from Linear to Obsidian
Here’s where things get interesting. I wanted my Linear “Todo” tasks to appear in my Obsidian vault so I wouldn’t have to keep checking the Linear web app throughout the day.
Requirements:
- No API keys
- Use my existing logged-in browser session
- Pull tasks directly into a markdown file
Using Codex CLI agent
Before diving into details about the skill, let’s grasp the fact that Codex CLI can do things on your behalf. It’s an agent. Here’s an example query I asked Codex CLI: open amanhimself.dev. Running this query, Codex uses the default web browser set on my system and opens the link.
Troubleshooting
If the above natural language instruction does not work for you, you need to ensure that approval for this project directory (current working directory where you are running codex) has Agent (current) access.
To do so, within Codex CLI, run the slash command /approval and select the second option under Select Approval Mode:

Continue using Codex CLI agent
The previous query was quite simple and a stepping stone. Let’s use the Codex CLI agent to open the website, do a search, and then open that web link on the blog.
It kind of works. If you look at the above screen recording, in a web browser tab, it opens the blog, does a quick search for the blog post title, but cannot open the link.
Codex CLI can’t “click around websites like a human” by itself. But you can extend what it can do with Model Context Protocol (MCP) servers.
What’s Model Context Protocol (MCP)?
MCP is an open standard that lets AI models connect to external tools. Think of it as a universal adapter - it lets Codex talk to your browser, Figma, documentation sites, whatever. The official MCP docs explain it better than I can here.
Setting Up Playwright MCP
Microsoft’s Playwright MCP provides a server that enables Codex CLI to interact with web pages. Codex CLI has first-class support for connecting to any MCP server.
Adding it takes one command:
codex mcp add playwright npx "@playwright/mcp@latest" --extensionYou can verify it’s there with:
codex mcp listAlternatively, you can add the following config to your global Codex configuration file:
[mcp_servers.playwright]
command = "npx"
args = ["@playwright/mcp@latest", "--extension"]
On macOS, this file is located at: ~/.codex/config.toml.
In the above configuration, --extension is important. It’s a special argument that Playwright accepts to connect to a running browser instance inside Chrome or Edge. It also requires that the browser has the “Playwright MCP Bridge” extension installed.
Back to the original query: open amanhimself.dev, click search, search for week notes 01, and open result. To run this, you need to run codex first and then run the query.
Install Playwright MCP Bridge extension
Playwright MCP Bridge extension works with Chrome and Edge. It allows you or an AI agent to launch the MCP server against an existing browser profile. If you use a browser profile like work, it will continue to use that and there is no requirement for you to log in to the web apps you want Codex to access.
To install this extension, you’ll have to do it manually:
- Download the Playwright MCP extension and unzip the file.
- Open
chrome://extensionsoredge://extensionsin your browser. - Enable Developer Mode.
- Click Load unpacked and select the extension folder.
After following the steps above, you will see the Playwright MCP Bridge in your browser’s extension list.

Once installed, pin the extension in your browser and click on it. It will give you a PLAYWRIGHT_MCP_EXTENSION_TOKEN. Copy the variable name and its value into ~/.codex/config.toml:
[mcp_servers.playwright.env]
PLAYWRIGHT_MCP_EXTENSION_TOKEN = "your-token-value"
For extension bridge mode, this token is necessary. This token tells the MCP server (Playwright MCP) to connect to your existing Chrome or Edge session via the Playwright MCP Bridge extension.
Sync Linear tasks into Obsidian workflow
With everything configured, I tested pulling my Linear todos:
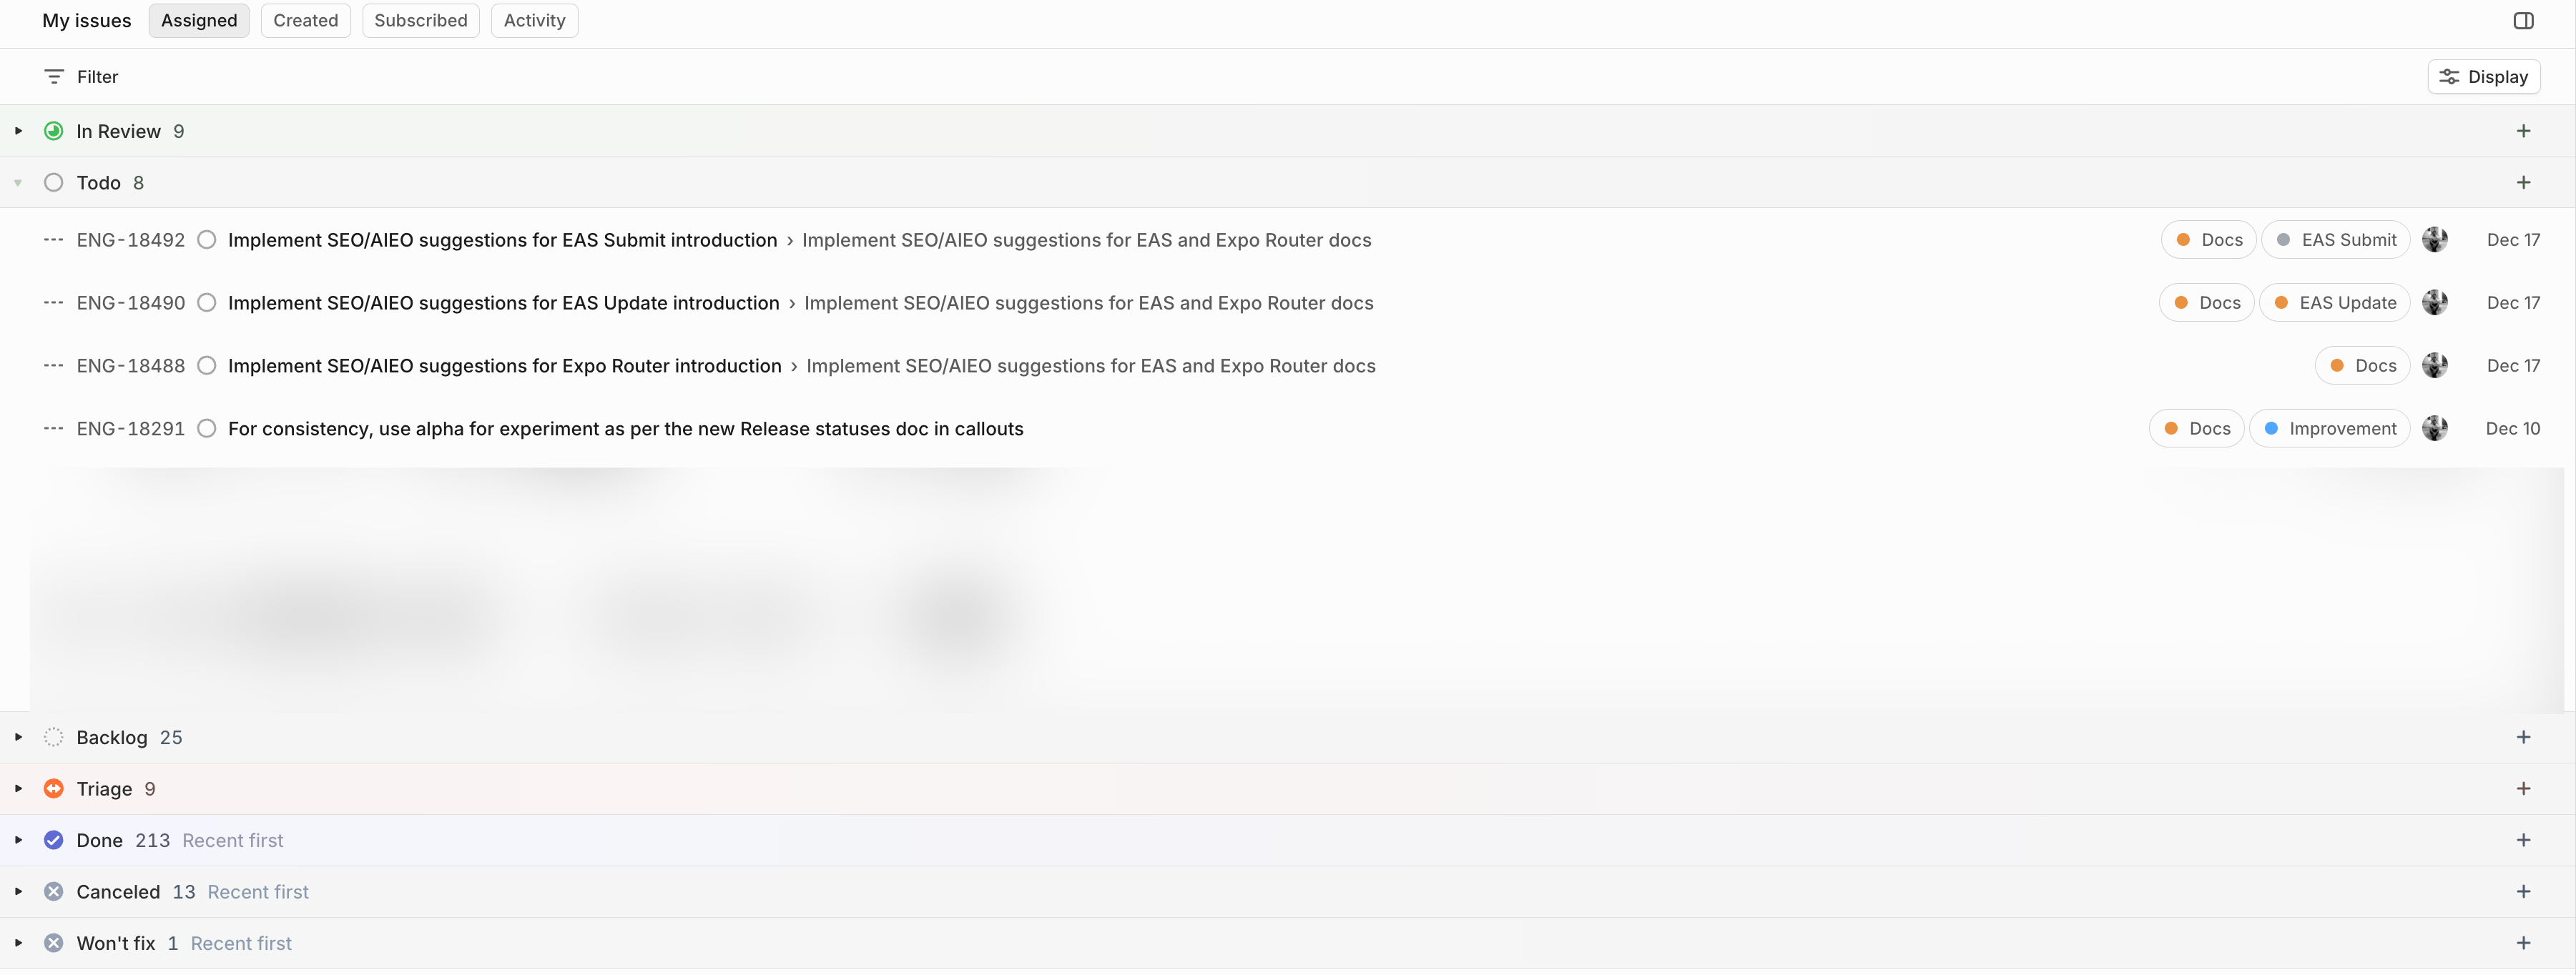
Open https://linear.app/expo/my-issues/assigned
- Wait for the page to load
- Find the “Todo” group in the current browser window
- Read the task titles, grab their issue keys, and save each task with a link back to Linear
This flow gave me a reliable checklist in my vault. I had to tell Codex the location of the file to save the tasks inside the Obsidian vault.
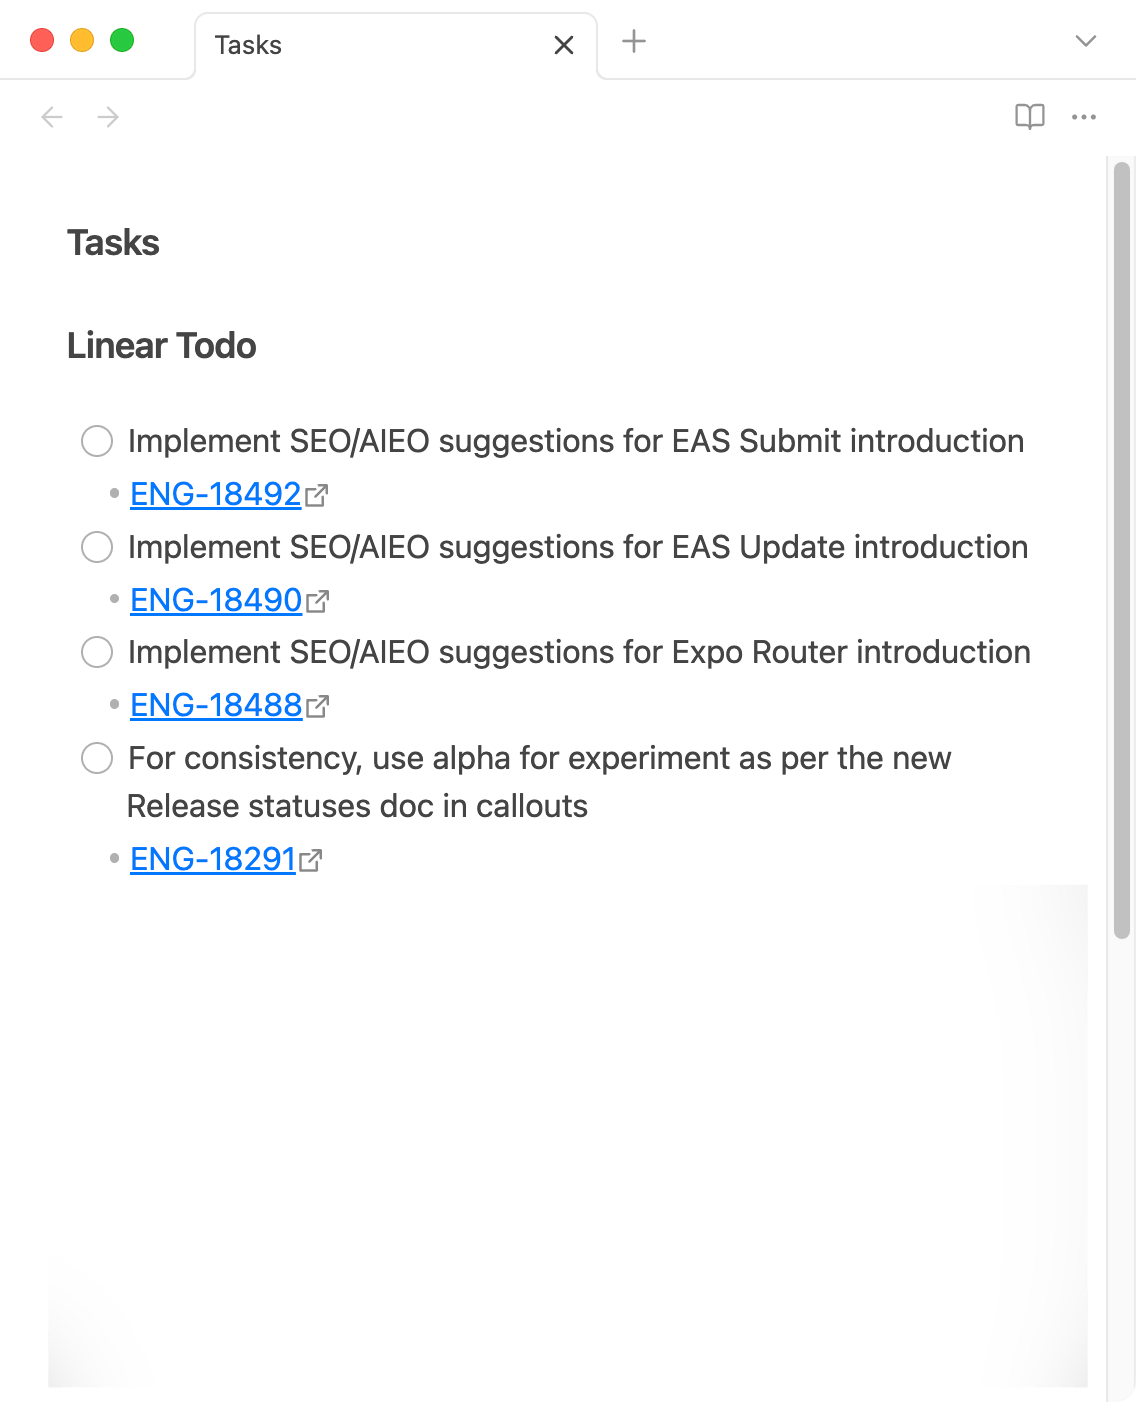
I compared the result to my actual Linear view. Every task synced correctly.
Making the workflow reusable with Skills
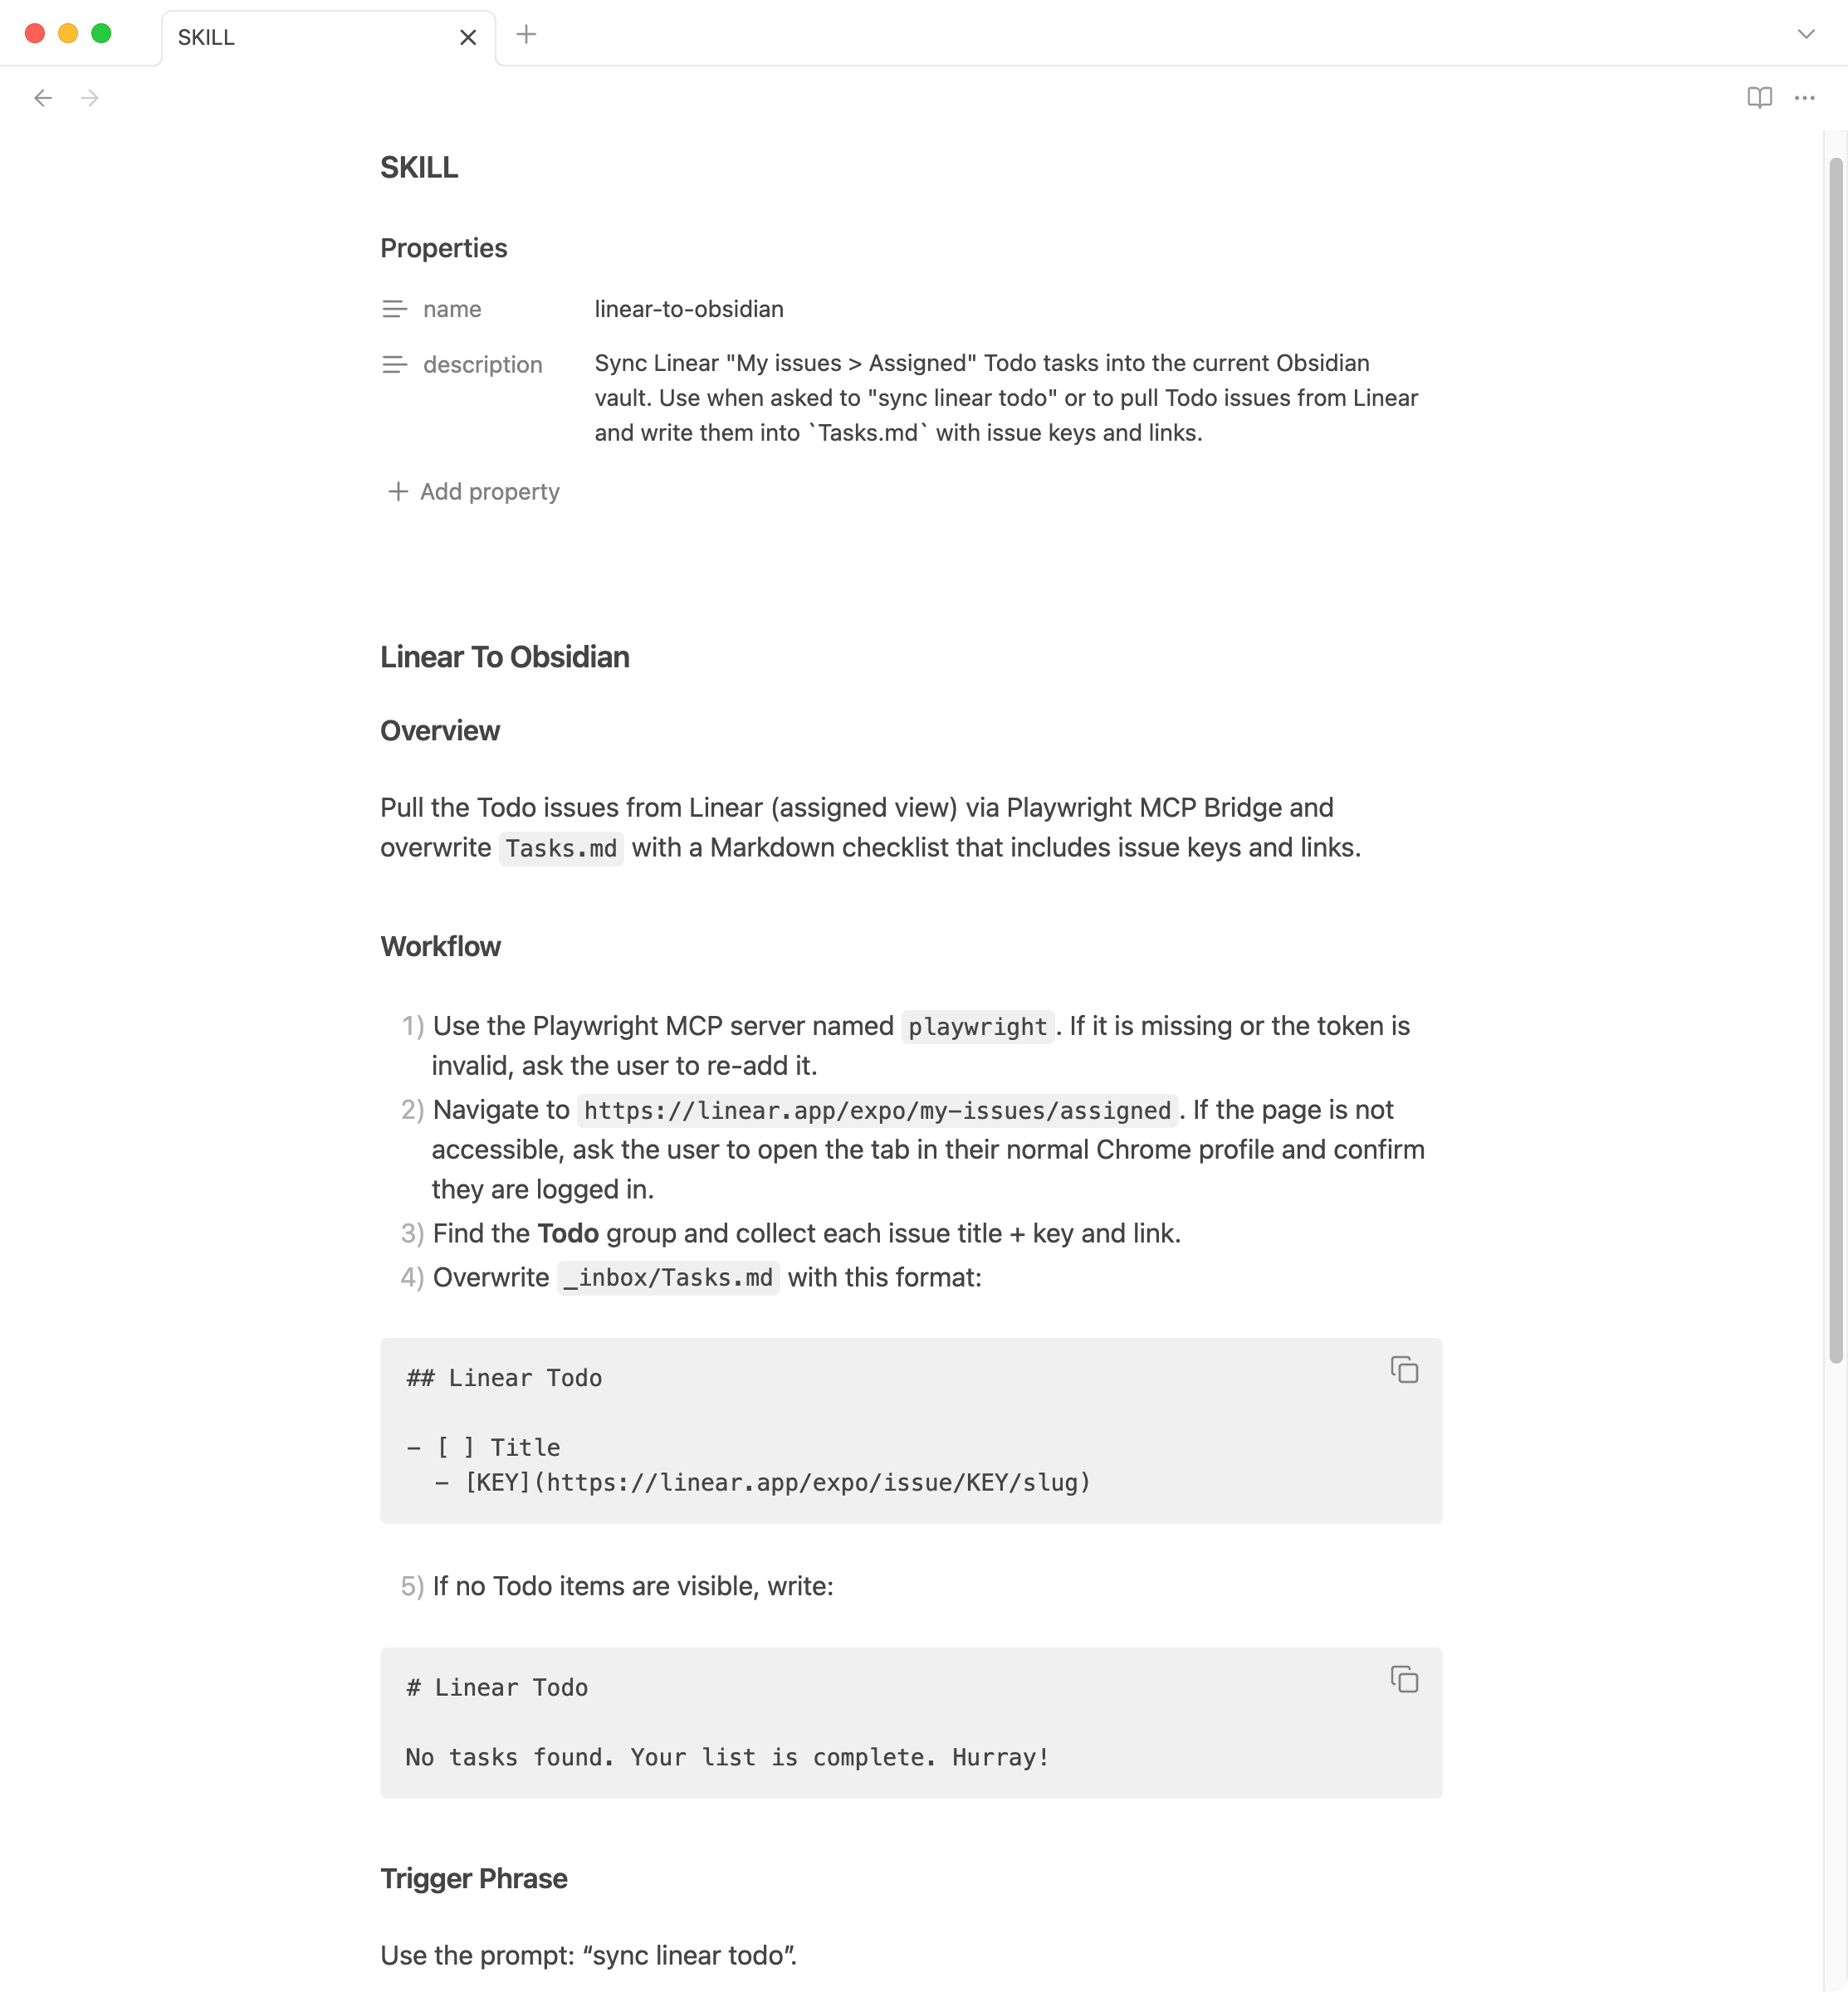
The final step was converting this workflow into a reusable skill. Skills extend Codex with task-specific capabilities and use a SKILL.md file inside a directory that has the name of the actual skill. The skill should run all the steps from the workflow defined in the previous section, every time it’s asked.
A Skill is a package of instructions (in a markdown file), resources, and optional scripts so Codex can follow the workflow reliably. Do you remember that we created AGENTS.md earlier in this post for Codex to act as an editor for my writing? That can be a skill in itself that you can run on demand, and you won’t have to keep an AGENTS.md file around or use it for project specification.
Skills for tools like Codex CLI or Claude Code are often built on the Agent Skills standard.
Obsidian doesn’t let you create directories starting with a . character. Otherwise, I could have created a skills directory called .codex/skills, since that is the standard convention Codex seems to follow.
So I put my skills in LLMS/skills/. Each skill gets its own subdirectory with a SKILL.md file. For the Linear-to-Obsidian workflow, I named the skill linear-to-obsidian. Now, anytime I ask Codex to run the skill, I can type sync linear todo in Codex CLI and it will update the Tasks.md file in my vault.
To create your own skills, I’d highly recommend asking Codex to start the process and create the file with instructions. Then, you can edit them and tweak them as per your workflow’s needs. Much faster. No need to write a SKILL.md from scratch.
Wrapping up
Codex CLI represents something I’ve wanted for a while: AI that works where my files already live, without forcing everything through a chat window or a code editor.
The workflows I’ve shown here barely scratch the surface. Once you understand how skills work, you can automate pretty much any multi-step process that involves reading, modifying, or creating files.
I’m convinced that using AI agents and working with LLMs has changed a lot in 2025. In 2024, LLMs were good at building toy apps. In 2025, they’re good at building daily workflows. Tools like Codex CLI make AI useful for the boring, repetitive stuff that actually eats your time.
The terminal might seem like an odd place to find the future. But then again, the best tools usually are.
