Tanstack Query (also known as React Query) is a powerful library to fetch data and manage state in React applications. It leverages the hook oriented architecture, which goes well with modern React apps. It also offers automatic data caching, managing errors internally for easier API interactions.
While building the home screen of the manga tracker app, a playground project, I decided to use this library to fetch the data from the AniList API. I am using Expo Router to handle navigation and create my React Native and Expo app.
Installation and configuration
Inside your React Native project, install @tanstack/react-query library by running the following command:
bun add @tanstack/react-queryNow, inside the root layout file (app/_layout.tsx), you need to initialize QueryClientProvider with default option of QueryClient:
import { QueryClient, QueryClientProvider } from '@tanstack/react-query';
import { Stack } from 'expo-router';

const queryClient = new QueryClient();

export default function RootLayout() {
  return (
    <QueryClientProvider client={queryClient}>
      <Stack>
        <Stack.Screen
          name="index"
          options={{
            headerTitle: 'Manga'
          }}
        />
      </Stack>
    </QueryClientProvider>
  );
}
The QueryClient is like a manager for all the data fetching operations in your app. It maintains the cache of query results, handles background refetching, and manages loading and error states.
The QueryClientProvider is a Context provider that makes the QueryClient available to all the child components in the component tree. By placing this provider at the root level of your app, you can ensure consistent data fetching behavior.
Creating a custom hook to fetch basic data
Inside hooks directory, create two new files: fetch.ts and index.ts. The fetch.ts file will contain all the functions to fetch data from the AniList API. The index.ts file will contain the custom hooks.
Inside hooks/fetch.ts, create fetchTrendingManga function which will fetch the trending manga data. AniList API offer different endpoints to get list of manga which are ordered by their category (such as popularity, rating, and so on).
import { AnilistResponse } from '@/types';

export async function fetchTrendingManga() {
  const query = `
    query {
      Page(page: 1, perPage: 40) {
        media(type: MANGA, sort: TRENDING_DESC) {
          id
          title {
            romaji
            english
          }
        }
      }
    }
  `;

  const response = await fetchFromAnilist<AnilistResponse>(query);
  return response.data.Page.media;
}

export async function fetchFromAnilist<T>(
  query: string,
  variables?: Record<string, any>
): Promise<T> {
  const response = await fetch('https://graphql.anilist.co', {
    method: 'POST',
    headers: {
      'Content-Type': 'application/json',
      Accept: 'application/json'
    },
    body: JSON.stringify({
      query,
      variables
    })
  });

  if (!response.ok) {
    throw new Error(`API request failed with status ${response.status}.`);
  }

  return (await response.json()) as T;
}
Inside hooks/index.ts, create useTrendingManga function which will fetch the trending manga data. This function uses useQuery hook from @tanstack/react-query library to fetch the data. It returns an object with status of the query, (which includes loading, error, and success), the data fetched from the API, and iother functions to refetch the data.
import { useQuery, UseQueryResult } from '@tanstack/react-query';

import { Manga } from '@/types';
import { fetchTrendingManga } from './fetch';

export function useTrendingManga(): UseQueryResult<Manga[], Error> {
  return useQuery({
    queryKey: ['trendingManga'],
    queryFn: fetchTrendingManga
  });
}
The useQuery hook in the above example also handles caching when the key trendingManga is passed, after fetching the data. The trendingManga key is the unique identifier for the cache. When useQuery is called again (let’s assume you refetch the data on the home screen) with the same key (trendingManga), Tanstack Query will return the cached data instead of performing a new fetch.
Display a list of data
In home screen component (app/index.tsx), let’s implement a way to display the manga data. This component fetches trending manga using the custom useTrendingManga hook and renders them in a scrollable list using FlatList. While the data is being fetched, a loading indicator is displayed, and if there’s an error, an error message is shown on the screen.
import { FlatList, StyleSheet, Text, View } from 'react-native';

// A custom loading indicator component
import Indicator from '@/components/Indicator';
import { useTrendingManga } from '@/hooks';

export default function HomeScreen() {
  const { data, isLoading, isError } = useTrendingManga();

  if (isLoading) {
    return <Indicator isLoading={isLoading} />;
  }

  if (isError) {
    return <Indicator isError={isError} />;
  }

  return (
    <View style={[styles.container]}>
      <FlatList
        data={data}
        renderItem={({ item }) => (
          <View style={styles.mangaItem}>
            <Text style={styles.mangaTitle}>{item.title.romaji}</Text>
          </View>
        )}
      />
    </View>
  );
}

const styles = StyleSheet.create({
  container: {
    flex: 1
  },
  loadingContainer: {
    flex: 1,
    justifyContent: 'center',
    alignItems: 'center'
  },
  errorText: {
    color: 'red',
    fontSize: 16
  },
  header: {
    fontSize: 24,
    fontWeight: 'bold',
    marginBottom: 16,
    paddingHorizontal: 12
  },
  mangaItem: {
    padding: 12
  },
  mangaTitle: {
    fontSize: 16
  }
});
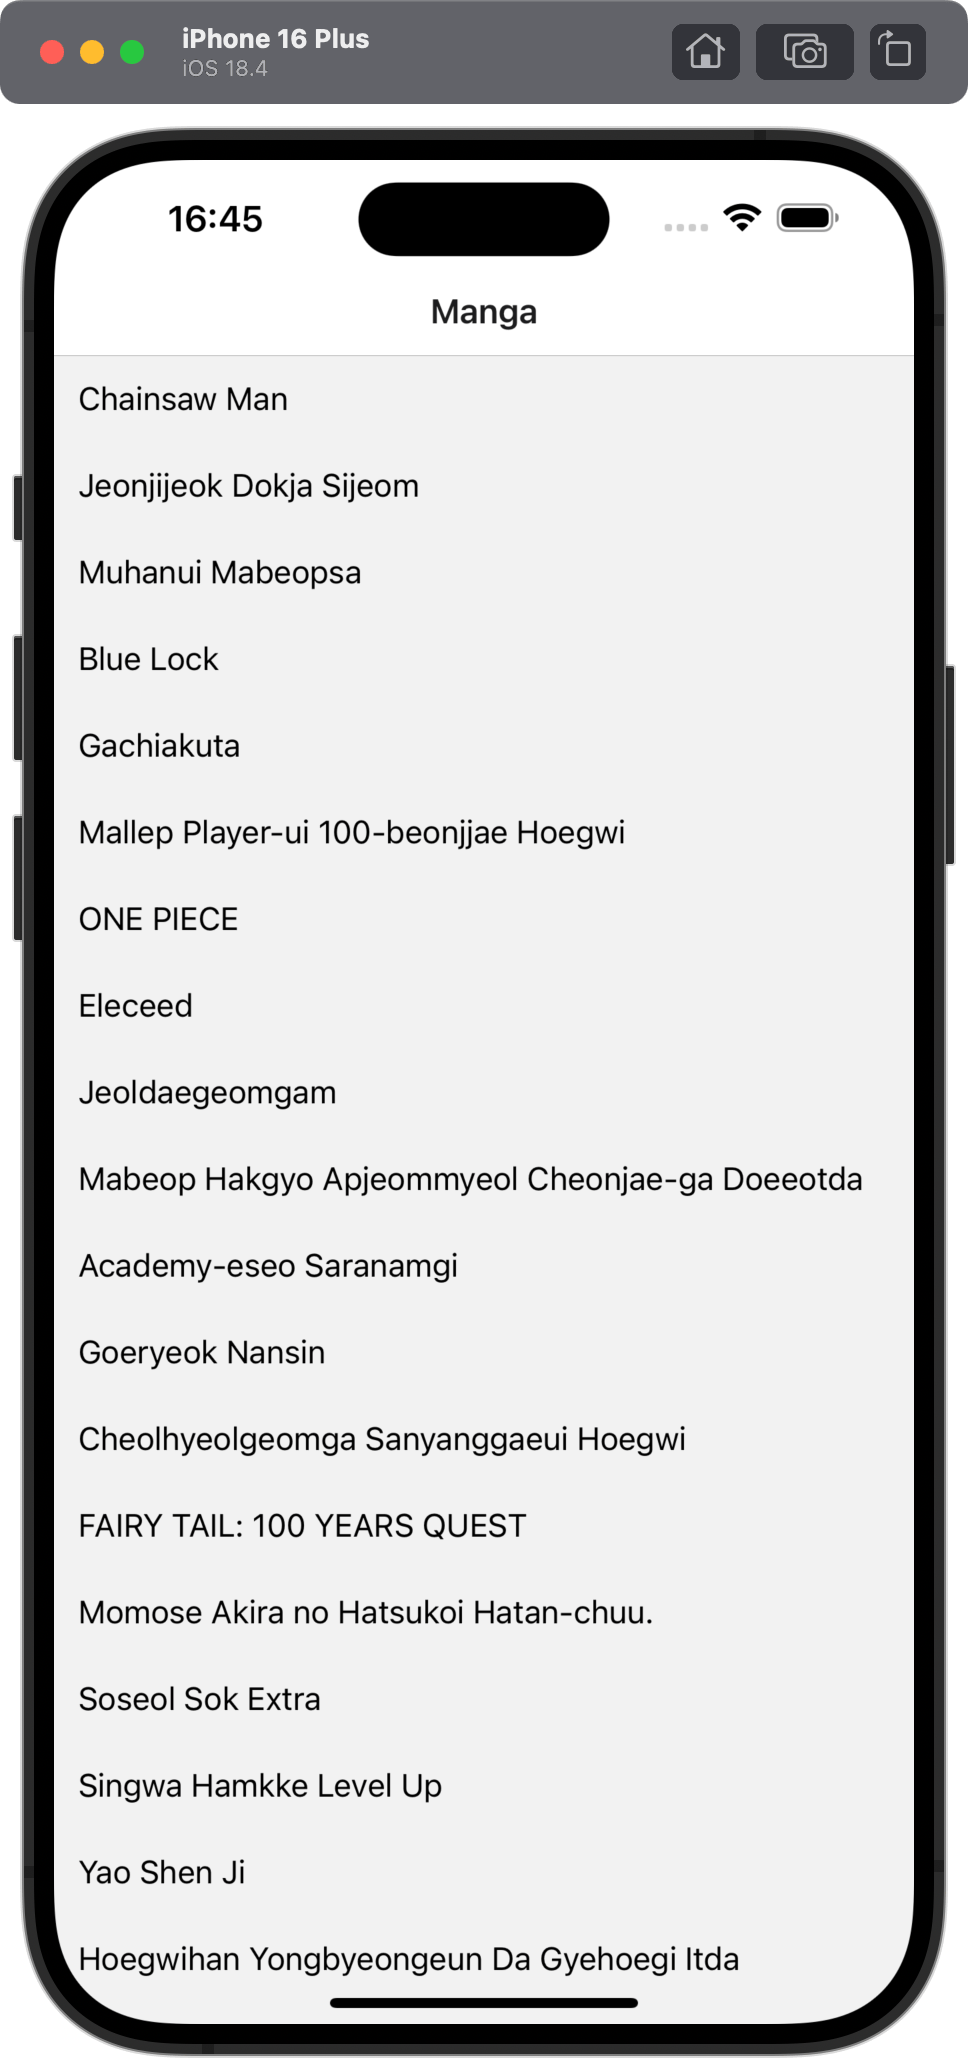
After running npx expo start, I get the list of mangas displayed on the home screen:

Fetching data for a single item
To fetch data for a single item, you can use useQuery hook with the queryKey and queryFn parameters. The queryKey is the unique identifier for the cache, and the queryFn is the function that will fetch the data.
First, you need to create a function to fetch the data for a single item. Let’s create fetchMangaById function in hooks/fetch.ts file.
export async function fetchMangaById(id: string) {
  const query = `
    query {
      Media(id: ${id}) {
        id
        title {
          romaji
          english
        }
        description
      }
    }
  `;

  const response = await fetchFromAnilist<AnilistResponse>(query);
  return response.data.Media;
}
Then, in hooks/index.ts file, create useMangaById function which fetches the manga data for a single item.
export function useMangaById(id: string): UseQueryResult<Manga, Error> {
  return useQuery({
    queryKey: ['manga', id],
    queryFn: () => fetchMangaById(id)
  });
}
Adding a detail screen
In Expo Router, you can create a detail screen using dynamic routes. Add a new file app/manga/[id].tsx and implement the detail screen component.
import { useLocalSearchParams } from 'expo-router';
import { ScrollView, StyleSheet, Text, View } from 'react-native';

// A custom loading indicator component
import Indicator from '@/components/Indicator';
import { useMangaById } from '@/hooks';

export default function MangaDetailsScreen() {
  const { id } = useLocalSearchParams();
  const { data, isLoading, error } = useMangaById(id as string);

  if (isLoading) {
    return <Indicator isLoading />;
  }

  if (error || !data) {
    return <Indicator isError />;
  }

  return (
    <ScrollView style={styles.container}>
      <Text style={styles.screenTitle}>
        {data.title.english || data.title.romaji}
      </Text>
      {data.description && (
        <View style={styles.descriptionContainer}>
          <Text style={styles.descriptionTitle}>Description</Text>
          <Text style={styles.description}>{data.description}</Text>
        </View>
      )}
    </ScrollView>
  );
}

const styles = StyleSheet.create({
  container: {
    flex: 1,
    backgroundColor: '#F5F5F5'
  },
  screenTitle: {
    fontSize: 32,
    fontWeight: 'bold',
    marginTop: 16,
    marginHorizontal: 12,
    marginBottom: 8
  },
  descriptionContainer: {
    marginBottom: 16,
    padding: 12
  },
  descriptionTitle: {
    fontSize: 18,
    fontWeight: 'bold',
    marginBottom: 8,
    color: '#333'
  },
  description: {
    fontSize: 16,
    color: '#666',
    lineHeight: 24
  }
});
Update root layout to include the detail screen
In app/_layout.tsx file, add the detail screen to the stack navigator.
import { QueryClient, QueryClientProvider } from '@tanstack/react-query';
import { Stack } from 'expo-router';

const queryClient = new QueryClient();

export default function RootLayout() {
  return (
    <QueryClientProvider client={queryClient}>
      <Stack>
        <Stack.Screen
          name="index"
          options={{
            headerTitle: 'Manga'
          }}
        />
        <Stack.Screen
          name="[id]"
          options={{
            headerTitle: 'Manga Details'
          }}
        />
      </Stack>
    </QueryClientProvider>
  );
}
Using Link component to navigate to the detail screen
In the home screen component (app/index.tsx), import Link component from expo-router and wrap the Pressable component with it.
import { FlatList, Pressable, StyleSheet, Text, View } from 'react-native';

import Indicator from '@/components/Indicator';
import { useTrendingManga } from '@/hooks';
import Ionicons from '@expo/vector-icons/Ionicons';
import { Link } from 'expo-router';

export default function HomeScreen() {
  const { data, isLoading, isError } = useTrendingManga();

  if (isLoading) {
    return <Indicator isLoading={isLoading} />;
  }

  if (isError) {
    return <Indicator isError={isError} />;
  }

  return (
    <View style={[styles.container]}>
      <FlatList
        data={data}
        renderItem={({ item }) => (
          <Link href={`/${item.id}`} asChild>
            <Pressable style={styles.mangaItem}>
              <Text style={styles.mangaTitle}>{item.title.romaji}</Text>
              <Ionicons name="chevron-forward" size={16} color="#ccc" />
            </Pressable>
          </Link>
        )}
      />
    </View>
  );
}

const styles = StyleSheet.create({
  container: {
    flex: 1
  },
  loadingContainer: {
    flex: 1,
    justifyContent: 'center',
    alignItems: 'center'
  },
  errorText: {
    color: 'red',
    fontSize: 16
  },
  header: {
    fontSize: 24,
    fontWeight: 'bold',
    marginBottom: 16,
    paddingHorizontal: 12
  },
  mangaItem: {
    padding: 12,
    flexDirection: 'row',
    alignItems: 'center',
    justifyContent: 'space-between'
  },
  mangaTitle: {
    fontSize: 16
  }
});
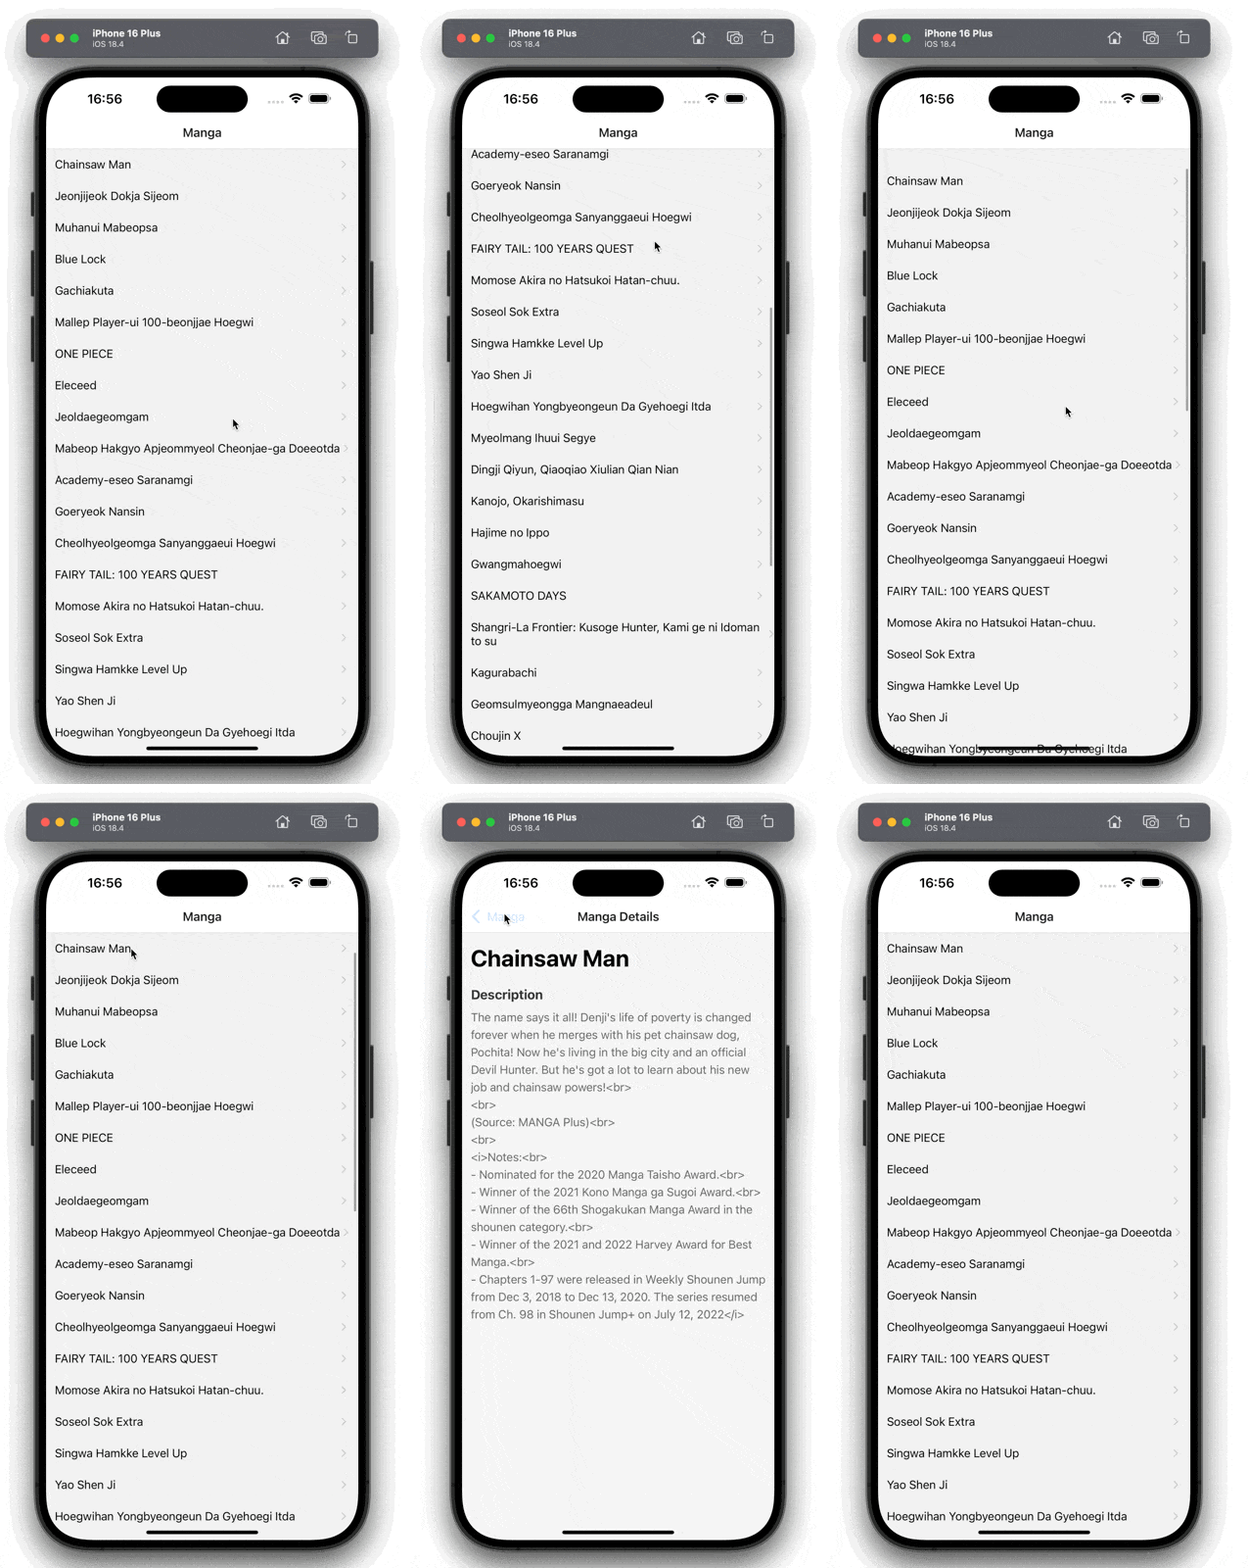
After running npx expo start, I get the list of mangas displayed on the home screen and then I can navigate to the detail screen by tapping on an item.

Wrapping up
I just wanted to document the simple approach of fetching data with ease using TanStack Query (React Query) and going through its basic concepts. Hopefully, this has been helpful to you as well.