
It can sometime be overwhelming to build a full-stack web application using a stack like MERN.
Setting up the the back end and connecting it with a client-side library like React to fetch and display data is just the beginning. One you have the data user will interact with, you need to focus on developing a functional User Interface (UI) for your web application. For some developers, UI can be the tricky part.
MERN is full-stack because it consists of MongDB, Express, React and Nodejs. Each of these technologies can be replaced with something comparable but it is common practice to use them together.
React is the library you will use to build the front-end of the web application. Express is a Nodejs framework that helps you to build a server that communicates to and fro with a NoSQL database like MongoDB.
In this tutorial, I am going to show you how to build a small web application using this technology stack, step-by-step. Along with building a simple web app, you will learn how to use the Material UI library to make the application look good. You can then use what you learn here for to make your own applications look better and be more functional.
Pre-requisites
Before we get started, install all the tools we are going to need to set up our application.
- Nodejs
- MongoDB
- yarn
- create-react-app
The last in the above list are installed using npm.
Set up the MERN App
To get started, you need to follow the steps below by opening your terminal and typing these commands. To keep you from getting lost, I will leave a comment before each command using #.
# create an empty directory and traverse inside it
mkdir mern-material-demo

# initialize it with npm
npm init -y

# install server side dependencies (initially)
yarn add express mongoose cookie-parser express-jwt jsonwebtoken

# use babel for import statements in Node
yarn add -D babel-cli babel-preset-env babel-watch

# create a client using create-react-app from root
create-react-app client
After this step, make sure your root project looks like below with some extra files and folders.
We are going to bootstrap the server using Babel. To setup and learn what Babel is, please read here.
The next step is to define the configuration you will need to proceed with server creation. Inside server, create a new file config/index.js and define the following inside it.
const config = {
  port: process.env.PORT || 4000,
  jwtSecret: process.env.JWT_SECRET || 'mkT23j#u!45',
  mongoURI: process.env.MONGODB_URI || 'mongodb://localhost/mern-auth'
};

export default config;
For MongoDB, I am going to use a local instance. If you want to use a cloud service (free tier), please read the steps to set it up and consume in a Node server app here.
Make sure add the dev script inside package.json.
"scripts": {
	"dev": "babel-watch index.js"
}
Connect Database and the Server
Inside config directory, create a new file called dbConnection.js. Let us start by defining the MongoDB connection.
import mongoose from 'mongoose';
import config from './index';

const URI = config.mongoURI;
mongoose.connect(URI);

// When successfully connected
mongoose.connection.on('connected', () => {
  console.log('Established Mongoose Default Connection');
});

// When connection throws an error
mongoose.connection.on('error', err => {
  console.log('Mongoose Default Connection Error : ' + err);
});
I am going to use Mongoose as ODM (Object Document Mapper). This helps write queries inside the Node server and create business logic behind it. It also provides a schema-based solution to create data models and define them in our Node app.
Although MongoDB is a schema-less database, Mongoose helps our application understand the data structure and organize it at the same time. The most basic benefit is to make a connection between the Express app when it bootstraps and the MongoDB instance on our local machine.
Let’s create a small server in the index.js file of the root of our web app. Here it is in action.
import express from 'express';
import cookieParser from 'cookie-parser';
import config from './server/config';

// DB connection
require('./server/config/dbConnection');

const app = express();

// middleware functions
app.use(express.json());
app.use(express.urlencoded({ extended: true }));
app.use(cookieParser());

// Error handling middleware
app.use((err, req, res, next) => {
  if (err.name === 'UnauthorizedError') {
    res.status(401).json({ error: err.name + ':' + err.message });
  }
});

app.listen(config.port, () => {
  console.log(`🚀 at port ${config.port}`);
});
If you are getting a message like below (ignore the mongoose warning), this means our server is up and running and successfully connected to the local instance of the database.
Building The User Model
To demonstrate, I am going to create a user data model with properties to save the user data when a new user registers with our application. We are going to save user credentials and validate it using Mongoose in this section. Create a new file inside server/models/user.js.
We will start by importing the necessary dependencies at the top of our file and then create a new Mongoose Schema, userSchema which is an object with properties. Typically, NoSQL databases are super flexible, in that they allow us to put whatever we want in them without enforcing any specific kind of structure. However, Mongoose adds a layer of structure on top of the typical MongoDB way of doing things. This helps us perform additional validation to ensure that our users are not submitting any random data to our database without us having to write tons of boilerplate code ourselves.
import mongoose from 'mongoose';
import crypto from 'crypto';
const Schema = mongoose.Schema;

const userSchema = new Schema({
  name: {
    type: String,
    trim: true,
    required: 'User Name is required'
  },
  email: {
    type: String,
    trim: true,
    unique: 'Email already exists',
    match: [/.+\@.+\..+/, 'Please fill a valid email address'],
    required: 'Email is required'
  },
  hashedPassword: {
    type: String,
    required: 'Password is required'
  },
  salt: {
    type: String
  }
});

userSchema
  .virtual('password')
  .set(function (password) {
    this._password = password;
    this.salt = this.makeSalt();
    this.hashedPassword = this.encryptedPassword(password);
  })
  .get(function () {
    return this._password;
  });

userSchema.methods = {
  authenticate: function (plainText) {
    return this.encryptedPassword(plainText) === this.hashedPassword;
  },
  encryptedPassword: function (password) {
    if (!password) return '';
    try {
      return crypto
        .createHmac('sha1', this.salt)
        .update(password)
        .digest('hex');
    } catch (err) {
      return '';
    }
  },
  makeSalt: function () {
    return Math.round(new Date().valueOf() * Math.random()) + '';
  }
};

userSchema.path('hashedPassword').validate(function (v) {
  if (this.hashedPassword && this._password.length < 6) {
    this.invalidate('password', 'Password must be at least 6 characters long.');
  }
  if (this.isNew && !this._password) {
    this.invalidate('password', 'Password is required.');
  }
}, null);

export default mongoose.model('User', userSchema);
We now use the userSchema object to add a virtualpassword field. Note that whatever property is described inside the userSchema object is going to be saved in the MongoDB document. We are not saving the password directly. We are creating a virtual field first to generate an encrypted hash of the password and then save it in our database.
A virtual field is a document property that can be used to combine different fields or decompose a single value into multiple values for storage but never gets carried on inside the MongoDB database itself.
Using the Nodejs crypto module we are creating a hash that updates the virtual password. The ‘salt’ field is a randomly generated string for each password. This terminology comes from cryptography. We are also putting in the logic of validating the password field and checking whether it is 6 characters long. Lastly, we export the User model to be used with routes and controllers logic in our server.
User Routes
Now, let’s write the business logic behind the routes to create for the React end to interact with the server. Create a new file server/controllers/user.js and write the following code. Import the user model first that from the previous section.
import User from '../models/user';
import errorHandler from '../helpers/dbErrorHandler';

export const registerUser = (req, res, next) => {
  const user = new User(req.body);
  user.save((err, result) => {
    if (err) {
      return res.status(400).json({
        error: errorHandler.getErrorMessage(err)
      });
    }
    res.status(200).json({
      message: 'New user registered successfully!'
    });
  });
};

export const findUserById = (req, res, next, id) => {
  User.findById(id).exec((err, user) => {
    if (err || !user) {
      return res.status(400).json({
        error: 'No user found with that credentials!'
      });
    }
    req.profile = user;
    next();
  });
};

export const findUserProfile = (req, res) => {
  // eliminate password related fields before sending the user object
  req.profile.hashedPassword = undefined;
  req.profile.salt = undefined;
  return res.json(req.profile);
};

export const deleteUser = (req, res, next) => {
  let user = req.profile;
  user.remove((err, deletedUser) => {
    if (err) {
      return res.status(400).json({
        error: errorHandler.getErrorMessage(err)
      });
    }
    deletedUser.hashedPassword = undefined;
    user.salt = undefined;
    res.json(user);
  });
};
I have also added a helper function inside a separate file at the location server/helpers/dbErrorHandler.js to gracefully handle any error that occurs in any of the routes like we are using in above and respond back with a meaningful message. You can download the file from here.
In the file above, we are creating three controller functions. The first one, registerUser, creates a new user in the database from the JSON object received in a POST request from the client. The JSON object is received inside req.body that contains the user credentials we need to store in the database. Further, user.save, saves the new user in the database. Notice that we are not creating a unique field which is common in this type of scenarios to identify each new user saved in our database. This is because MongoDB database creates an _id field each time a new record is saved.
The next function we are exporting is findUserById. It queries the database to find the specific details related to the user whose _id is provided in parametric route (which I will define shortly). If a matching user is found with that _id in the database, then the user object is returned and appended inside the req.profile.
findUserProfile controller function retrieves the user detail from req.profile and removes any sensitive information such as password’s hash and salt values before sending this user object to the client. The last function deleteUser removes the the user details from the database.
Now let use the controller logic and add it to corresponding routes inside server/routes/user.js.
import express from 'express';
import {
  registerUser,
  findUserById,
  findUserProfile,
  deleteUser
} from '../controllers/user';

const router = express.Router();

router.route('/api/users').post(registerUser);

router.route('/api/users/:userId').get(findUserProfile).delete(deleteUser);

router.param('userId', findUserById);

export default router;
The controller functions are first imported and then used with their corresponding route.
Auth Routes
To restrict access to user operations — such as the logged in user can only access their profile and no one else’s — we are going to implement a JWT authentication to protect the routes. The two routes required to sign in and sign out the user from our application are going to be inside a separate file server/routes/auth.js.
import express from 'express';
import { signin, signout } from '../controllers/auth';

const router = express.Router();

router.route('/auth/signin').post(signin);

router.route('/auth/signout').get(signout);

export default router;
The first route uses an HTTP POST request to authenticate a user with email and password credentials. The second route is used when the user hits the signout button (which we will implement in our front-end). The logic behind how these two routes work has to be defined in another file. Create a new file server/controllers/auth.js with the following code.
import User from '../models/user';
import jwt from 'jsonwebtoken';
import expressJwt from 'express-jwt';
import config from '../config';

export const signin = (req, res) => {
  User.findOne({ email: req.body.email }, (err, user) => {
    if (err || !user) {
      return res.status(401).json({
        error: 'User not found'
      });
    }
    if (!user.authenticate(req.body.password)) {
      return res.status(401).json({
        error: 'Wrong Email or Password!'
      });
    }

    const token = jwt.sign(
      {
        _id: user._id
      },
      config.jwtSecret
    );

    res.cookie('t', token, {
      expire: new Date() + 9999
    });

    return res.json({
      token,
      user: { _id: user._id, name: user.name, email: user.email }
    });
  });
};

export const signout = (req, res) => {
  res.clearCookie('t');
  return res.status(200).json({
    message: 'Sign out successful!'
  });
};

export const requireSignin = expressJwt({
  secret: config.jwtSecret,
  userProperty: 'auth'
});

export const hasAuthorization = (req, res) => {
  const authorized = req.profile && req.auth && req.profile._id == req.auth._id;
  if (!authorized) {
    return res.status(403).json({
      error: 'User is not authorized!'
    });
  }
};
I am using two JWT related packages from npm to enable authentication and protect our routes: express-jwt and jsonwebtoken. You already installed them when we bootstrapped this project. The first controller function signin we are exporting receives user’s credentials in req.body. Email is used to retrieve the matching user from the database. Remember, we have added a unique field when defining the userSchema.
// model/user.js
	email: {
		type: String,
		trim: true,
		unique: 'Email already exists',
		match: [/.+\@.+\..+/, 'Please fill a valid email address'],
		required: 'Email is required'
  },
Since we are also receiving user’s password, we are going to verify it with the hash and the salt value that we stored in our database. The signed JWT is returned to the client to authenticate the user with their details if successful. We are using browser’s cookies here to store the JWT token. You can use the browser’s local storage for this purpose.
The signout function above clears the cookie containing the signed JWT token. The last two functions are important for our application. Both requireSignin and hasAuthorization are used to protect access to certain routes from an unauthorized user. They check and validate the user on client whether they are authenticated to give access.
requireSignin method here verifies a valid JWT in the Authorization header of the request. hasAuthorization allows a user to operate protected routes by checking that the user who is sending the request is identical to the authenticated user. In our application we are going to use this on one protected route. We are going to delete the user profile and their data from the database in that route.
Now let us use these methods to protect user routes. Open server/routes/user.js.
import express from 'express';
import {
  registerUser,
  findUserById,
  findUserProfile,
  deleteUser
} from '../controllers/user';

// import them to protect routes
import { requireSignin, hasAuthorization } from '../controllers/auth';

const router = express.Router();

router.route('/api/users').post(registerUser);

router
  .route('/api/users/:userId')
  .get(requireSignin, findUserProfile)
  .delete(requireSignin, hasAuthorization, deleteUser);

router.param('userId', findUserById);

export default router;
Finishing the back-end
With the routing logic set up, we can now complete the server by adding our routes to index.js file.
import express from 'express';
import cookieParser from 'cookie-parser';
import config from './server/config';
// ADD these
import userRoutes from './server/routes/user';
import authRoutes from './server/routes/auth';

// DB connection
require('./server/config/dbConnection');

const app = express();

// middleware functions
app.use(express.json());
app.use(express.urlencoded({ extended: true }));
app.use(cookieParser());

// ADD routes
app.use('/', userRoutes);
app.use('/', authRoutes);

app.use((err, req, res, next) => {
  if (err.name === 'UnauthorizedError') {
    res.status(401).json({ error: err.name + ':' + err.message });
  }
});

app.listen(config.port, () => {
  console.log(`🚀 at port ${config.port}`);
});
To test these routes, open up a REST Client like Postman or Insomnia and the URL http://localhost:4000/api/users with required fields in order to create a user.
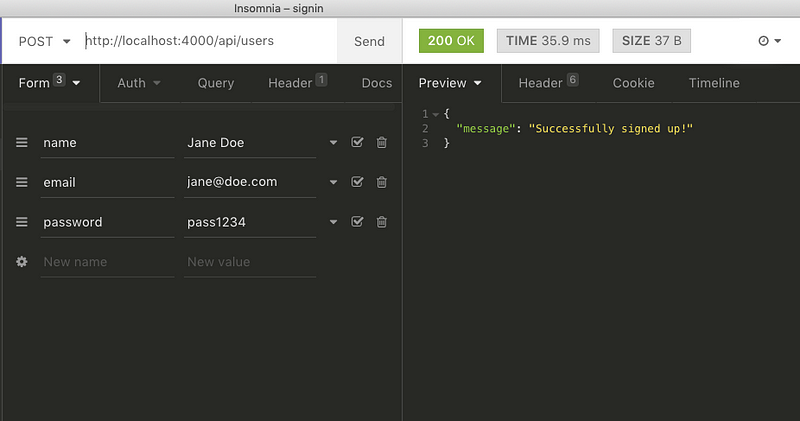
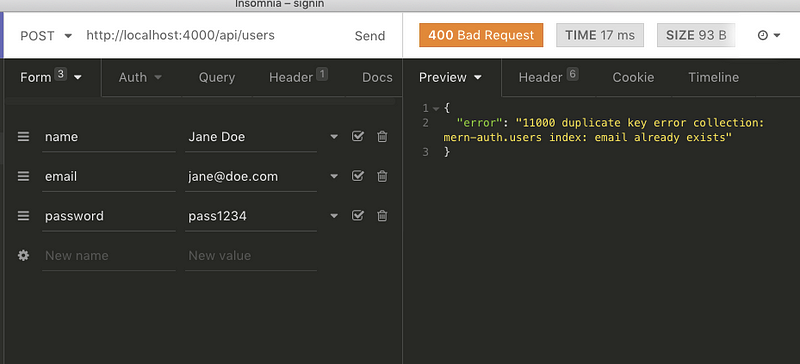
If there are no errors, you are going to receive the message Successfully signed up!. This means the user has been added to the database. If you try to make a new user with same credentials, it will throw an error this time.
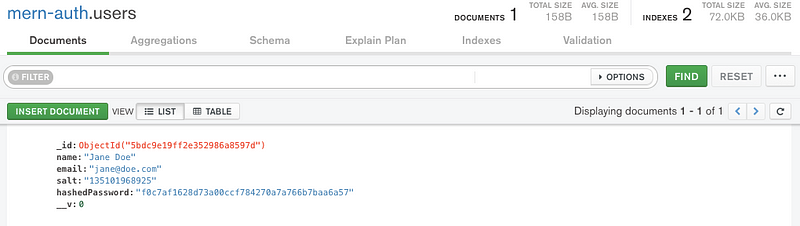
If you use a MongoDB Client to view the records of your local database like Mongo Compass or Robomongo, you can easily see newly created user’s details.
Using the same user credentials, we will attempt a sign-in. It should give us a JWT back.
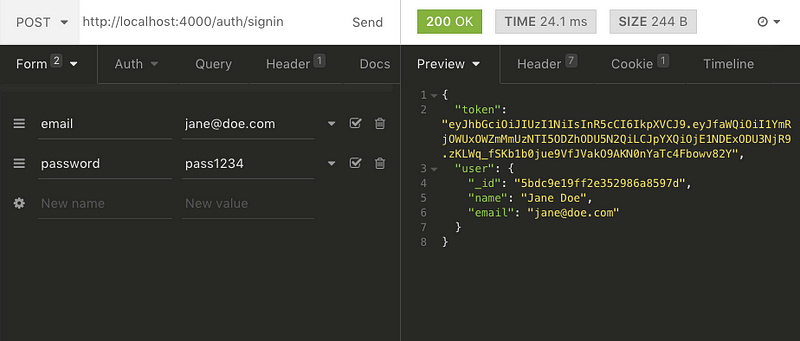
It works!
Except for the sensitive information that we eliminated from the route, we are receiving back the token and a user object.
Now let’s find the user profile. Hit the URL http://localhost:4000/api/users/{USER_ID} where USER_ID is the same created by MongoDB database when adding the user record.
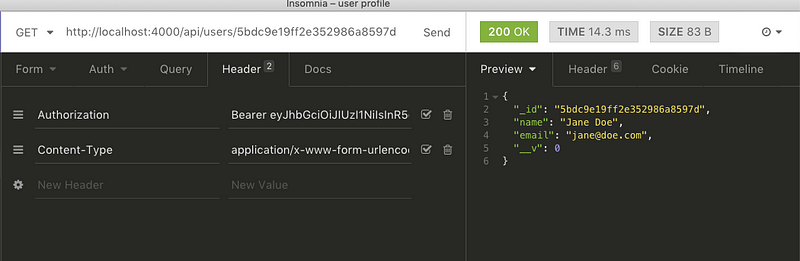
You have to add the Bearer before signed JWT returned from the previous request at the Header Authorization. This completes our API testing and now we can focus on building the front-end of our application.
Adding Material UI in React
There are a series of steps to follow to add the Material UI Library to our react app. Traverse in the client directory and follow the below steps. We are going to use Material Icons in SVG form, so let’s add that package.
# Open terminal and install the package
yarn add @material-ui/core @material-ui/icons
Material-UI uses Roboto font and we have to add it through Google Font CDN to our client side. Open public/index.html add the following. Let’s also change the title.
<head>
<link rel="manifest" href="%PUBLIC_URL%/manifest.json" />
<link
rel="stylesheet"
href="https://fonts.googleapis.com/css?family=Roboto:300,400,500"
/>
<title>MERN App</title>
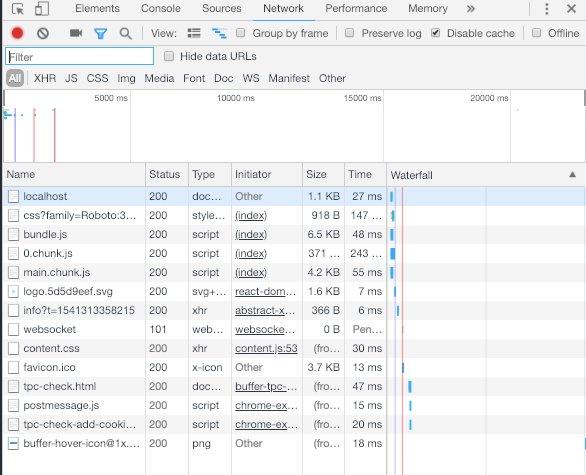
</head>To see if everything installed correctly and is working, run the client project using command yarn start. This will open the default React app that comes with create-react-app at URL http://localhost:3000. To see our our assets (such as Roboto font) being loaded, go to Developer Tools and open Network tab. Refresh the page to reload the assets and you will notice that the font family is being loaded.
Defining the Home Page
Now let’s build the first component of our application. Create a new file inside src/components/Home.js and put the following content.
import React, { Component } from 'react';
import { withStyles } from '@material-ui/core/styles';
import Card from '@material-ui/core/Card';
import CardContent from '@material-ui/core/CardContent';
import CardMedia from '@material-ui/core/CardMedia';
import Typography from '@material-ui/core/Typography';
import logo from '../logo.svg';

const styles = theme => ({
  card: {
    maxWidth: 700,
    margin: 'auto',
    marginTop: theme.spacing.unit * 5
  },
  title: {
    padding: `${theme.spacing.unit * 3}px ${theme.spacing.unit * 2.5}px ${
      theme.spacing.unit * 2
    }px`,
    color: theme.palette.text.secondary,
    fontSize: 24
  },
  media: {
    minHeight: 450
  }
});

class Home extends Component {
  render() {
    const { classes } = this.props;
    return (
      <div>
        <Card className={classes.card}>
          <Typography type="headline" component="h2" className={classes.title}>
            Welcome to the MERN APP
          </Typography>
          <CardMedia
            className={classes.media}
            image={logo}
            title="Auth with MERN"
          />
          <CardContent>
            <Typography type="body1" component="p">
              This is a demo application that uses a Node + MongoDB API for user
              authentication. Built With React + Material UI.
            </Typography>
          </CardContent>
        </Card>
      </div>
    );
  }
}

export default withStyles(styles)(Home);
The first component we are importing from @material-ui in this file is withStyles. It allows us to style a component by declaring a styles object with access top-level styles such as we are using theme with our home component. We will define these top-level theme related styles shortly in App.js. Next, we are importing Card, CardContent, CardMedia to create a card view. CardMedia is used to display any media file whereas CardContent is used with Typography to output text. Typography is used to present hierarchy based styles over text to the content as clearly and efficiently as possible.
Now open up App.js and add the following content.
import React, { Component } from 'react';
import MuiThemeProvider from '@material-ui/core/styles/MuiThemeProvider';
import { createMuiTheme } from '@material-ui/core/styles';
import green from '@material-ui/core/colors/green';
import red from '@material-ui/core/colors/red';

import Home from './components/Home';

const theme = createMuiTheme({
  palette: {
    primary: {
      light: '#C8E6C9',
      main: '#4CAF50',
      dark: '#2E7D32',
      contrastText: '#fff'
    },
    secondary: {
      light: '#EF9A9A',
      main: '#F44336',
      dark: '#C62828',
      contrastText: '#000'
    },
    openTitle: green['400'],
    protectTitle: red['400'],
    type: 'dark'
  }
});

class App extends Component {
  render() {
    return (
      <MuiThemeProvider theme={theme}>
        <Home />
      </MuiThemeProvider>
    );
  }
}

export default App;
MuiThemeProvider and createMuiTheme classes are used to create default theme. The theme specifies the color of the components, darkness of the surfaces, level of shadow, appropriate opacity of ink elements, and so on. If you wish to customize the theme, you need to use the MuiThemeProvider component in order to inject a theme into your application. To configure a theme of your own, createMuiTheme is used. You can also make the theme dark by setting type to dark like we have done above. Lastly, <MuiThemeProvider theme={theme}> is where the top level styles are being passed to child components, in our case Home.
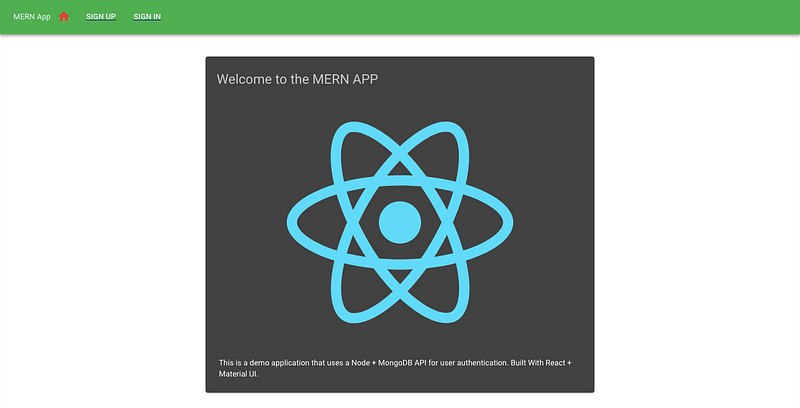
If you render the app by running yarn start, you will get the below output.

Adding React Router
We need a way to navigate different routes for the user to sign in and sign out. In this section, we will add react-router library to our app for this purpose.
yarn add react-router react-router-domreact-router library is a collection of navigational components. To get started, create a new file inside src folder called Routes.js.
import React, { Component } from 'react';
import { Route, Switch } from 'react-router-dom';

import Home from './components/Home';

class Routes extends Component {
  render() {
    return (
      <Switch>
        <Route exact path="/" component={Home} />
      </Switch>
    );
  }
}

export default Routes;
The Route component is the main building block of React Router. Anywhere that you want to only render content based on the location’s pathname, you should use a Route element. Switch is used to group different Route components. The route for the homepage, our Home component does include an exact prop. This is used to state that route should only match when the pathname matches the route’s path exactly. To use the newly created Routes, we have to make some changes to App.js to make it work.
import React, { Component } from 'react';
import MuiThemeProvider from '@material-ui/core/styles/MuiThemeProvider';
import { createMuiTheme } from '@material-ui/core/styles';
import green from '@material-ui/core/colors/green';
import red from '@material-ui/core/colors/red';
import { BrowserRouter } from 'react-router-dom';

import Routes from './Routes';

const theme = createMuiTheme({
  palette: {
    primary: {
      light: '#C8E6C9',
      main: '#4CAF50',
      dark: '#2E7D32',
      contrastText: '#fff'
    },
    secondary: {
      light: '#EF9A9A',
      main: '#F44336',
      dark: '#C62828',
      contrastText: '#000'
    },
    openTitle: green['400'],
    protectTitle: red['400'],
    type: 'dark'
  }
});

class App extends Component {
  render() {
    return (
      <BrowserRouter>
        <MuiThemeProvider theme={theme}>
          <Routes />
        </MuiThemeProvider>
      </BrowserRouter>
    );
  }
}

export default App;
The BrowserRouter defined above is used when you have a server that will handle dynamic requests.
Connecting Node server and React
I wrote an article for Crowdbotics dealing how to connect a Node.js server with the React front end here. We do not need to review the whole process. Just open your package.json and add the following for our app to kickstart.
"proxy": "http://localhost:4000/"Next, I am going to add methods to be used in different components that will handle API calls from our server side code. Create two new files inside utils directory: api-auth.js and api-user.js.
// api-user.js

export const registerUser = user => {
  return fetch('/api/users/', {
    method: 'POST',
    headers: {
      Accept: 'application/json',
      'Content-Type': 'application/json'
    },
    body: JSON.stringify(user)
  })
    .then(response => {
      return response.json();
    })
    .catch(err => console.log(err));
};

export const findUserProfile = (params, credentials) => {
  return fetch('/api/users/' + params.userId, {
    method: 'GET',
    headers: {
      Accept: 'application/json',
      'Content-Type': 'application/json',
      Authorization: 'Bearer ' + credentials.t
    }
  })
    .then(response => {
      return response.json();
    })
    .catch(err => console.error(err));
};

export const deleteUser = (params, credentials) => {
  return fetch('/api/users/' + params.userId, {
    method: 'DELETE',
    headers: {
      Accept: 'application/json',
      'Content-Type': 'application/json',
      Authorization: 'Bearer ' + credentials.t
    }
  })
    .then(response => {
      return response.json();
    })
    .catch(err => console.error(err));
};
In api-auth.js, add the following.
// api-auth.js
export const signin = user => {
  return fetch('/auth/signin/', {
    method: 'POST',
    headers: {
      Accept: 'application/json',
      'Content-Type': 'application/json'
    },
    credentials: 'include',
    body: JSON.stringify(user)
  })
    .then(response => {
      return response.json();
    })
    .catch(err => console.log(err));
};

export const signout = () => {
  return fetch('/auth/signout/', {
    method: 'GET'
  })
    .then(response => {
      return response.json();
    })
    .catch(err => console.log(err));
};
The signin method takes care of user credentials from the view component (which we will create shortly), then uses fetch to make a POST call to verify the user credentials with the backend. The signout method uses fetch to make a GET call to the sign-out API endpoint on the back-end.
Front-End: Auth Components
Next, we will setup all the necessary components required for authentication.
One by one, I am going to create new files so please follow closely.
Create a new directory inside components and call it auth. Then, create a new file auth-helper.js.
import { signout } from '../../utils/api-auth.js';

const auth = {
  isAuthenticated() {
    if (typeof window == 'undefined') return false;

    if (sessionStorage.getItem('jwt'))
      return JSON.parse(sessionStorage.getItem('jwt'));
    else return false;
  },
  authenticate(jwt, cb) {
    if (typeof window !== 'undefined')
      sessionStorage.setItem('jwt', JSON.stringify(jwt));
    cb();
  },
  signout(cb) {
    if (typeof window !== 'undefined') sessionStorage.removeItem('jwt');
    cb();
    //optional
    signout().then(data => {
      document.cookie = 't=; expires=Thu, 01 Jan 1970 00:00:00 UTC; path=/;';
    });
  }
};

export default auth;
These functions will help us manage the state of authentication in the browser. Using these methods our client side app will be able to check whether the user has logged in or not. To protect the routes, such as a user’s profile, from un-authorized access, we have to define a new component inside PrivateRoute.js and make use of the methods above.
import React, { Component } from 'react';
import { Route, Redirect } from 'react-router-dom';
import auth from './auth-helper';

const PrivateRoute = ({ component: Component, ...rest }) => (
  <Route
    {...rest}
    render={props =>
      auth.isAuthenticated() ? (
        <Component {...props} />
      ) : (
        <Redirect
          to={{
            pathname: '/signin',
            state: { from: props.location }
          }}
        />
      )
    }
  />
);

export default PrivateRoute;
We are going to use this component as an auth flow in the Routes.js we have defined. Components that rendered via this route component will only load when the user is authenticated. Our last component related to user authentication is to be defined inside Signin.js.
import React, { Component } from 'react';
import Card from '@material-ui/core/Card';
import CardContent from '@material-ui/core/CardContent';
import CardMedia from '@material-ui/core/CardMedia';
import Button from '@material-ui/core/Button';
import TextField from '@material-ui/core/TextField';
import Typography from '@material-ui/core/Typography';
import Icon from '@material-ui/core/Icon';
import { withStyles } from '@material-ui/core/styles';
import auth from './auth-helper';
import { Redirect } from 'react-router-dom';
import { signin } from '../../utils/api-auth.js';

const styles = theme => ({
  card: {
    maxWidth: 600,
    margin: 'auto',
    textAlign: 'center',
    marginTop: theme.spacing.unit * 5,
    paddingBottom: theme.spacing.unit * 2
  },
  error: {
    verticalAlign: 'middle'
  },
  title: {
    marginTop: theme.spacing.unit * 2,
    color: theme.palette.openTitle
  },
  textField: {
    marginLeft: theme.spacing.unit,
    marginRight: theme.spacing.unit,
    width: 300
  },
  submit: {
    margin: 'auto',
    marginBottom: theme.spacing.unit * 2
  }
});

class Signin extends Component {
  state = {
    email: '',
    password: '',
    error: '',
    redirectToReferrer: false
  };

  clickSubmit = () => {
    const user = {
      email: this.state.email || undefined,
      password: this.state.password || undefined
    };

    signin(user).then(data => {
      if (data.error) {
        this.setState({ error: data.error });
      } else {
        auth.authenticate(data, () => {
          this.setState({ redirectToReferrer: true });
        });
      }
    });
  };

  handleChange = name => event => {
    this.setState({ [name]: event.target.value });
  };

  render() {
    const { classes } = this.props;
    const { from } = this.props.location.state || {
      from: {
        pathname: '/'
      }
    };
    const { redirectToReferrer } = this.state;
    if (redirectToReferrer) {
      return <Redirect to={from} />;
    }

    return (
      <Card className={classes.card}>
        <CardContent>
          <Typography type="headline" component="h2" className={classes.title}>
            Sign In
          </Typography>
          <TextField
            id="email"
            type="email"
            label="Email"
            className={classes.textField}
            value={this.state.email}
            onChange={this.handleChange('email')}
            margin="normal"
          />
          <br />
          <TextField
            id="password"
            type="password"
            label="Password"
            className={classes.textField}
            value={this.state.password}
            onChange={this.handleChange('password')}
            margin="normal"
          />
          <br />{' '}
          {this.state.error && (
            <Typography component="p" color="error">
              <Icon color="error" className={classes.error}>
                error
              </Icon>
              {this.state.error}
            </Typography>
          )}
        </CardContent>
        <CardActions>
          <Button
            color="primary"
            variant="raised"
            onClick={this.clickSubmit}
            className={classes.submit}
          >
            Submit
          </Button>
        </CardActions>
      </Card>
    );
  }
}

export default withStyles(styles)(Signin);
This is a form component that contains email and password field (_as we defined in state above) for the user to enter to get authenticated. redirectToReferrer property in state is what we are using if the user gets verified by the server or not. If the credentials entered by the user are valid, this property will trigger Redirect component of react-router-dom.
Front-End: User Components
Similarly to our auth routes, we are going to separate our user components inside components/user/ folder. First, we need a React component to register a new user. Create a file called Signup.js.
import React, { Component } from 'react';
import Card from '@material-ui/core/Card';
import CardContent from '@material-ui/core/CardContent';
import CardActions from '@material-ui/core/CardActions';
import Button from '@material-ui/core/Button';
import TextField from '@material-ui/core/TextField';
import Typography from '@material-ui/core/Typography';
import Icon from '@material-ui/core/Icon';
import { withStyles } from '@material-ui/core/styles';
import DialogTitle from '@material-ui/core/DialogTitle';
import DialogActions from '@material-ui/core/DialogActions';
import DialogContentText from '@material-ui/core/DialogContentText';
import DialogContent from '@material-ui/core/DialogContent';
import Dialog from '@material-ui/core/Dialog';
import { Link } from 'react-router-dom';

import { registerUser } from '../../utils/api-user.js';

const styles = theme => ({
  card: {
    maxWidth: 600,
    margin: 'auto',
    textAlign: 'center',
    marginTop: theme.spacing.unit * 5,
    paddingBottom: theme.spacing.unit * 2
  },
  error: {
    verticalAlign: 'middle'
  },
  title: {
    marginTop: theme.spacing.unit * 2,
    color: theme.palette.openTitle
  },
  textField: {
    marginLeft: theme.spacing.unit,
    marginRight: theme.spacing.unit,
    width: 300
  },
  submit: {
    margin: 'auto',
    marginBottom: theme.spacing.unit * 2
  }
});

class Signup extends Component {
  state = {
    name: '',
    password: '',
    email: '',
    open: false,
    error: ''
  };

  handleChange = name => event => {
    this.setState({ [name]: event.target.value });
  };

  clickSubmit = () => {
    const user = {
      name: this.state.name || undefined,
      email: this.state.email || undefined,
      password: this.state.password || undefined
    };
    registerUser(user).then(data => {
      if (data.error) {
        this.setState({ error: data.error });
      } else {
        this.setState({ error: '', open: true });
      }
    });
  };

  render() {
    const { classes } = this.props;
    return (
      <div>
        <Card className={classes.card}>
          <CardContent>
            <Typography
              type="headline"
              component="h2"
              className={classes.title}
            >
              Sign Up
            </Typography>
            <TextField
              id="name"
              label="Name"
              className={classes.textField}
              value={this.state.name}
              onChange={this.handleChange('name')}
              margin="normal"
            />
            <br />
            <TextField
              id="email"
              type="email"
              label="Email"
              className={classes.textField}
              value={this.state.email}
              onChange={this.handleChange('email')}
              margin="normal"
            />
            <br />
            <TextField
              id="password"
              type="password"
              label="Password"
              className={classes.textField}
              value={this.state.password}
              onChange={this.handleChange('password')}
              margin="normal"
            />
            <br />{' '}
            {this.state.error && (
              <Typography component="p" color="error">
                <Icon color="error" className={classes.error}>
                  error
                </Icon>
                {this.state.error}
              </Typography>
            )}
          </CardContent>
          <CardActions>
            <Button
              color="primary"
              variant="raised"
              onClick={this.clickSubmit}
              className={classes.submit}
            >
              Submit
            </Button>
          </CardActions>
        </Card>
        <Dialog open={this.state.open} disableBackdropClick={true}>
          <DialogTitle>New Account</DialogTitle>
          <DialogContent>
            <DialogContentText>
              New account successfully created.
            </DialogContentText>
          </DialogContent>
          <DialogActions>
            <Link to="/signin">
              <Button color="primary" autoFocus="autoFocus" variant="raised">
                Sign In
              </Button>
            </Link>
          </DialogActions>
        </Dialog>
      </div>
    );
  }
}

export default withStyles(styles)(Signup);
We start the component by declaring an empty state that contains various properties such as name, email, password and error. The open property is used to capture the state of a Dialog box.
In Material UI, a Dialog is a type of modal window that appears in front of app content to provide critical information or ask for a decision. The modal in our case will either render an error message or the confirmation message depending on the status returned from the server.
We are also defining two handler functions. handleChange changes the new value of every input field entered. clickSubmit invokes when a user after entering their credentials, submit the registration form. This function calls registerUser from the API to send the data to the backend for further actions.
Create a new file called Profile.js.
import React, { Component } from 'react';
import { withStyles } from '@material-ui/core/styles';
import Paper from '@material-ui/core/Paper';
import ListItem from '@material-ui/core/ListItem';
import ListItemAvatar from '@material-ui/core/ListItemAvatar';
import ListItemText from '@material-ui/core/ListItemText';
import ListItemSecondaryAction from '@material-ui/core/ListItemSecondaryAction';
import Avatar from '@material-ui/core/Avatar';
import Typography from '@material-ui/core/Typography';
import Person from '@material-ui/icons/Person';
import Divider from '@material-ui/core/Divider';
import auth from '../auth/auth-helper';
import { findUserProfile } from '../../utils/api-user.js';
import { Redirect, Link } from 'react-router-dom';

import DeleteUser from './DeleteUser';

const styles = theme => ({
  root: theme.mixins.gutters({
    maxWidth: 600,
    margin: 'auto',
    padding: theme.spacing.unit * 3,
    marginTop: theme.spacing.unit * 5
  }),
  title: {
    margin: `${theme.spacing.unit * 3}px 0 ${theme.spacing.unit * 2}px`,
    color: theme.palette.protectedTitle
  }
});

class Profile extends Component {
  constructor({ match }) {
    super();
    this.state = {
      user: '',
      redirectToSignin: false
    };
    this.match = match;
  }
  init = userId => {
    const jwt = auth.isAuthenticated();
    findUserProfile(
      {
        userId: userId
      },
      { t: jwt.token }
    ).then(data => {
      if (data.error) {
        this.setState({ redirectToSignin: true });
      } else {
        this.setState({ user: data });
      }
    });
  };
  componentWillReceiveProps = props => {
    this.init(props.match.params.userId);
  };
  componentDidMount = () => {
    this.init(this.match.params.userId);
  };
  render() {
    const { classes } = this.props;
    const redirectToSignin = this.state.redirectToSignin;
    if (redirectToSignin) {
      return <Redirect to="/signin" />;
    }
    return (
      <Paper className={classes.root} elevation={4}>
        <Typography type="title" className={classes.title}>
          Profile
        </Typography>
        <List dense>
          <ListItem>
            <ListItemAvatar>
              <Avatar>
                <Person />
              </Avatar>
            </ListItemAvatar>
            <ListItemText
              primary={this.state.user.name}
              secondary={this.state.user.email}
            />{' '}
            {auth.isAuthenticated().user &&
              auth.isAuthenticated().user._id == this.state.user._id && (
                <ListItemSecondaryAction>
                  <DeleteUser userId={this.state.user._id} />
                </ListItemSecondaryAction>
              )}
          </ListItem>
          <Divider />
        </List>
      </Paper>
    );
  }
}

export default withStyles(styles)(Profile);
This component shows a single user who is authenticated by the back-end of our application. The profile information of each user is stored in the database. This is done by the init function we have defined above the render function of our component.
We are using redirectToSignin redirect to the user on sign-out. We are also adding a delete profile button as a separate component which has to be defined in a separate file called DeleteUser.js.
import React, { Component } from 'react';
import IconButton from '@material-ui/core/IconButton';
import Button from '@material-ui/core//Button';
import DialogTitle from '@material-ui/core/DialogTitle';
import DialogActions from '@material-ui/core/DialogActions';
import DialogContentText from '@material-ui/core/DialogContentText';
import DialogContent from '@material-ui/core/DialogContent';
import Dialog from '@material-ui/core/Dialog';
import Delete from '@material-ui/icons/Delete';
import auth from '../auth/auth-helper';
import { deleteUser } from '../../utils/api-user';
import { Redirect, Link } from 'react-router-dom';

class DeleteUser extends Component {
  state = {
    redirect: false,
    open: false
  };
  clickButton = () => {
    this.setState({ open: true });
  };
  deleteAccount = () => {
    const jwt = auth.isAuthenticated();
    deleteUser(
      {
        userId: this.props.userId
      },
      { t: jwt.token }
    ).then(data => {
      if (data.error) {
        console.log(data.error);
      } else {
        auth.signout(() => console.log('deleted'));
        this.setState({ redirect: true });
      }
    });
  };
  handleRequestClose = () => {
    this.setState({ open: false });
  };
  render() {
    const redirect = this.state.redirect;
    if (redirect) {
      return <Redirect to="/" />;
    }
    return (
      <span>
        <IconButton
          aria-label="Delete"
          onClick={this.clickButton}
          color="secondary"
        >
          <Delete />
        </IconButton>

        <Dialog open={this.state.open} onClose={this.handleRequestClose}>
          <DialogTitle>{'Delete Account'}</DialogTitle>
          <DialogContent>
            <DialogContentText>
              Confirm to delete your account.
            </DialogContentText>
          </DialogContent>
          <DialogActions>
            <Button onClick={this.handleRequestClose} color="primary">
              Cancel
            </Button>
            <Button
              onClick={this.deleteAccount}
              color="secondary"
              autoFocus="autoFocus"
            >
              Confirm
            </Button>
          </DialogActions>
        </Dialog>
      </span>
    );
  }
}

export default DeleteUser;
This component is used for deleting the user profile that exists in the database. It uses the same deleteUser API endpoint we defined in our back-end. deleteAccount method is responsible for handling this task.
Front-End: Completing the Navbar
In this section we are going to complete our client side routes by leveraging a Navbar component. Create a new file component/Navbar.js.
import React from 'react';
import AppBar from '@material-ui/core/AppBar';
import Toolbar from '@material-ui/core/Toolbar';
import Typography from '@material-ui/core/Typography';
import IconButton from '@material-ui/core/IconButton';
import Home from '@material-ui/icons/Home';
import Button from '@material-ui/core/Button';
import auth from './auth/auth-helper';
import { Link, withRouter } from 'react-router-dom';

const isActive = (history, path) => {
  if (history.location.pathname == path) return { color: '#F44336' };
  else return { color: '#ffffff' };
};
const Menu = withRouter(({ history }) => (
  <AppBar position="static">
    <Toolbar>
      <Typography type="title" color="inherit">
        MERN App
      </Typography>
      <Link to="/">
        <IconButton aria-label="Home" style={isActive(history, '/')}>
          <Home />
        </IconButton>
      </Link>
      {!auth.isAuthenticated() && (
        <span>
          <Link to="/signup">
            <Button style={isActive(history, '/signup')}>Sign up</Button>
          </Link>
          <Link to="/signin">
            <Button style={isActive(history, '/signin')}>Sign In</Button>
          </Link>
        </span>
      )}
      {auth.isAuthenticated() && (
        <span>
          <Link to={'/user/' + auth.isAuthenticated().user._id}>
            <Button
              style={isActive(
                history,
                '/user/' + auth.isAuthenticated().user._id
              )}
            >
              My Profile
            </Button>
          </Link>
          <Button
            color="inherit"
            onClick={() => {
              auth.signout(() => history.push('/'));
            }}
          >
            Sign out
          </Button>
        </span>
      )}
    </Toolbar>
  </AppBar>
));

export default Menu;
This Navbar component will allow us to access routes as views on the front-end. From react-router we are importing a High Order Component called withRouter to get access to history object’s properties and consume our front-end routes dynamically.
Using Link from react-router and auth.isAuthenticated() from our authentication flow, we are checking for whether the user has access to authenticated routes or not, that is, if they are logged in to our application or not.
isActive highlights the view to which the current route is activated by the navigation component.
Running the Application
The next step is to import this navigation component inside Routes.js and define other necessary routes we need in our app. Open Routes.js and add the following.
import React, { Component } from 'react';
import { Route, Switch } from 'react-router-dom';
import Navbar from './components/Navbar';

import Home from './components/Home';
import PrivateRoutes from './components/auth/PrivateRoutes';
import Signin from './components/auth/Signin';
import Profile from './components/user/Profile';
import Signup from './components/user/Signup';

class Routes extends Component {
  render() {
    return (
      <div>
        <Navbar />
        <Switch>
          <Route exact path="/" component={Home} />
          <PrivateRoutes path="/user/edit/:userId" />
          <Route path="/user/:userId" component={Profile} />
          <Route path="/signup" component={Signup} />
          <Route path="/signin" component={Signin} />
        </Switch>
      </div>
    );
  }
}

export default Routes;
After completing this test, let’s test our application. Make sure you are running the backend server using nr dev command in one tab in your terminal. Using another tab or window, traverse to client directory and run the command yarn start. Once the application starts, you will be welcomed by the Homepage, as below.
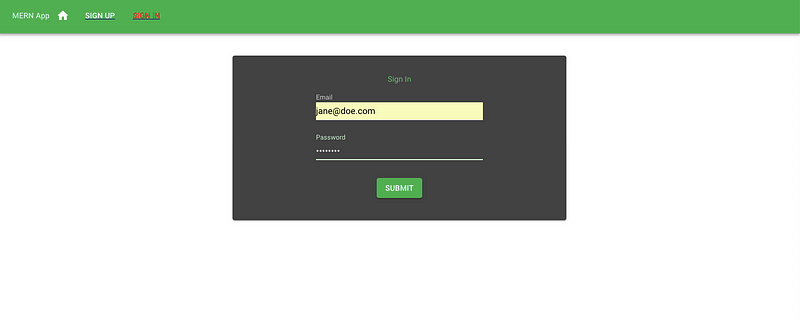
Notice in the navbar above there are three buttons. The home icon is for Home page highlighted red in color. If you move on to the sign in page, you will see the sign in button highlighted. We already have one user registered to our application (when we were building the API). Please enter the credentials (email: jane@doe.com and password: pass1234 or the credentials you entered) as shown below and submit the form.
On submitting the form you will be redirected to the home page as per the component logic. The changes can be noticed at the navigation menu. Instead of sign-up and sign-in, you will see My Profile and Sign Out button. Click My Profile and you can see the current user’s details.
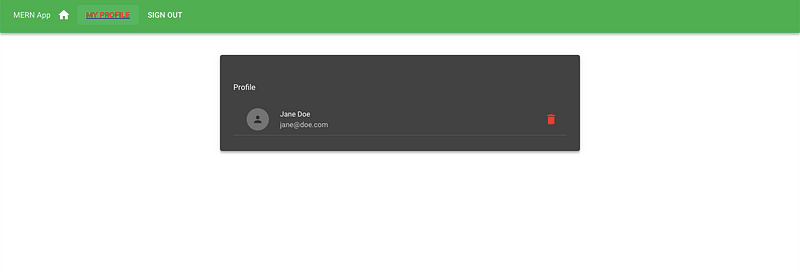
On clicking the delete icon it will delete the user. You can also try signing out of the application by clicking on the sign out button from navigation and then you will be redirected to the home page.
Conclusion
We have reached the end. Even though this tutorial is lengthy and, a lot is going on, I am sure if you take your time, you will understand the concepts and the logic behind it. It is after all, a full-stack MERN application. It uses JSON Web Tokens as an authentication strategy.
If you want to learn how to deploy this application, you can continue to read this article.
The complete code for the tutorial at this Github repository
