In this article, I am going to walk you through setting up your own Node.js backend server for a React application. Both frameworks are often used together to build real time, fullstack web applications. A database, such as MySQL, Postgresql, or a NoSQL database such as MongoDB, is used to store information. For brevity’s sake, I will not use a database in this walkthrough.
Requirements: You need Node.js and npm installed on your local machine as well as create-react-app installed as a global dependency. If you do not have it, run the following command and install it.
npm install -g create-react-appIn some cases, you might have to give root permissions when installing a global dependency.
For the Nodejs backend, I am going to use HapiJS. If you are not familiar with it, it will be fun as you will be learning a lot of new things.
Getting Started with the Backend
To start, we need an empty directory inside which we can have our server and client live alongside each other. Initialize it by running the command npm init and you are ready to install Hapijs as a framework to build the web server.
npm install hapi --saveAfter Express, Hapi is quite popular among teams and individuals who write the server side of their application using Node. Hapi is currently being used by organizations such as Walmart and Yahoo and has an active community. After the dependency is successfully installed, create a new file called server.js.
'use strict';

const Hapi = require('hapi');

// Create a server with a host and port
const server = Hapi.server({
  host: 'localhost',
  port: 8000
});

// Add the route
server.route({
  method: 'GET',
  path: '/',
  handler: (request, h) => {
    return 'hello world';
  }
});

// Start the server
async function start() {
  try {
    await server.start();
  } catch (err) {
    console.log(err);
    process.exit(1);
  }

  console.log('Server running at:', server.info.uri);
}

start();
This is the most basic server you can create using Hapi.
We start as usual by requiring Hapijs dependency and create a new object with a configuration of our own. See the host and port above.
After that, we add a simple route that uses HTTP method GET and has a handler function or usually called a callback function to return the response back to the client when a request comes in. Lastly, we are creating an asynchronous function to bootstrap the server using async/await syntax.
The async/await requires you to add a try/catch block every time you want to catch the errors. We console.log in case any error occurs running the program and use Nodejs global process object to make sure that program exits gracefully in case of one. To see it in action, run node server.js and it will eventually run on port 8000.

Setting up a React app
Now that we have built our server, let us create the front end of our application. We have already installed the main ingredient we need to start with. Open your terminal and type:
create-react-app clientThis will create a react application named client inside the folder where we previously built our server. Simple as that.
Now you can traverse to the client directory and run the React app separately on a different port. However, this is not what we want.
The proxy
We want a setup that will make our React app and use the server URL as a global variable. This is easier than you might think.
Navigate to client directory and locate package.json file. Add the following configuration to it.
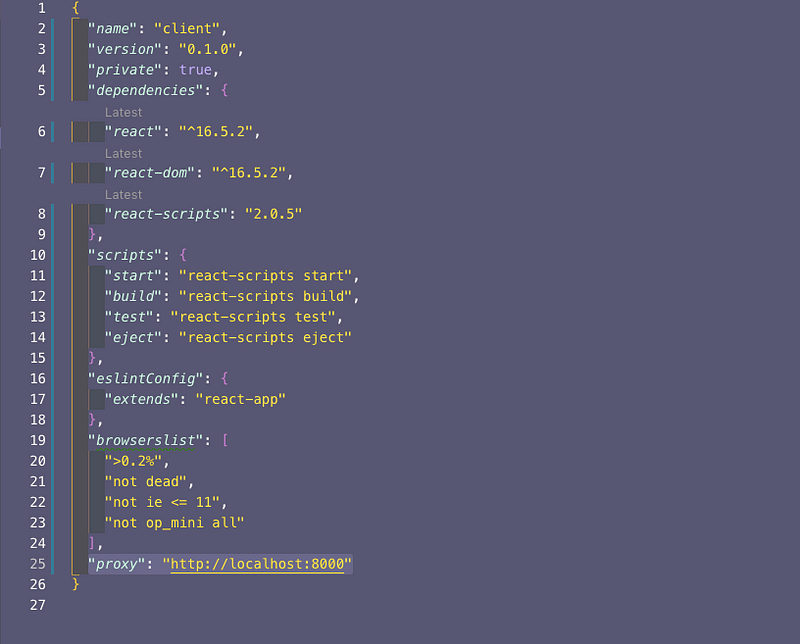
And that’s it. This is all you need to do. But wait! How is this even possible? The answer lies with the create-react-app.
create-react-app does all this automatically and behind the scene because it is using webpack.
Webpack has a development server that uses a proxy to handle the API server or in other terms, it requests to our Hapi server running on port 8000. This is one of the biggest advantages I have found for using create-react-app so far. Webpack handles all the configuration.
Conclusion: Running the app
Let us now test a route that sends the data from the Hapi backend server to React front-end side whenever a request comes from the client. Create a route /mockin server.js to serve the data the dummy data defined as an array data itself.
'use strict';
const Hapi = require('hapi');
// mock data
const data = [
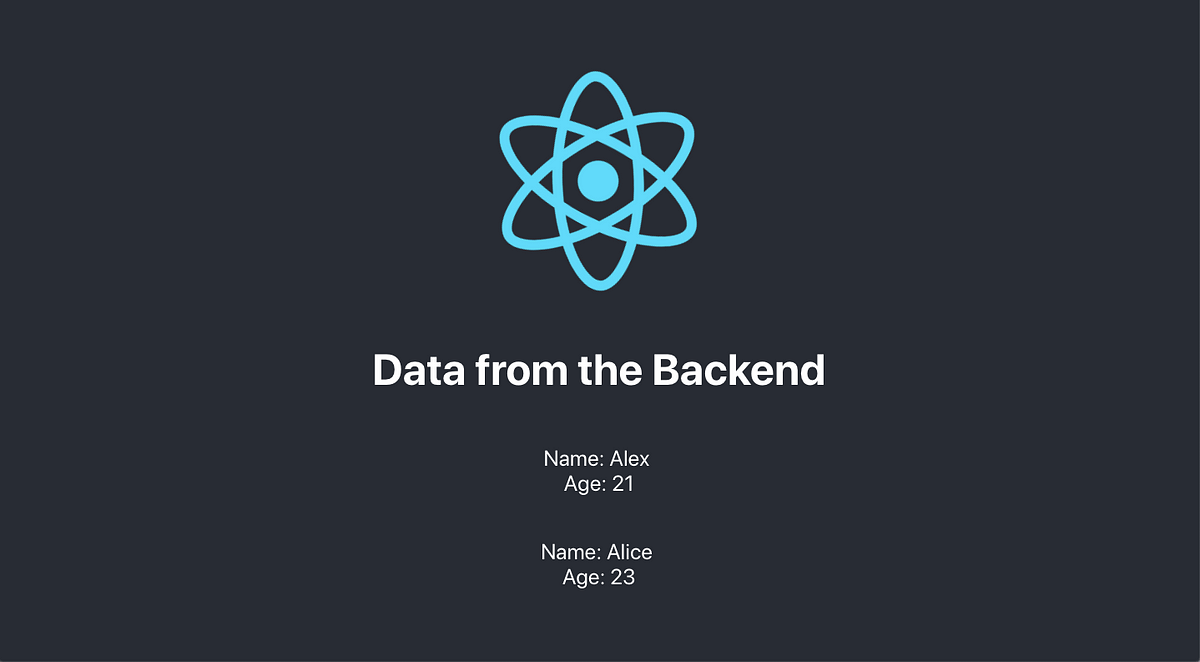
{ id: 1, name: 'Alex', age: 21 },
{ id: 2, name: 'Alice', age: 23 }
];
// Create a server with a host and port
const server = Hapi.server({
host: 'localhost',
port: 8000
});
// Add the route
server.route({
method: 'GET',
path: '/',
handler: (request, h) => {
return 'hello world';
}
});
server.route({
method: 'GET',
path: '/mock',
handler: (request, h) => {
return { data };
}
});
// Start the server
async function start() {
try {
await server.start();
} catch (err) {
console.log(err);
process.exit(1);
}
console.log('Server running at:', server.info.uri);
}
start();To test this route, let us use REST client like POSTMAN or Insomnia and see if the data is being requested at the route /mock.

Now let us display this data in our front end. Traverse to client/App.js file and do the following.
import React, { Component } from 'react';
import logo from './logo.svg';
import './App.css';

class App extends Component {
  state = {
    data: []
  };

  componentDidMount() {
    this.fetchData()
      .then(res => this.setState(res))
      .catch(err => console.log(err));
  }

  fetchData = async () => {
    const response = await fetch('/mock');
    const body = response.json();

    return body;
  };

  render() {
    return (
      <div className="App">
        <header className="App-header">
          <img src={logo} className="App-logo" alt="logo" />
          <h1>Data from the Backend</h1>
          {this.state.data.map(person => (
            <p key={person.id}>
              Name: {person.name} <br /> Age: {person.age}
            </p>
          ))}
        </header>
      </div>
    );
  }
}

export default App;
We start by defining a local state that will contain the data coming from the backend inside componentDidMount() life-cycle hook method. This further calls the asynchronous methodfetchData() that actually requests the data from the API url /mock. Since we have already defined the complete URL as proxy we do not have to write the complete url.
Finally, we are able to see the data as below.
You can find the complete source code for the above article at Github Repo