Internationalization is an important feature to overcome the language barrier among people who use a particular software application. Not every app requires us to consider a global customer base. But if you have plans to include support for international users in your app, you’ll need internationalization in your React Native app.
i18next is an internationalization framework written in JavaScript and provides methods for localizing the app and implementing the other standard i18n features.
In this tutorial, let’s take a look at the steps to add multi-language support to a React Native app using i18n.
Prerequisites
To follow this tutorial, please make sure you are familiarized with JavaScript/ES6, basics of React and meet the following requirements in your local dev environment:
- Node.js version
12.x.xor above installed. - Have access to one package manager such as npm or yarn or npx.
- react-native-cli installed, or use npx.
Setting up a React Native app
After initializing a React Native project, make sure to install the external libraries to follow along with this tutorial. Navigate inside the project directory, and then run the following command install the following libraries:
yarn add react-i18next i18next @react-navigation/native @react-navigation/bottom-tabs @react-native-async-storage/async-storage react-native-vector-icons react-native-screens react-native-safe-area-context react-native-reanimated react-native-localize react-native-gesture-handler

# after this step, for iOS, install pods
npx pod-install ios
React Native Vector Icons will be used for adding icons in the app. React Navigation is used to add and enable navigation between screens in the app. Make sure to initialize and configure navigation as described in React Navigation library getting started doc.
The following libraries are going to be used for adding multi-language support to the app:
i18next: internationalization library.react-i18next: provides binding for React and React Native projects using Hooks, High Order Components (HOCs), and so on. We will use theuseTranslationhook to translate the text within React Native function components.react-native-localize: provides helper functions to figure based on the device’s localized language preference.@react-native-async-storage/async-storage: is an unencrypted, asynchronous, persistent, key-value storage system that is global to the app. It is used to store the user’s language preference such that it persists when the app restarts.
🔥 Tip: Always make sure to check out installation steps in the documentation of libraries installed in a React Native app. Some may differ and change over time. It’s hard to keep a blog post up to date with all these changes.
Building a React Native app
After installing libraries, let’s setup the React Native app with mock screens and navigation.
Create a src/ folder inside the project root directory and inside it, create the following files and folders:
/constants/translationsIMLocalize.js
/navigationRootNavigator.js
/screens/HomeScreen.jsSettingsScreen.js
/componentsLanguageSelector.js
Start by adding a RootNavigator.js file inside the /navigation folder. It will have both screens as tabs and some configuration to display an icon and a label for each tab.
import * as React from 'react';
import { Text, View } from 'react-native';
import { NavigationContainer } from '@react-navigation/native';
import { createBottomTabNavigator } from '@react-navigation/bottom-tabs';
import Ionicons from 'react-native-vector-icons/dist/Ionicons';

import HomeScreen from '../screens/HomeScreen';
import SettingsScreen from '../screens/SettingsScreen';

const Tab = createBottomTabNavigator();

export default function RootNavigator() {
  return (
    <NavigationContainer>
      <Tab.Navigator
        screenOptions={({ route }) => ({
          tabBarIcon: ({ focused, color, size }) => {
            let iconName;

            if (route.name === 'Home') {
              iconName = focused ? 'ios-home' : 'ios-home-outline';
            } else if (route.name === 'Settings') {
              iconName = focused ? 'ios-settings' : 'ios-settings-outline';
            }

            return <Ionicons name={iconName} size={size} color={color} />;
          },
          tabBarActiveTintColor: 'tomato',
          tabBarInactiveTintColor: 'gray',
          headerShown: false
        })}
      >
        <Tab.Screen name="Home" component={HomeScreen} />
        <Tab.Screen name="Settings" component={SettingsScreen} />
      </Tab.Navigator>
    </NavigationContainer>
  );
}
Next, let’s add code snippets for screens. In HomeScreen.js, add the following code. For now, it only displays a Text component:
import React from 'react';
import { Text, View } from 'react-native';

export default function HomeScreen() {
  return (
    <View style={{ flex: 1, justifyContent: 'center', alignItems: 'center' }}>
      <Text>Home</Text>
    </View>
  );
}
Similarly, the SettingsScreen.js file will also display a Text component:
import React from 'react';
import { Text, View } from 'react-native';

export default function SettingsScreen() {
  return (
    <View style={{ flex: 1, justifyContent: 'center', alignItems: 'center' }}>
      <Text>Settings!</Text>
    </View>
  );
}
Now, modify the App.js file to add the following code snippet:
import React from 'react';

import RootNavigator from './src/navigation/RootNavigator';

export default function App() {
  return <RootNavigator />;
}
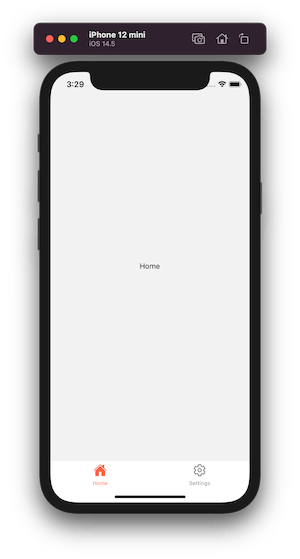
At this point, if you run the npx react-native run-ios or npx react-native run-android command, you should see the following screen on a simulator/emulator or on a device:

Create translation files
Initially, we will like to translate tab names based on the language selected within the app. To do this, we need to create translation config files.
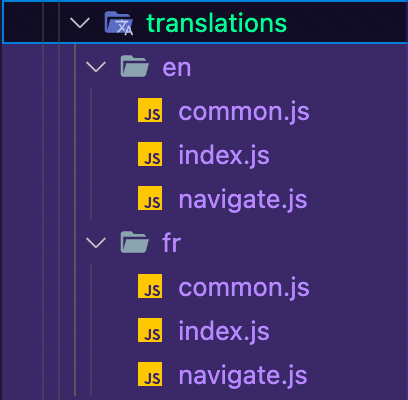
You can organize these translation files in the way you want, but here we are following a pattern. Inside constants/translations/ directory, let’s create subdirectories for each language to support in this demo app. The languages supported here are en for English and fr for French.
Inside each language directory, create separate files that will split the translations from commonly used text to translate specific texts such as for tab navigation labels. Under i18n, this separation leads to creating namespaces for each language. Later in the tutorial, you will see how to access the value of a key, for example, home from the namespace navigation to translate the tab bar label.
Here is how the directory structure would like under translations/:

Inside en/common.js file, add the following snippet:
export default {
  hello: 'Hello',
  languageSelector: 'Select Your Language'
};
Inside en/navigate.js file, add the following code snippet:
export default {
  hello: 'Bonjour',
  languageSelector: 'Sélecteur de langue'
};
Next, inside add translated tab labels for each language in their corresponding navigate.js files:
// en/navigate.js
export default {
  home: 'Home!',
  settings: 'Settings'
};


// fr/navigate.js
export default {
  home: 'Écran principal',
  settings: 'Le réglage'
};
Lastly, export these translated texts:
// en/index.js
import common from './common';
import navigate from './navigate';

export default {
  common,
  navigate
};

// fr/index.js
import common from './common';
import navigate from './navigate';

export default {
  common,
  navigate
};
Adding multi-language support configuration
Now that you have translation files ready and dependencies installed, let’s configure how to create a configuration using those libraries installed earlier.
All of this configuration will live inside IMLocalize.js file. Start by importing the following dependencies. Also, define a LANGUAGES object that requires each language file as an object and using JavaScript syntax of Object.keys convert the LANGUAGES object to an array.
import i18n from 'i18next';
import { initReactI18next } from 'react-i18next';
import AsyncStorage from '@react-native-async-storage/async-storage';
import * as RNLocalize from 'react-native-localize';

import en from './translations/en';
import fr from './translations/fr';

const LANGUAGES = {
  en,
  fr
};

const LANG_CODES = Object.keys(LANGUAGES);
The i18n is configured in a certain way. The initial step it requires is to detect a language. Hence, define your own custom language detector. It will check the user’s stored language preference when the app starts. If the user’s language preference is not available, you will need to define a fallback language or find the best available language to fall back on.
Create a LANGUAGE_DETECTOR configuration object:
const LANGUAGE_DETECTOR = {
  type: 'languageDetector',
  async: true,
  detect: callback => {
    AsyncStorage.getItem('user-language', (err, language) => {
      // if error fetching stored data or no language was stored
      // display errors when in DEV mode as console statements
      if (err || !language) {
        if (err) {
          console.log('Error fetching Languages from asyncstorage ', err);
        } else {
          console.log('No language is set, choosing English as fallback');
        }
        const findBestAvailableLanguage =
          RNLocalize.findBestAvailableLanguage(LANG_CODES);

        callback(findBestAvailableLanguage.languageTag || 'en');
        return;
      }
      callback(language);
    });
  },
  init: () => {},
  cacheUserLanguage: language => {
    AsyncStorage.setItem('user-language', language);
  }
};
Then, add the configuration initialize i18n. It will start by detecting the language, passing the i18n instance to react-i18next, and initializes using some options. This option makes i18n available for all React Native components.
i18n
  // detect language
  .use(LANGUAGE_DETECTOR)
  // pass the i18n instance to react-i18next.
  .use(initReactI18next)
  // set options
  .init({
    resources: LANGUAGES,
    react: {
      useSuspense: false
    },
    interpolation: {
      escapeValue: false
    },
    defaultNS: 'common'
  });
These options may vary depending on your React Native project. We recommend you to go through available configuration options for i18n.
Next, import the IMLocalize file in App.js file:
// after other import statements
import './src/constants/IMLocalize';
Creating a Language Selector component
Since you have initialized the languages in the React Native app, the next step is to allow the user to select between different languages available inside the app.
Inside LanguageSelector.js file, start by importing the following libraries:
import React from 'react';
import { View, Text, StyleSheet, Pressable } from 'react-native';
import Ionicons from 'react-native-vector-icons/dist/Ionicons';
import { useTranslation } from 'react-i18next';
The useTranslation hook will allow accessing i18n instance inside this custom component which is used to change the language.
Next, define an array of LANGUAGES.
const LANGUAGES = [
  { code: 'en', label: 'English' },
  { code: 'fr', label: 'Français' }
];
Then, define the function component Selector. It will allow the user to switch between different languages inside the app and also enlist the available languages.
It will get the currently selected language from the i18n instance. Using a handler method called setLanguage, you can allow the functionality to switch between different languages from the LANGUAGES array defined above this function component.
This function component uses Pressable from React Native to change the language.
const LANGUAGES = [
  { code: 'en', label: 'English' },
  { code: 'fr', label: 'Français' }
];

const Selector = () => {
  const { i18n } = useTranslation();
  const selectedLanguageCode = i18n.language;

  const setLanguage = code => {
    return i18n.changeLanguage(code);
  };

  return (
    <View style={styles.container}>
      <View style={styles.row}>
        <Text style={styles.title}>Select a Language</Text>
        <Ionicons color="#444" size={28} name="ios-language-outline" />
      </View>
      {LANGUAGES.map(language => {
        const selectedLanguage = language.code === selectedLanguageCode;

        return (
          <Pressable
            key={language.code}
            style={styles.buttonContainer}
            disabled={selectedLanguage}
            onPress={() => setLanguage(language.code)}
          >
            <Text
              style={[selectedLanguage ? styles.selectedText : styles.text]}
            >
              {language.label}
            </Text>
          </Pressable>
        );
      })}
    </View>
  );
};

const styles = StyleSheet.create({
  container: {
    paddingTop: 60,
    paddingHorizontal: 16
  },
  row: {
    flexDirection: 'row',
    alignItems: 'center',
    justifyContent: 'space-between'
  },
  title: {
    color: '#444',
    fontSize: 28,
    fontWeight: '600'
  },
  buttonContainer: {
    marginTop: 10
  },
  text: {
    fontSize: 18,
    color: '#000',
    paddingVertical: 4
  },
  selectedText: {
    fontSize: 18,
    fontWeight: '600',
    color: 'tomato',
    paddingVertical: 4
  }
});

export default Selector;
Import the Selector component inside the SettingsScreen.js file:
import React from 'react';
import { View } from 'react-native';

import Selector from '../components/LanguageSelector';

export default function SettingsScreen() {
  return (
    <View style={{ flex: 1, backgroundColor: '#fff' }}>
      <Selector />
    </View>
  );
}
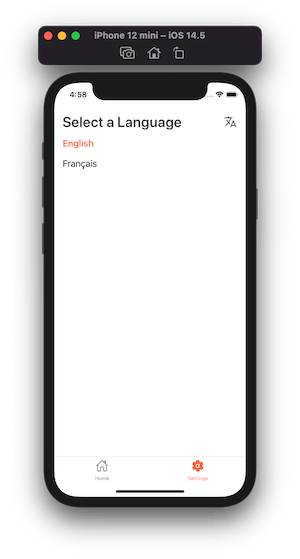
Here is the output in the simulator after this step:

Using the useTranslation hook
The useTranslation hook has two important functions that you can utilize inside your React Native app. You have already seen the first one (i18n instance) in the previous step. The next is called t (my personal guess is that it is short for translation) function. You can refer the namespaces defined in the translation files and pass them as arguments to this function.
Let’s see that in action. Let’s start with the LanguageSelector component itself. It has a title called Select a Language. While defining the translation files, we’ve already defined its translation in both English and French languages in their corresponding common.js files.
The initial step to getting the t function is to import the useTranslation hook. However, the LanguageSelector.js file already has it from the previous section.
Modify the following line to get the t function from the hook inside the Selector component:
const { t, i18n } = useTranslation();Next, modify the Text component contents used to define the title:
<Text style={styles.title}>{t('common:languageSelector')}</Text>Here is the output. The default or the initial language in our case is English. When the next language is selected, it translates the title on the Settings screen.

You can also modify the text strings according to the previously defined namespaces in the translation files.
For an example, the RootNavigator will be modified as follows:
import * as React from 'react';
import { Text, View } from 'react-native';
import { NavigationContainer } from '@react-navigation/native';
import { createBottomTabNavigator } from '@react-navigation/bottom-tabs';
import Ionicons from 'react-native-vector-icons/dist/Ionicons';
import { useTranslation } from 'react-i18next';

import HomeScreen from '../screens/HomeScreen';
import SettingsScreen from '../screens/SettingsScreen';

const Tab = createBottomTabNavigator();

export default function RootNavigator() {
  const { t } = useTranslation();
  return (
    <NavigationContainer>
      <Tab.Navigator
        screenOptions={({ route }) => ({
          tabBarIcon: ({ focused, color, size }) => {
            let iconName;

            if (route.name === 'Home') {
              iconName = focused ? 'ios-home' : 'ios-home-outline';
            } else if (route.name === 'Settings') {
              iconName = focused ? 'ios-settings' : 'ios-settings-outline';
            }

            return <Ionicons name={iconName} size={size} color={color} />;
          },
          tabBarActiveTintColor: 'tomato',
          tabBarInactiveTintColor: 'gray',
          headerShown: false
        })}
      >
        <Tab.Screen
          name="Home"
          component={HomeScreen}
          options={{ tabBarLabel: t('navigate:home') }}
        />
        <Tab.Screen
          name="Settings"
          component={SettingsScreen}
          options={{ tabBarLabel: t('navigate:settings') }}
        />
      </Tab.Navigator>
    </NavigationContainer>
  );
}
Here is the final output:

Conclusion
This completes our tutorial on how to add multi-language support in a React Native app. There are different strategies you can use inside your app to provide translation support. This tutorial is just one of the examples.
Please don’t mind my translation for French text corresponding to English text. I am not good at it at all. 😅
Useful Links