Geolocation as an API has different methods that can be used in a web application. But it’s also a powerful API for mobile development. Ride share mobile apps like Uber, map app like Google Maps, and location features implemented in apps like Instagram depend on using this API. React Native takes advantage of this API and its available methods by extending the Geolocation Web specification.
The Geolocation API returns different methods such as getCurrentPosition to get the current location and watchPosition to subscribe to location updates. They are available in React Native as polyfill.
Along with this, you’re going to implement a real-time feature to ask user permissions. Permissions in react-native-cli can be a bit tricky, but after reading this article, it should be much easier.
What are we building?
In this tutorial, we’ll start by going to use basic methods from the Geolocation API and then build a complete app in React Native using a react-native command-line interface tool.
The outcome of following this tutorial is going to be a complete React Native weather application that consumes weather data from a third-party API and presents that data in a simple UI.
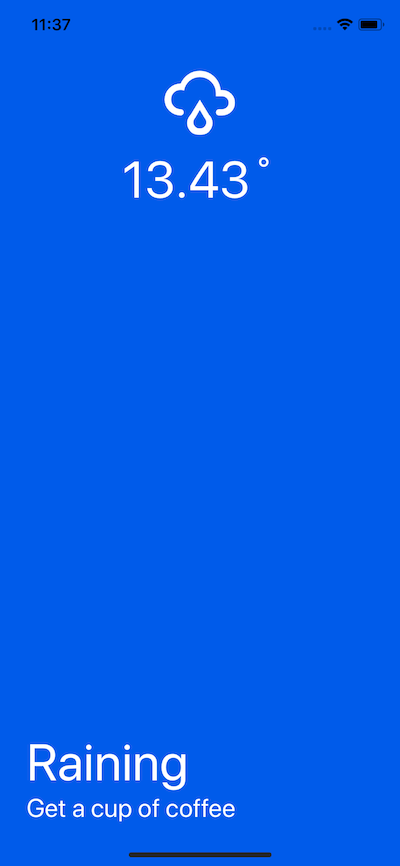
Table of Contents
- Getting Started with
react-native-cli - Accessing Geolocation API
- Setting Permissions for iOS and Android
- Building the Weather App: First Steps
- The Loading Component
- Weather Screen
- Fetching the Data
- Adding Dynamic Weather Conditions
- Conclusion
Prerequisites
To follow this tutorial, please make sure you have the following installed on your local development environment and have access to the services mentioned below:
- Node.js (>=
8.x.x) with npm/yarn installed. react-nativeCLI tool with a version equal to or above2.0.1. You can install the CLI tool with the following command.
npm install -g react-native-cliPlease note that, throughout this tutorial, I’ll be using an iOS simulator to demonstrate the application.
Getting Started
To get started, we need to initialize a new React Native project. Run the command below:
react-native init geoWeatherAppThen traverse into the newly-created directory and run the following commands to see if everything is working fine.
cd geoWeatherApp
npm run start
## in second tab/window terminal
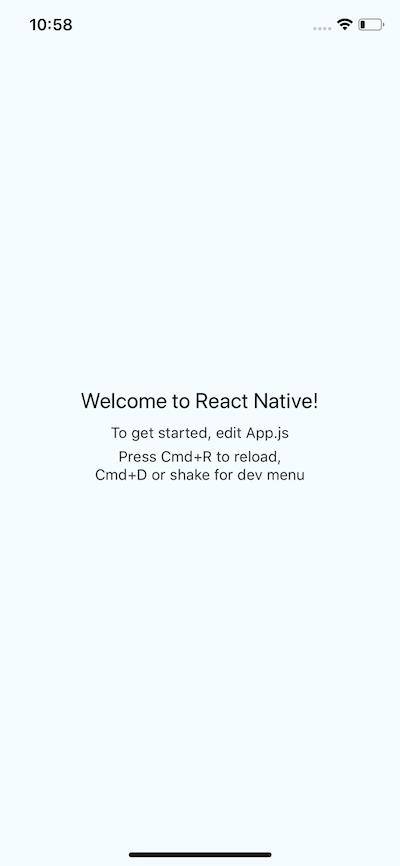
react-native run-iosThe second command will run the build process for the iOS platform. You can run react-native run-android if you wish to you use an Android emulator. Since our application is ‘bare minimum’ right now and doesn’t contain much source code, except in the App.js file, you’ll see the image below when the app runs for the first time in the simulator.
If you take a look at the project structure, you’ll notice that there are separate build folders such as /android and /ios for each platform to bootstrap the application.
Accessing the Geolocation API
The Geolocation API exists as a global object called navigator object in React Native, just like the web. It’s accessible through navigator.geolocation in our source code, and there’s no need to import it.
For our demonstration purposes, we’ll use the getCurrentPosition method from the Geolocation API. This method allows a mobile app to request a user’s location and accepts three parameters: success callback, error callback, and a configuration object.
We’ll only modify the App.js file with the following code:
// App.js

import React, { Component } from 'react';
import { Alert, StyleSheet, Text, View, TouchableOpacity } from 'react-native';

export default class App extends Component {
	state = {
		location: null
	};

	findCoordinates = () => {
		navigator.geolocation.getCurrentPosition(
			position => {
				const location = JSON.stringify(position);

				this.setState({ location });
			},
			error => Alert.alert(error.message),
			{ enableHighAccuracy: true, timeout: 20000, maximumAge: 1000 }
		);
	};

	render() {
		return (
			<View style={styles.container}>
				<TouchableOpacity onPress={this.findCoordinates}>
					<Text style={styles.welcome}>Find My Coords?</Text>
					<Text>Location: {this.state.location}</Text>
				</TouchableOpacity>
			</View>
		);
	}
}

const styles = StyleSheet.create({
	container: {
		flex: 1,
		justifyContent: 'center',
		alignItems: 'center',
		backgroundColor: '#F5FCFF'
	},
	welcome: {
		fontSize: 20,
		textAlign: 'center',
		margin: 10
	}
Observe the function findCoordinates. It holds the logic of fetching a device’s current location. We’re also using the local state object to store and display the returned data object provided by position.

When you click the text Find My Coords? (it’s touchable since we’re using TouchableOpacity) it will first ask for permission, as shown below.
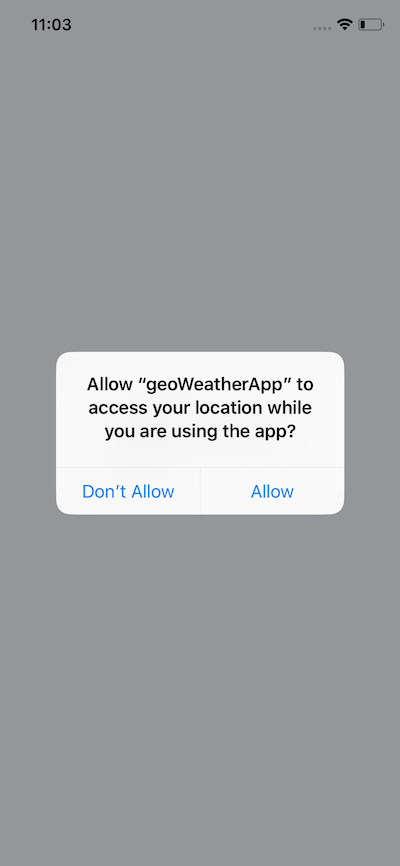
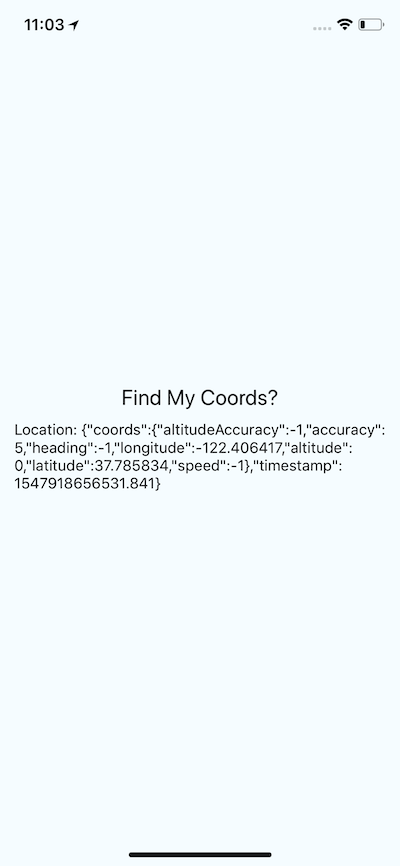
Note that even in development mode and while running the app in a simulator, permission is only asked for once. To perform this again, you’ll have to delete the app from your simulator and re-run the command to start the Expo app. When permission is granted, it will fetch the result, store it in the app’s state, and display the returned object:
Setting Permissions for iOS and Android
In iOS, geolocation is enabled by default when a project is created using the react-native-cli. To use it, we just need to include a key in info.plist, which is inside the ios/geoWeatherApp directory.

That field is already there if you check the file. In order to enable geolocation in the background, you need to include the NSLocationAlwaysUsageDescription key in info.plist file and add location as a background mode in the Capabilities tab through Xcode. Also, if you’re using CocoaPods for React Native, make sure to include the RCTGeolocation sub-podspec.
For Android, we need to add the following line in our android/app/src/AndroidManifest.xml file.
<uses-permission android:name="android.permission.ACCESS_FINE_LOCATION" />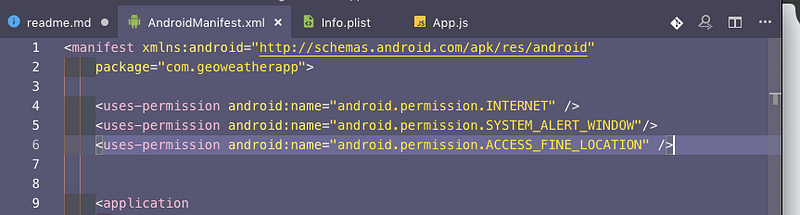
Now if you run your application in the Android Emulator, you’ll see the same welcome screen as shown before in the iOS simulator. Click on the text Find My Coords? and you’ll be prompted to ask whether to allow the application to request the user’s location or not.
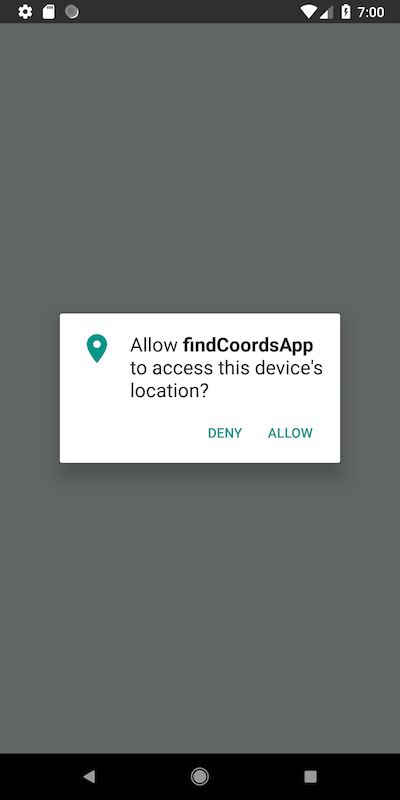
If you press allow, you’ll see the following result.
You can find the complete code for this part of the tutorial in the repository below.
Building the Weather App: First Steps
In this section, we’re going to take what we learned in the last section and build a complete weather application using a third party weather API provider—such as the OpenWeatherMap API—and our current Geolocation API knowledge.
First, we need to gather the API key from OpenWeatherMap. Sign in or make a new account if you don’t already have one (it’s free, no worries). Using this API, we’re going to build a simple mobile application that uses a mobile device’s geolocation. The coordinates from a user’s location will be passed to the OpenWeatherMap API which, in return, will give us a forecast for that location.
Once you’re logged in, visit https://home.openweathermap.org/api_keys to fetch your API key. There’s a default API key provided by OpenWeatherMap, so we’re going to use that in our project.
Now, open up your App.js file and enter the following snippet of code to see if everything is working well:
// App.js
import React from 'react';
import { StyleSheet, Text, View } from 'react-native';

export default class App extends React.Component {
  render() {
    return (
      <View style={styles.container}>
        <Text>Minimalist Weather App</Text>
      </View>
    );
  }
}

const styles = StyleSheet.create({
  container: {
    flex: 1,
    backgroundColor: '#fff',
    alignItems: 'center',
    justifyContent: 'center'
  }
});
And you’ll see the following output is rendered.

The next step is to install react-native-vector-icons. If you’ve already installed react-native-vector-icons, then you can skip this step. Otherwise, enter the following command in your terminal window.
npm install -S react-native-vector-iconsThe last step in this process is to link our newly-installed library.
react-native link react-native-vector-iconsWhy do we have to perform this last command? All third-party libraries in React Native have some native dependencies that use platform-specific capabilities for iOS and/or Android. Linking these native dependencies with the react-native link command indicates that a library’s native dependencies are linked successfully to your iOS/Android project.
Whenever you link a library, you’ll always get a prompt message informing you whether the library has been successfully linked or not. Since we’ve already added permissions to ask and access a user’s location in this project, we can skip this and continue to the next step. If you’re building this project from scratch, you can go back to the section Setting Permissions for iOS and Android and add the necessary permissions.
The Loading Component
In this step, we’ll develop our first screen—a loading screen. Inside the App.js file, start by defining a local state:
import React from 'react';
import { StyleSheet, Text, View } from 'react-native';

export default class App extends React.Component {
  state = {
    isLoading: true
  };

  render() {
    const { isLoading } = this.state;
    return (
      <View style={styles.container}>
        {isLoading ? null : (
          <View>
            <Text>Minimalist Weather App</Text>
          </View>
        )}
      </View>
    );
  }
}

const styles = StyleSheet.create({
  container: {
    flex: 1,
    backgroundColor: '#fff',
    alignItems: 'center',
    justifyContent: 'center'
  }
});
The code above states that when the value of local state for isLoading is false, it’s going show the name of the value of the <Text> component, which in this case is the name of the application. This is what we’re going to render.
Later on, instead of displaying the name of the application, we’ll show the weather info here, once our API has successfully fetched the data. For now, let’s stick to this message so we can first work on the question: What if our app is in the state of loading? Let’s add the message text to indicate that the app is fetching the data. Change the content of render():
render() {
    const { isLoading } = this.state;
    return (
      <View style={styles.container}>
        {isLoading ? (
          <Text>Fetching The Weather</Text>
        ) : (
          <View>
            <Text>Minimalist Weather App</Text>
          </View>
        )}
      </View>
    );
}
Right now, if you change to value of isLoading to true, you’ll notice the below screen appear.

Note: After testing for the above screen, make sure you set the default value of
isLoadingto false.
Weather Screen
We’ll define a new weather component at ./components/Weather.js. The boilerplate code for every weather condition screen is going to be the same. It will be divided into two views—a header and a body. The header will show the weather condition icon and temperature, and the body will display the text associated with the weather condition.
In Weather.js, we start by defining two containers inside the main container: headerContainer and bodyContainer. Do note that we’re defining the Weather component not as a class but as a function in order to receive props and since it won’t be managing a state.
// Weather.js
import React from 'react';
import { View, Text, Stylesheet } from 'react-native';
const Weather = () => {
return (
<View style={styles.container}>
<View style={styles.headerContainer} />
<View style={styles.bodyContainer} />
</View>
);
};
const styles = StyleSheet({
container: {
flex: 1
},
headerContainer: {},
bodyContainer: {}
});
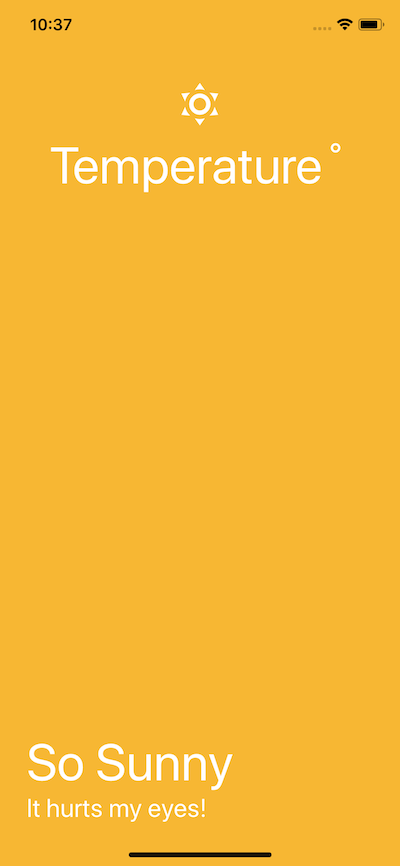
export default Weather;I’m going to use MaterialCommunityIcons to display weather icons in the app.
import React from 'react';
import { View, Text, Stylesheet } from 'react-native';
import Icon from 'react-native-vector-icons/MaterialCommunityIcons';

const Weather = () => {
  return (
    <View style={styles.weatherContainer}>
      <View style={styles.headerContainer}>
        <Icon size={48} name="weather-sunny" color={'#fff'} />
        <Text style={styles.tempText}>Temperature˚</Text>
      </View>
      <View style={styles.bodyContainer}>
        <Text style={styles.title}>So Sunny</Text>
        <Text style={styles.subtitle}>It hurts my eyes!</Text>
      </View>
    </View>
  );
};

const styles = StyleSheet.create({
  weatherContainer: {
    flex: 1,
    backgroundColor: '#f7b733'
  },
  headerContainer: {
    flex: 1,
    alignItems: 'center',
    justifyContent: 'center'
  },
  tempText: {
    fontSize: 48,
    color: '#fff'
  },
  bodyContainer: {
    flex: 2,
    alignItems: 'flex-start',
    justifyContent: 'flex-end',
    paddingLeft: 25,
    marginBottom: 40
  },
  title: {
    fontSize: 48,
    color: '#fff'
  },
  subtitle: {
    fontSize: 24,
    color: '#fff'
  }
});

export default Weather;
To see it in action, let’s modify App.js. Import the Weather component and then make changes to the render() function accordingly:
// App.js
import Weather from './components/Weather';


// ...
render() {
		const { isLoading } = this.state;
		return (
			<View style={styles.container}>
				{isLoading ? <Text>Fetching The Weather</Text> : <Weather />}
			</View>
		);
  }
Fetching the Data
To fetch real-time weather data, I found the OpenWeatherMap API to be highly useful and consistent. To communicate with the API, you’ll need an API key (as discussed previously). To store the API key in our app, create a new file called ./utils/WeatherApiKey.js.
export const API_KEY = '849338767c0e95025b5559533d26b7c4';The way the OpenWeatherMap API works is that we need to feed it longitude and latitude coordinates from the device’s location. It then fetches the data from its server as a JSON object. From the server, we now need two things: the temperature, and the weather condition. We should have both stored in the local state in App.js.
state = {
  isLoading: false,
  temperature: 0,
  weatherCondition: null,
  error: null
};
We start by importing the API key we just defined, then updating our state with temperature, weatherCondition, and error. We need a lifecycle method to re-render the component once the data is fetched from the API. For this purpose, componentDidMount() works best. Add the below snippet before the render() function in App.js:
componentDidMount() {
		navigator.geolocation.getCurrentPosition(
			position => {
				this.fetchWeather(position.coords.latitude, position.coords.longitude);
			},
			error => {
				this.setState({
					error: 'Error Getting Weather Conditions'
				});
			}
		);
	}

	fetchWeather(lat = 25, lon = 25) {
		fetch(
      `http://api.openweathermap.org/data/2.5/
      weather?lat=${lat}&lon=${lon}&APPID=${API_KEY}
      &units=metric`
		)
			.then(res => res.json())
			.then(json => {
				this.setState({
					temperature: json.main.temp,
					weatherCondition: json.weather[0].main,
					isLoading: false
				});
			});
  }
We’re also using JavaScript’s navigator API to get the current location. (This is where a JavaScript API will communicate with a native one using a bridge.) We pass on the values of latitude and longitude to our custom function fetchWeather, where the OpenWeatherMap API is called.
The result we get is in JSON format, and if you console log it, you’ll be able to see the result as a JSON object in the Expo terminal, where there are a lot of values. We need only the temperature value and weather condition. We then update our local state with the new values obtained. &units=metric at the end of our API call converts the temperature from Kelvin to Celsius.
Now all we have to do is pass the two values of our local state as props to the Weather component and then update it so that it can receive those props:
<Weather
  weather={this.state.weatherCondition}
  temperature={this.state.temperature}
/>
Then, update Weather.js accordingly to use props:
const Weather = ({ weather, temperature }) => {
  return (
    <View style={styles.weatherContainer}>
      <View style={styles.headerContainer}>
        <MaterialCommunityIcons size={48} name="weather-sunny" color={'#fff'} />
        <Text style={styles.tempText}>{temperature}˚</Text>
      </View>
      <View style={styles.bodyContainer}>
        <Text style={styles.title}>{weather}</Text>
        <Text style={styles.subtitle}>It hurts my eyes!</Text>
      </View>
    </View>
  );
};
The result will be as follows:
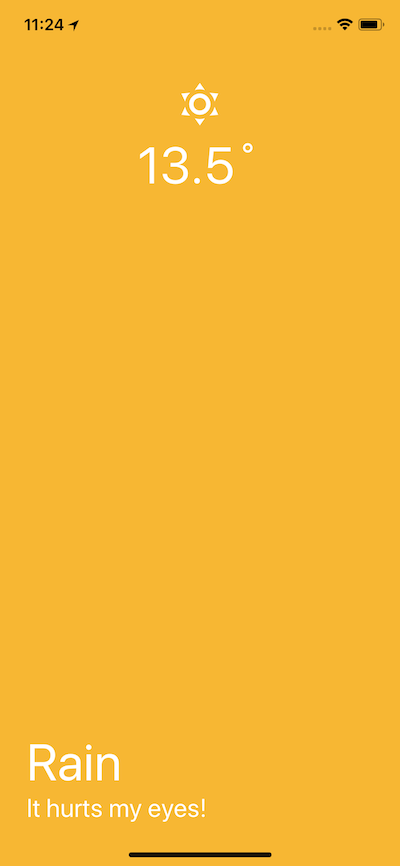
Adding Dynamic Weather Conditions
Since we’ve done the hard part of fetching the real-time data, we need to make the Weather component behave dynamically based on the values it’s getting. This entire dynamic behavior will be associated with weatherCondition.
Using weatherCondition, we can define changes in our background, title, subtitle, and weather icon. Let’s start by pre-defining weather conditions in a file, ./utils/WeatherConditions.js:
export const weatherConditions = {
  Rain: {
    color: '#005BEA',
    title: 'Raining',
    subtitle: 'Get a cup of coffee',
    icon: 'weather-rainy'
  },
  Clear: {
    color: '#f7b733',
    title: 'So Sunny',
    subtitle: 'It is hurting my eyes',
    icon: 'weather-sunny'
  },
  Thunderstorm: {
    color: '#616161',
    title: 'A Storm is coming',
    subtitle: 'Because Gods are angry',
    icon: 'weather-lightning'
  },
  Clouds: {
    color: '#1F1C2C',
    title: 'Clouds',
    subtitle: 'Everywhere',
    icon: 'weather-cloudy'
  },

  Snow: {
    color: '#00d2ff',
    title: 'Snow',
    subtitle: 'Get out and build a snowman for me',
    icon: 'weather-snowy'
  },
  Drizzle: {
    color: '#076585',
    title: 'Drizzle',
    subtitle: 'Partially raining...',
    icon: 'weather-hail'
  },
  Haze: {
    color: '#66A6FF',
    title: 'Haze',
    subtitle: 'Another name for Partial Raining',
    icon: 'weather-hail'
  },
  Mist: {
    color: '#3CD3AD',
    title: 'Mist',
    subtitle: "Don't roam in forests!",
    icon: 'weather-fog'
  }
};
These weather conditions are provided from the OpenWeatherMap API. Then, let’s import them in Weather.js:
import React from 'react';
import { View, Text, StyleSheet } from 'react-native';
import Icon from 'react-native-vector-icons/MaterialCommunityIcons';

import { weatherConditions } from '../utils/WeatherConditions';

const Weather = ({ weather, temperature }) => {
  return (
    <View
      style={[
        styles.weatherContainer,
        { backgroundColor: weatherConditions[weather].color }
      ]}
    >
      <View style={styles.headerContainer}>
        <Icon size={72} name={weatherConditions[weather].icon} color={'#fff'} />
        <Text style={styles.tempText}>{temperature}˚</Text>
      </View>
      <View style={styles.bodyContainer}>
        <Text style={styles.title}>{weatherConditions[weather].title}</Text>
        <Text style={styles.subtitle}>
          {weatherConditions[weather].subtitle}
        </Text>
      </View>
    </View>
  );
};

const styles = StyleSheet.create({
  weatherContainer: {
    flex: 1
  },
  headerContainer: {
    flex: 1,
    alignItems: 'center',
    justifyContent: 'center'
  },
  tempText: {
    fontSize: 48,
    color: '#fff'
  },
  bodyContainer: {
    flex: 2,
    alignItems: 'flex-start',
    justifyContent: 'flex-end',
    paddingLeft: 25,
    marginBottom: 40
  },
  title: {
    fontSize: 48,
    color: '#fff'
  },
  subtitle: {
    fontSize: 24,
    color: '#fff'
  }
});

export default Weather;
We’ve made some additions by using available props with weather conditions to dynamically change the background, icon, weather name, and the subtitle. You can play around with the styling to make it look more minimalistic or more exquisite — it’s up to you!

Conclusion
You’ve successfully used the knowledge of geolocation data and setting up permissions in a real-time scenario to build a weather forecast application using a third party API and React Native.
