There is an element of confusion when it comes to use FontAwesome in an Ionic Application. To include this fonts library in Ionic needs a bit of configuration and this step by step guide will provide just that.
Bootstrap an Ionic Application
Create a new Ionic application or you can follow these steps to include FontAwesome in your Ionic application. Nothing will break down.
$ ionic start ionic-use-fontawesomeNow, install the FontAwesome package from npm and save it in the app’s dependencies:
$ npm install font-awesome --saveType the above in the root folder of your app. This will add the font-awesome folder under node_modules. The --save option will include the package inside the dependencies section of package.json file.
Include the fonts
Now wander to the src/index.html file and add the following link tag just above build/main.css:
<link rel="stylesheet" href="assets/css/font-awesome.min.css" />
<link href="build/main.css" rel="stylesheet" />
Add a Custom Copy Script
Ionic includes a copy script file that is called during the build process when the command ionic serve executes and it is responsible for moving specific and required resources from node_modules to the www folder such as ionicons.
The location of this script file is under node_modules folder:
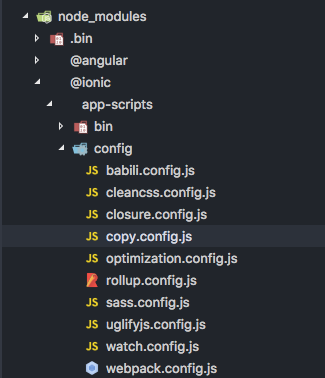
Copy this file and paste in inside a new directory called config under the root directory of your Ionic application. Open the file and add fontawesome entries at the bottom of this file.
copyFontawesomeFonts: {
    src: ['{{ROOT}}/node_modules/font-awesome/fonts/**/*'],
    dest: '{{WWW}}/assets/fonts'
  },
  copyFontawesomeCss: {
    src: ['{{ROOT}}/node_modules/font-awesome/css/font-awesome.min.css'],
    dest: '{{WWW}}/assets/css'
  }
Include Custom Copy Script in package.json
We must include this custom script inside our package.json file to override the one where we copied the original file from. Open the package.json file and add this json code:
"config": {
    "ionic_copy": "./config/copy.config.js"
  }
That’s it in the configuration part.
Use FontAwesome
To implement FontAwesome in this or any Ionic application after the above configuration, we try adding some fonts on our pre-generated home page.
<ion-header>
  <ion-navbar color="secondary">
    <ion-title> FontAwesome Icons </ion-title>
  </ion-navbar>
</ion-header>

<ion-content padding>
  <ion-list>
    <ion-item>
      <i class="fa fa-battery-empty" style="color: red;"></i> Battery Level
      Empty
    </ion-item>
    <ion-item> <i class="fa fa-battery-1"></i> Battery Level 1 </ion-item>
    <ion-item> <i class="fa fa-battery-2"></i> Battery Level 2 </ion-item>
    <ion-item> <i class="fa fa-battery-3"></i> Battery Level 3 </ion-item>
    <ion-item>
      <i class="fa fa-battery-4" style="color: green;"></i> Battery Level 4
    </ion-item>
  </ion-list>
</ion-content>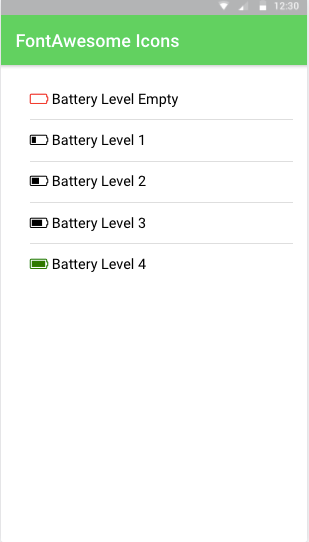
There are more than 675 icons available in FontAwesome and I think a combination of both Ionicons and FontAwesome will be enough for some the applications out there. You can even style them, change their font-size and color as per your needs.
