
One of the most important aspects of being a Web Developer is to know how to work with APIs.
Whether building your own application as a front-end or back-end engineer, you are going to come across them. APIs are the core communication system behind the different software systems including the server, the database and the client-side of an application.
In this tutorial, we are going to create a REST API using Node.js as the back-end server with help from ExpressJS framework, and connect it with PostgreSQL database.
Prerequisites
To get started with this tutorial, knowledge of the following will be beneficial.
- Knowledge of some of the ES6 JavaScript features
- Node.js and npm installed on your local dev machine
- PostgreSQL installed
If you do not have PostgreSQL installed on your local development machine, you can continue reading the next step where I will walk you through step by step installing it. If you already have it, please skip the next step.
Installing PostgreSQL
PostgreSQL is a powerful and an open source object-relational database. If you are on a Windows machine, PostgreSQL offers an installer.
On macOS, I am going to use Homebrew to install it. Open a terminal window and type the following command.
brew install postgresqlOnce the installation is complete, to start the PostgreSQL database you will need to run the below command.
brew services start postgresqlAfter starting this service, you will get a success message like below.

Note: Later on, when you need to stop the postresql service, you can run the command brew services stop postgresql.
Getting Started
Create an empty directory and run the following set of commands to initialize an Express server.
# create a new directory
mkdir rest-api-nodejs-postgresql

# traverse inside it
cd rest-api-nodejs-postgresql

# initialize npm
npm int --yes

# install express
npm install -S express
Create a server.js file which is going to be the entry point for our server. At the top, we are going to require the express module and add some configuration middleware functions to handle req.body data. To run the server, type the command node index.js and go to URL http://localhost:4000/ in a browser window and you will get the following result.

With that working, we need a way to restart the server every time we change something in our code. I am going to use nodemon which will automatically watch for changes in any .js file we make in our demo app. To install run npm i -D nodemon and add the following to your package.json file.
"scripts": {
  "start": "nodemon server.js"
}
To now run the project we need to use npm run start command from now on.
Setting up Sequelize
Since you have installed PostgreSQL database, and the service is up and running, we can move on to the next step that is to make a connection between the ExpressJS server and PostgreSQL. In order to do that, you will need an ORM (Object Relational Mapper) to provide us an interface for both the connection and the API. For our demo, we are going to use Sequelize. Let us begin by installing it.
npm install -S sequelize-cliThe next step is to create a .sequelizerc file in the root of our project. This is going to be the configuration file that contains the specific paths required by Sequelize module. It will help us generate folders and files necessary for sequelize to work.
path = require('path');

module.exports = {
  config: path.resolve('./config', 'config.json'),
  'models-path': path.resolve('./models'),
  'seeders-path': path.resolve('./seeders'),
  'migration-path': path.resolve('./migrations')
};
Notice that we are making use of path module from Node’s core API in this process. The path.resolve() method resolves a sequence of paths or path segments into an absolute path. If no path segments are passed, path.resolve() will return the absolute path of the current working directory and in our case, the current working directory is going to be the root of our project.
Now, let’s run the initializing command in order to generate the boilerplate code and necessary folders.
sequelize initWhen you run the above command successfully, you will get the following result.
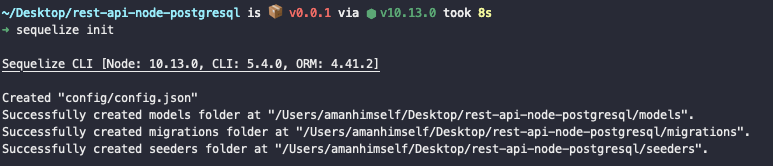
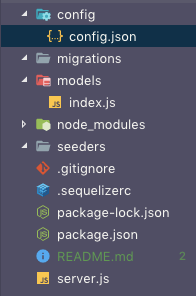
You will also find changes made to your project directory like below. New files and folders created from the .sequelizerc file.
Making Database Connection
The next step is to install the required dependencies in order to create a database connection with a PostgreSQL database and have access to the database for CRUD operations. Fire up your terminal with the following command.
npm install -S pg pg-hstoreThe package pg is responsible for creating the database connection with our Express server and pg-hstore is for serializing and deserializing JSON data into the PostgreSQL’s hstore format. hstore data format stores information in key/value pairs within a single PostgreSQL value. To read more about what exactly hstore is or how it works, you can pause here and give the official documentation a glimpse.
The two files that are being used in order to create the database connection in our project are config/config.js and models/index.js. The first thing you need to do here is to create a local database instance. From the command line run the below command.
createdb todosThe above createdb command is made available to us when we install the PostgreSQL database. Now, let us make some modifications to theconfig.js file. We have to manually define the database instance we create. You can even set up the password to protect the database on your local machine. For our demo, I am going to leave this configuration field to null. Also, you will have to change the database dialect to postgres.
{
  "development": {
    "username": "root",
    "password": null,
    "database": "todos",
    "host": "127.0.0.1",
    "dialect": "postgres"
  },
  "test": {
    "username": "root",
    "password": null,
    "database": "todos",
    "host": "127.0.0.1",
    "dialect": "postgres"
  },
  "production": {
    "username": "root",
    "password": null,
    "database": "todos",
    "host": "127.0.0.1",
    "dialect": "postgres"
  }
}
You can change the aforementioned values for all three: development, test, and production but do make a notice, for now, we are going to use development. This is done in models/index.js.
'use strict';

const fs = require('fs');
const path = require('path');
const Sequelize = require('sequelize');
const basename = path.basename(__filename);
const env = process.env.NODE_ENV || 'development';
const config = require(__dirname + '/../config/config.json')[env];
const db = {};

let sequelize;
if (config.use_env_variable) {
  sequelize = new Sequelize(process.env[config.use_env_variable], config);
} else {
  sequelize = new Sequelize(
    config.database,
    config.username,
    config.password,
    config
  );
}

fs.readdirSync(__dirname)
  .filter(file => {
    return (
      file.indexOf('.') !== 0 && file !== basename && file.slice(-3) === '.js'
    );
  })
  .forEach(file => {
    const model = sequelize['import'](path.join(__dirname, file));
    db[model.name] = model;
  });

Object.keys(db).forEach(modelName => {
  if (db[modelName].associate) {
    db[modelName].associate(db);
  }
});

db.sequelize = sequelize;
db.Sequelize = Sequelize;

module.exports = db;
When you deploy your application and use an online hosted database instance, you will need to change const env = process.env.NODE_ENV || 'development'; with the database URL you get. With this, our setup is complete.
Creating the Database Model
In this section, you are going to create two models: Todo and TodoItem. The Todo is going to be the list of one or many TodoItem. In terms of traditional SQL database, you can say that Todo will have a relationship with TodoItem of one-to-many. We are going to sequelize command line interface to generate the boilerplate code for our models.
sequelize model:create --name Todo --attributes title:stringThe above command will generate a new file inside models/todo.js. You can verify that the above command runs successfully with below image.

As you can see, another file is created in migrations/ directory. Our concern at this time is the model file itself which looks like this.
'use strict';
module.exports = (sequelize, DataTypes) => {
  const Todo = sequelize.define(
    'Todo',
    {
      title: DataTypes.STRING
    },
    {}
  );
  Todo.associate = function (models) {
    // associations can be defined here
  };
  return Todo;
};
This file is exporting a model called Todo which has a single attribute title as type string. Let us now create our next model for TodoItem.
sequelize model:create --name TodoItem --attributes content:string,complete:booleanThis is how our second model inside todoitem.js looks like. It has two attributes, content of datatype string and complete of datatype boolean.
'use strict';
module.exports = (sequelize, DataTypes) => {
  const TodoItem = sequelize.define(
    'TodoItem',
    {
      content: DataTypes.STRING,
      complete: DataTypes.BOOLEAN
    },
    {}
  );
  TodoItem.associate = function (models) {
    // associations can be defined here
  };
  return TodoItem;
};
Creating the Database Relationship
Todo and TodoItem are going to have one-to-many-relationship. This done by associating both the models and define a custom class method. Let us modify both the model files to add this and some modification in each attribute for things to work our way. Open todo.js file.
'use strict';
module.exports = (sequelize, DataTypes) => {
  const Todo = sequelize.define(
    'Todo',
    {
      title: {
        type: DataTypes.STRING
      }
    },
    {}
  );
  Todo.associate = function (models) {
    // associations can be defined here
    Todo.hasMany(models.TodoItem, {
      foreignKey: 'todoId',
      as: 'todoItems'
    });
  };
  return Todo;
};
The first modification you will make is to add type to make the attribute easier to read. Next, inside Todo.associate class method we are defining a relationship between both our models using hasMany method. Notice how it intakes models parameter. The foreignKey, in this case, the id of each TodoItem. The as attribute next to foreignKey means that on each query for a todo, it will include the todo items for the above id.
Now, open todoitem.js.
'use strict';
module.exports = (sequelize, DataTypes) => {
  const TodoItem = sequelize.define(
    'TodoItem',
    {
      content: { type: DataTypes.STRING },
      complete: { type: DataTypes.BOOLEAN, defaultValue: false }
    },
    {}
  );
  TodoItem.associate = function (models) {
    // associations can be defined here

    TodoItem.belongsTo(models.Todo, {
      foreignKey: 'todoId',
      onDelete: 'CASCADE'
    });
  };
  return TodoItem;
};
First, you are going to edit both attributes content and complete. With complete a default value is now has been added. Having a default value will allow the database to provide a value for the particular field. The onDelete tells the database to delete the whole todo item when from the associated todo it belongs too.
Running the Migrations
Migrations provide a clearer picture of what our database models going to look like inside. Since you are making changes in the generated attributes and adding fields like in our case, defaultValue, you have to edit the migration files for each specific model wherever necessary.
Running migrations take care of creating the database table and associated column inside the table for us. This is the functionality of each up function in both migrations files. There is also a down function that is only to run when you need to undo the changes inside the database table for some reason. Open inside migrations/<date-time>-create-todo.js file.
'use strict';
module.exports = {
  up: (queryInterface, Sequelize) => {
    return queryInterface.createTable('Todos', {
      id: {
        allowNull: false,
        autoIncrement: true,
        primaryKey: true,
        type: Sequelize.INTEGER
      },
      title: {
        type: Sequelize.STRING
      },
      createdAt: {
        allowNull: false,
        type: Sequelize.DATE
      },
      updatedAt: {
        allowNull: false,
        type: Sequelize.DATE
      }
    });
  },
  down: (queryInterface, Sequelize) => {
    return queryInterface.dropTable('Todos');
  }
};
Similar changes are made inside migrations/<date-time>-crrate-todo-item.js.
'use strict';
module.exports = {
up: (queryInterface, Sequelize) => {
return queryInterface.createTable('TodoItems', {
id: {
allowNull: false,
autoIncrement: true,
primaryKey: true,
type: Sequelize.INTEGER
},
content: {
type: Sequelize.STRING
},
complete: {
type: Sequelize.BOOLEAN,
defaultValue: false
},
createdAt: {
allowNull: false,
type: Sequelize.DATE
},
updatedAt: {
allowNull: false,
type: Sequelize.DATE
},
todoId: {
type: Sequelize.INTEGER,
onDelete: 'CASCADE',
references: {
model: 'Todos',
key: 'id',
as: 'todoId'
}
}
});
},
down: (queryInterface, Sequelize) => {
return queryInterface.dropTable('TodoItems');
}
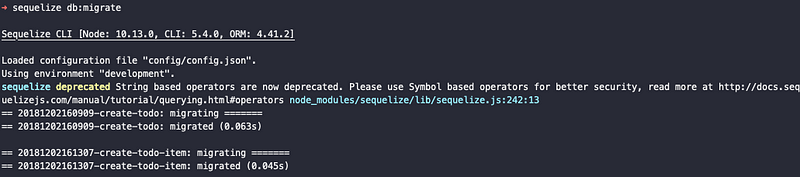
};In the above file, you are also defining the relationship between both the models. The todoId field is not going to be generated by Sequelize automatically until we define it above inside migrations/<date-time>-crrate-todo-item.js. Let us run the migration command and generate these models in our database. Open your terminal and execute the below command.
sequelize db:migrateYou will get a result like below indicating the success of the above command.
Please Note if the above command throws an error such as ERROR: role "root" does not exist. This means you do not have a username created already for postgres. You will have to run the following command and can follow the official documentation here for information.
createuser <username>Building the API
Creating models might seem overwhelming if you are doing it the first time but if you have followed closely so far, you will have no problem going through the whole process next time. In this section, we are going to start building our API. You are going to create your first controller for todos inside a new directory and file controllers/todos.js. We start by requiring the todos model.
const Todo = require('../models').Todo;

module.exports = {
  create(req, res) {
    return Todo.create({
      title: req.body.title
    })
      .then(todo => res.status(201).send(todo))
      .catch(error => res.status(400).send(error));
  }
};
Then, we are exporting the controller function inside which create function exists. This function will handle the business logic behind the route handler that we are going to define soon for creating a new todo in our database. It accepts two parameters, req for incoming requests and res to send the response back to an individual incoming request. On success, .then() function will trigger and send back the todo item with an HTTP status of 201. If an error is encountered, .catch will return the error with an HTTP status of 400.
You can think of each todo we create here as the name of a list of items. Right now we only are defining the business logic of creating the name for each list. Let’s complete this process and test with a REST client to see if everything works. Now we are going to connect this controller to the desired route. Create a new folder called routes and inside it a file called index.js.
const todosController = require('../controllers/todos.js');

module.exports = app => {
  app.get('/api', (req, res) =>
    res.status(200).send({
      message: 'Create Your Own Todo Lists API'
    })
  );

  app.post('/api/todos', todosController.create);
};
In the above file, there are two routes being defined. One is /api which displays the welcome message and using app.post('/api/todos) where the request for creating a new to-do list can be send. Last step before the testing of this two new routes begin is to hook the routes inside server.js file.
const express = require('express');
const app = express();
const PORT = 4000;
app.use(express.json());
app.use(
express.urlencoded({
extended: true
})
);
// app.get('/', (req, res) => {
// res.json({ message: 'REST API with Node.js, and Postgres API' });
// });
require('./routes/index')(app);
app.listen(PORT, () => {
console.log(`Server running at port ${PORT}.`);
});
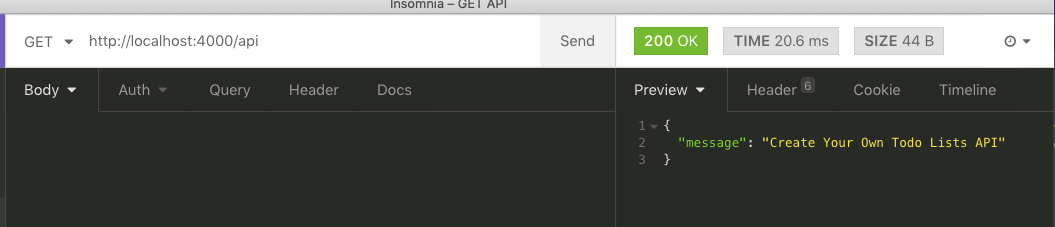
module.exports = app;To see if everything is working, let’s run the server by running npm run start and open your favorite REST API client like Postman Abhinav Asthana or Insomnia REST Client to test the new routes. When you run the URL http://localhost:4000/api you will get the success message like below.
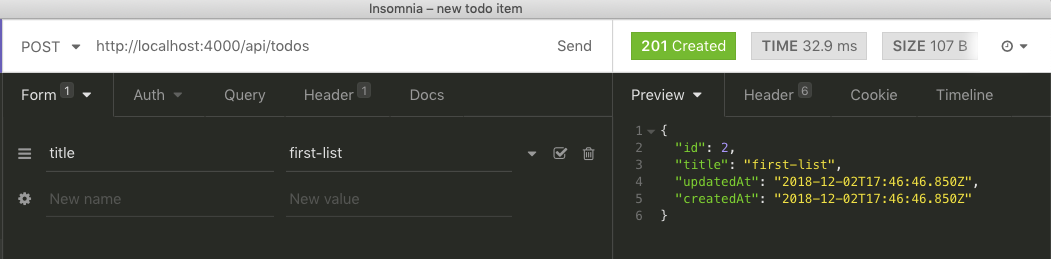
Next step is to create a new todo item. Run the URL http://localhost:4000/api/todos.
So far so good. Let us create a new controller and a route that will list all the to-do lists in our database. Open controllers/todos.js. Add the below after create() function.
// after create()
list(req, res) {
		return Todo.all()
			.then(todos => res.status(201).send(todos))
			.catch(error => res.status(400).send(error));
  }
Now open routes/index.js and create the new route for this logic to run.
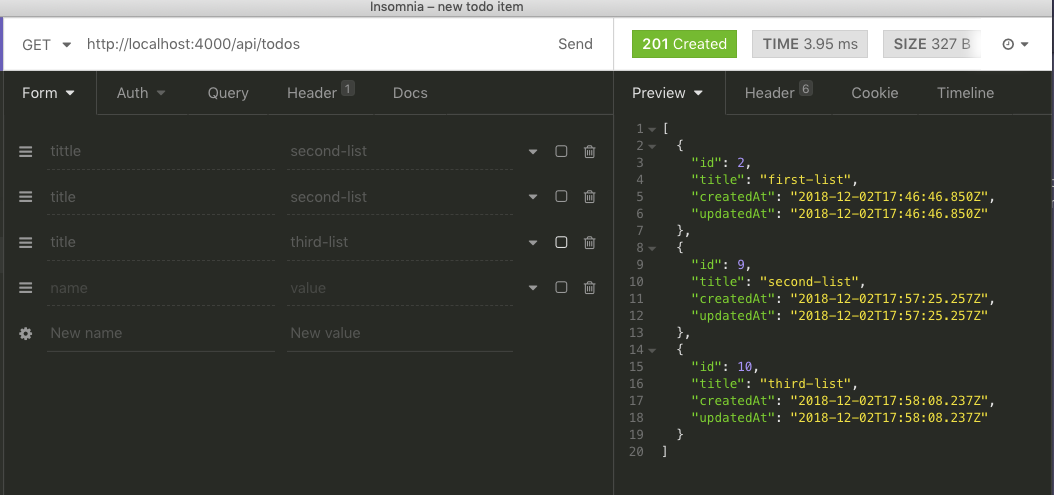
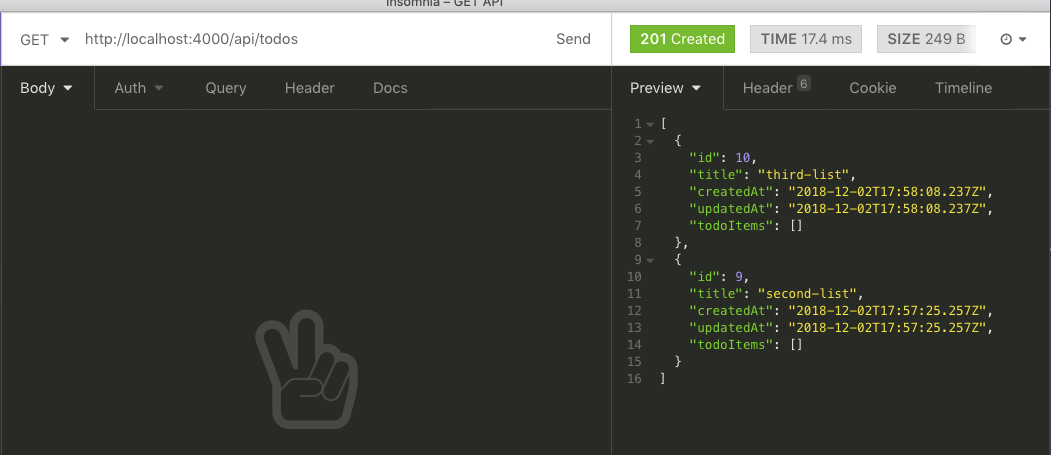
app.get('/api/todos', todosController.list);Open the REST client and visit the URL http://localhost:4000/api/todos](http://localhost:4000/api/todos.
API for Todo Items
Since the API is responding to the logic we have written behind it, you can continue to build it. In this section, you are going to create an individual item and add it to a specific list. Start by creating a file todoitem.js inside controllers/.
const TodoItem = require('../models').TodoItem;

module.exports = {
  create(req, res) {
    return TodoItem.create({
      content: req.body.content,
      todoId: req.params.todoId
    })
      .then(todoItem => res.status(201).send(todoItem))
      .catch(error => res.status(400).send(error));
  }
};
Next step is to add the route for it inside routes/index.js.
const todosController = require('../controllers/todos.js');
const todoItemsController = require('../controllers/todoitem.js');
module.exports = app => {
app.get('/api', (req, res) =>
res.status(200).send({
message: 'Create Your Own Todo Lists API'
})
);
app.post('/api/todos', todosController.create);
app.get('/api/todos', todosController.list);
app.post('/api/todos/:todoId/items', todoItemsController.create);
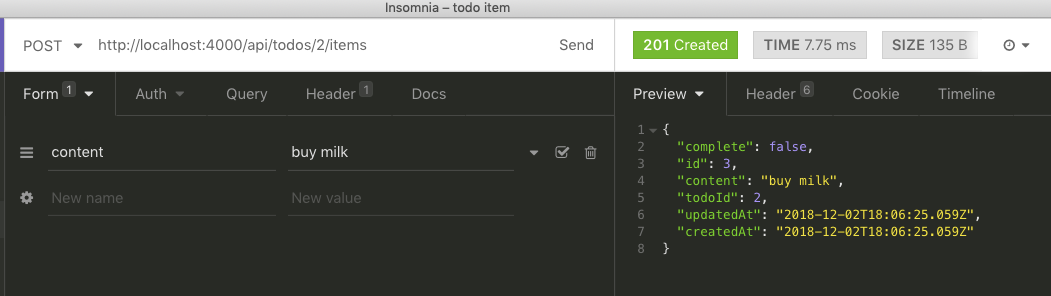
};The last step is to test this API endpoint. Run the URL http://localhost:4000/api/todos/2/items. Do note that the 2 in this URL is the id of the list that will associate this todo item to a todo list. From earlier images, you can note that I had three lists with IDs: 2, 9 and 10. If everything is going right for you, this may differ. You will have IDs starting from 1.
Now let us modify the list function in controllers/todos.js such that it returns the todo item along with the list name.
const Todo = require('../models').Todo;
const TodoItem = require('../models').TodoItem;

module.exports = {
  create(req, res) {
    return Todo.create({
      title: req.body.title
    })
      .then(todo => res.status(201).send(todo))
      .catch(error => res.status(400).send(error));
  },
  list(req, res) {
    return Todo.findAll({
      include: [
        {
          model: TodoItem,
          as: 'todoItems'
        }
      ]
    })
      .then(todos => res.status(201).send(todos))
      .catch(error => res.status(400).send(error));
  }
};
To test this, run the URL http://localhost:4000/api/todos and you will get similar result like below.

Notice how the below snippet is added. This is done through the association methods we defined earlier when creating both of our models.
"todoItems": [
  {
    "id": 3,
    "content": "buy milk",
    "complete": false,
    "createdAt": "2018-12-02T18:06:25.059Z",
    "updatedAt": "2018-12-02T18:06:25.059Z",
    "todoId": 2
  }
]
Deleting Todo Lists
The last API endpoint we require is to delete a todo list which will further delete all items inside it as todoItems. Open controllers/todos.js.
destroy(req, res) {
		return Todo.findById(req.params.todoId)
			.then(todo => {
				if (!todo) {
					return res.status(400).send({
						message: 'Todo List not found'
					});
				}
				return todo
					.destroy()
					res.status(200).send({ message: 'Todo List deleted Successfully' })
					.catch(error => res.status(400).send(error));
			})
			.catch(error => res.status(400).send(error));
  }
Add the corresponding route inside routes/index.js.
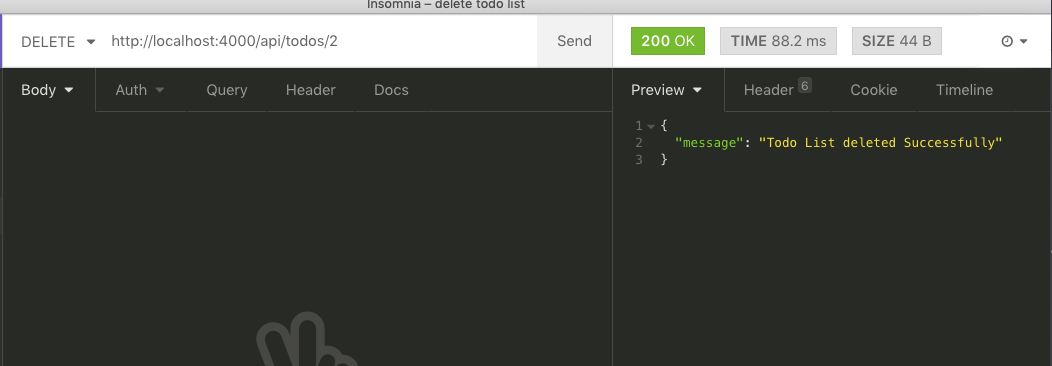
app.delete('/api/todos/:todoId', todosController.destroy);When you run the URL http://localhost:4000/api/todos/2 with HTTP DELETE request it will respond back like below.
This can also be verified by running http://localhost:4000/api/todos. In response, you will not see the same todo list we just deleted.
Conclusion
That’s it! In this article, you learned about using PostgreSQL as a database and using ORM tools like Sequelize, and how to migrate data models into database properly. We learned how to connect PostgreSQL database and what the correct configuration to do so. Also, we created a REST API using Express as the back-end server framework. Our REST API can be improved with better error handling and form validation. The possibilities from here are endless. The popularity of the PostgreSQL database among developers is at its peak.
The complete code for the tutorial at this Github repository