I have been getting familiar with Ionic Framework in past recent days. To start, I had a question in mind which might be similar to yours. Why choose Ionic Framework?
The reasons I chose Ionic as my next framework to elaborate my skill-set, are listed here:
- Ionic is all about HTML, CSS, JavaScript
- Since I have been following JavaScript closely in past months and recently worked on a freelance project using technologies and framework (I am familiar with) such as Node.js, Express.js & AngularJS.
- To build mobile applications using my current knowledge (that is of AngularJS)
- Learning curve is if you are familiar with AngularJS
- Ionic is cross-platform
- has its own UI components that feels Bootstrapish and is easy to customize
- It’s open-source and has an active ever-growing community (with the release of version 2, especially)
With above “list of reasoning” I am also including few more points that Ionic provides:
- has its own Command Line interface (CLI) to scaffold, develop and deploy applications.
- it gives access to mobile device APIs through two options: ngCordova & ionic-native
- application written in Ionic can be converted for a specific device (such as Android & iOS) using Apache’s Cordova.
With all that said, I am going to briefly discuss few things in this article that you should know of if/when you are planning to start developing applications using Ionic Framework.
Hybrid Mobile Architecture
Did you think I am going to start this article by discussing some myths around Hybrid Mobile Applications? Well I am not because there’s already an awesome article written by Simon on DevDactic.com
The genesis of Hybrid Mobile applications is to understand what an Hybrid application is?
Hybrid application is a type of mobile application that uses browser window to display its interface.
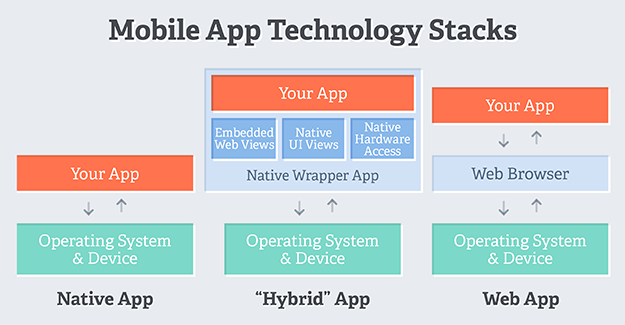
This comes under the classification of types of mobile applications that consists of three types:
- Native: developed using platform specific programming language such as Objective C or Java
- Mobile Websites: developed using web technologies such as HTML, CSS & JavaScript and are accessible only through mobile web browser. They are actually web applications.
- Hybrid: cross-platform and have access to native APIs (mostly through plugins)
Architecture of Hybrid Mobile applications developed using Ionic Framework consists of two concepts that one must be familiar with ASAP: WebView & Apache Cordova.
What is WebView?
Think it of as a browser that runs inside the scope of a mobile application using Ionic. This browser implements code written in HTML, CSS and JavaScript.
The application on a specific mobile operating system runs via tool like Cordova. It provides APIs written in JavaScript to interact with Native features of mobile device such as access to camera or a microphone.
WebView communicates with Cordova’s APIs which then further communicates with mobile devices.
WebViews are so common these days that you can build desktop applications using Electron.
For detailed information on Hybrid Mobile Applications, I would like you to consider reading John Bristowe’s article.
Pre-requisites for developing an Ionic Application?
You will need these tools as a part of your environment setup with your Operating System.
Even if you do not use Node.js as a part of your development environment, to use Ionic you have to install it to get access to command line tools such as Bower, Gulp, and Ionic’s own Command Line Interface using its Node’s package manager: npm.
Installing Ionic
Ionic is a collection of Angular.js, UI Router, Angular directives, Angular services, JS utilities, and mobile focused CSS styles. These are bundled together as ionic.bundle.js and ionic.css.
From your command line:
$ npm install cordova ionic -g
This will install a tool you are going make use of: Ionic CLI which is a command line utility.
For detailed information on what it can do:
$ ionic --help which list all the things tasks you can perform using this utility.
Ionic App Development Process
After installing the command line utility, you can start by creating an app using Ionic’s starter templates. Ionic provides three starter templates:
- blank
ionic start myApp blank - tabs
ionic start myApp tabs - sidemenu tart
myApp sidemenu
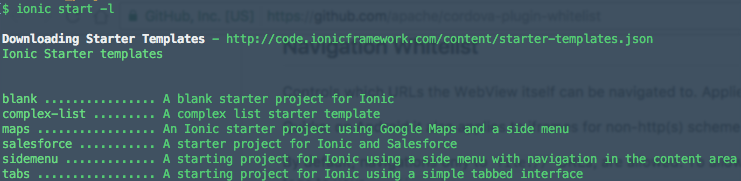
To get a list of all Ionic templates available type in terminal:
$ ionic start -l
ionic start is the command that is used to scaffold an Ionic application.
Scaffolding an Ionic Application
$ ionic start -a "Example" -i app.example example blank
This command can help you scaffold an Ionic Project with following options:
-a "Example"human readable name of application-i app.exampleapplication IDexampleproject folder’s nameblankionic template
This steps allows the config file to update with application name and its ID. (We will learn more about the config file later).
After this step, if you look closely at your terminal window, a script runs which installs six Cordova plugins mentioned package.json file.
cordova-plugin-deviceto get device informationcordova-plugin-consoledefines a global instance ofconsole.log()cordova-plugin-whitelistimplements whitelist policy for navigating the application’s WebViewcordova-plugin-splashscreenit shows and hides a splash screen during the start of the application on a devicecordova-plugin-statusbarprovides functions to customize the iOS and Android StatusBarionic-plugin-keyboardprovides functions to interact with the keyboard
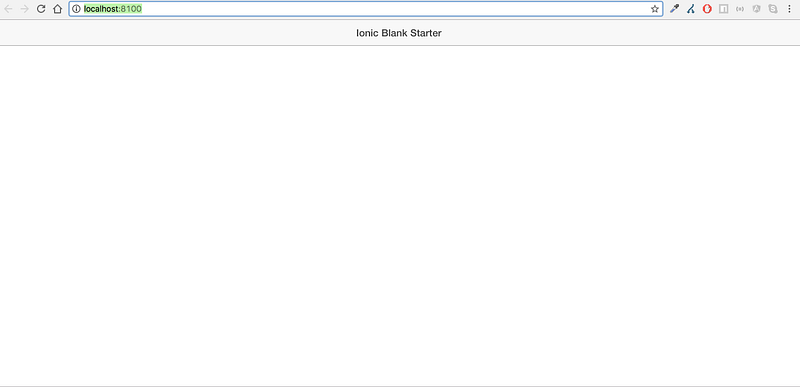
So now you have an Ionic project setup and you are familiar the basic elements of a project’s setup. It’s time to run the application from the command line using ionic serve command to run the app locally on a port.
$ cd example $ ionic serve
It will open a browser window in the default web browser and you will see similar to this:
ionic serve --lab will run the app locally showing two instances of the app for iOS & Android.

To run the application deliberately on a different port number: ionic serve -p 8080
Ionic Project Structure
Following is the root structure of an Ionic Project after scaffolding:
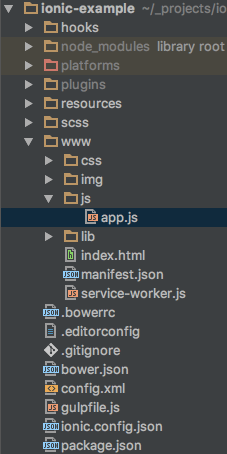
I will start describing what each folder/file in the root folder of the app contains, from top to bottom.
hooksconsists of scripts that are executed when a specific Cordova task is performedpluginscontains all plugins that comes added to projectwwwionic app code that we write to build appscssconsists base scss file (styles of ionic UI components).bowerrcpath to directory where Bower dependencies get installed.editorconfigdefault editor configuration for brevitybower.jsonlist of Bower dependenciesconfig.xmlmeta information needed by Cordova when converting Ionic application to platform specific. It consists of XML tags that describes the projectgulpfile.jsbuild tasks used while developing applicationionic.config.jsoninformation regarding ionic application
www/ Folder
This folder is the main folder of our application and its where the code of our application is written. It consists of a app startup file index.html which act as first page of app, css to define custom styles, images to add images to app, js which further consists of app.js where we bootstrap AngularJS framework. In this file, ionic is passed as dependency using Angular Dependency Injection. $ionicPlatform is the service that is injected to run method which enables Cordova plugins discussed earlier and the app itself.
The last folder, lib contain the packages/dependencies that are installed using Bower. It contains a pre-loaded dependency of Ionic and Angular files.
I guess, you now have the idea of how an Hybrid application using Ionic Framework works.