
Uploading Files might seem a task that needs to be conquered especially if you are getting into web development. In this tutorial, simple AJAX based file uploads using Reactjs on front-end and Node.js back-end. This is easy to accomplish with the following technologies since the whole source code will be in one language, JavaScript. In this example, to demonstrate for connecting a Reactjs application with Node.js backend, we will be making the use of a simple file upload example. The topics we will be covering are going to be:
- Setting up a Back-end of our app using
express-generator - Using
create-react-appto scaffold a front-end Reactjs app - Using
axiosfor cross-origin API calls - Handling POST requests on our server
- Using
express-fileupload, a promise based library - Lastly, making a connection between Reactjs and Node.js
Getting Started
We will be starting without back-end first. We will write a server application with necessary configurations required to accept cross-origin requests and uploading files. First, we need to install express-generator which is the official and quickest way to start with an Express back-end application.
npm install -g express-generatorWe will install this module globally from our terminal. After installing this global npm module, we have an instance of it named express to generate our project structure.
mkdir fileupload-example
express server
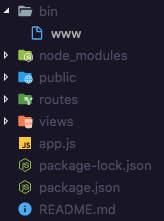
cd serverWhen changing the current directory to the project express command just scaffolded, we can observe the following structure and files:
To run this backend server on default configuration, we have to install the dependencies mentioned in package.json first.
npm install
npm start
Express-generator comes with following dependencies. Some of them are essential to use such as morgan and body-parser and some we can leave out for this project.
"dependencies": {
    "body-parser": "~1.18.2",
    "cookie-parser": "~1.4.3",
    "debug": "~2.6.9",
    "express": "~4.15.5",
    "jade": "~1.11.0",
    "morgan": "~1.9.0",
    "serve-favicon": "~2.4.5"
  }
I will be adding two more packages for our configurable back-end application to behave in the way we want to.
npm install --save cors express-fileuploadcors provide a middleware function for Express applications to enable various Cross-Origin Resource Sharing options. CORS is a mechanism that allows restricted resources (in our case, API or AJAX requests) on a web page from another domain. It helps a browser and a server to communicate and can be hosted on separate domains. You will understand it more when you will see it in action.
The other module, express-fileupload is a bare minimum express middleware function for uploading files. The advantages it has it that it has support for Promises and can handle multiple file uploads.
With these two important packages added as dependencies in our project, we can now start by modifying the default Express back-end in app.js file.
const express = require('express');
const path = require('path');
const favicon = require('serve-favicon');
const logger = require('morgan');
const cookieParser = require('cookie-parser');
const bodyParser = require('body-parser');
const cors = require('cors'); // addition we make
const fileUpload = require('express-fileupload'); //addition we make

const index = require('./routes/index');
const users = require('./routes/users');

const app = express();

// view engine setup
app.set('views', path.join(__dirname, 'views'));
app.set('view engine', 'jade');

// uncomment after placing your favicon in /public
//app.use(favicon(path.join(__dirname, 'public', 'favicon.ico')));
app.use(logger('dev'));
app.use(bodyParser.json());
app.use(bodyParser.urlencoded({ extended: true }));
app.use(cookieParser());

// Use CORS and File Upload modules here
app.use(cors());
app.use(fileUpload());

app.use('/public', express.static(__dirname + '/public'));

app.use('/', index);

// catch 404 and forward to error handler
app.use(function (req, res, next) {
  const err = new Error('Not Found');
  err.status = 404;
  next(err);
});

// error handler
app.use(function (err, req, res, next) {
  // set locals, only providing error in development
  res.locals.message = err.message;
  res.locals.error = req.app.get('env') === 'development' ? err : {};

  // render the error page
  res.status(err.status || 500);
  res.render('error');
});

module.exports = app;
In the above code, you would notice that we made some additions. The first addition we did is to import packages cors and express-fileupload in app.js after other dependencies are loaded.
const cors = require('cors'); // addition we make
const fileUpload = require('express-fileupload'); //addition we make
Then just after other middleware functions, we will instantiate these two newly imported packages.
// Use CORS and File Upload modules here
app.use(cors());
app.use(fileUpload());
Also, we need to allow data coming from a form. For this, we have to enable urlencoded options of body-parser module and specify a path as to store the image file coming from the client.
app.use(bodyParser.urlencoded({ extended: true }));

// below, also change this to
app.use('/public', express.static(__dirname + '/public'));
With this, we can see if our server is working correctly by running:
npm startIf you get the screen below by navigation on port http://localhost:3000, it means that our server is running.

Before we move to generate our front-end application, we need to change to port for our backend since front-end application generated using create-react-app will also be running on port 3000. Open bin/www file and edit:
/**
 * Get port from environment and store in Express.
 */

// 3000 by default, we change it to 4000

var port = normalizePort(process.env.PORT || '4000');
app.set('port', port);
Setting up Front-end
create-react-app is another command line utility that to generate a default Reactjs front-end application.
create-react-app node-react-fileupload-front-endWe will also install the required library we are going to use for making API calls to our backend server.
yarn add axiosindex.js is the starting point of our application in the src/ directory. It registers the render function using ReactDOM.render() by mounting App component. Components are the building blocks in any Reactjs application. This App component comes from src/App.js. We will be editing this file in our front-end source code.
File Upload Form
We will be using the HTML form element that has an input which provides access to the value, that is the file, using refs. Ref is a special attribute that can be attached to any component in React. It takes a callback function and this callback will be executed immediately after the component is mounted. It can be also be used on an HTML element and the callback function associated will receive the DOM element as the argument. This way, ref can be used to store a reference for that DOM element. That is exactly what we are going to do.
class App extends Component {
  // We will add this part later

  render() {
    return (
      <div className="App">
        <h1>FileUpload</h1>
        <form onSubmit={this.handleUploadImage}>
          <div>
            <input
              ref={ref => {
                this.uploadInput = ref;
              }}
              type="file"
            />
          </div>
          <br />
          <div>
            <input
              ref={ref => {
                this.fileName = ref;
              }}
              type="text"
              placeholder="Enter the desired name of file"
            />
          </div>
          <br />
          <div>
            <button>Upload</button>
          </div>
          <hr />
          <p>Uploaded Image:</p>
          <img src={this.state.imageURL} alt="img" />
        </form>
      </div>
    );
  }
}
The input element must have the type="file" otherwise it would not be able to recognize what type we are using it for. It is similar to the values like email, password, and so on.
The handleUploadImage method will take care of the API calls that we need to request to the server. If that call is successful, the local state of our React application will be set to let the user know that the upload was successful. Inside this function, to make the API call, we will be using axios library we installed when setting up our front end app.
constructor(props) {
		super(props);

		this.state = {
			imageURL: ''
		};

		this.handleUploadImage = this.handleUploadImage.bind(this);
	}

	handleUploadImage(ev) {
		ev.preventDefault();

		const data = new FormData();
		data.append('file', this.uploadInput.files[0]);
		data.append('filename', this.fileName.value);

		fetch('http://localhost:4000/upload', {
			method: 'POST',
			body: data
		}).then(response => {
			response.json().then(body => {
				this.setState({ imageURL: `http://localhost:4000/${body.file}` });
			});
		});
	}
The FormData object lets you compile a set of key/value pairs to send using XMLHttpRequest. It is primarily intended for use in sending form data but can be used independently from forms in order to transmit keyed data. To build a FormData object, instantiating it then appending fields to it by calling its append() method like we did above.
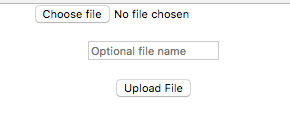
Since we are not using any styling, our form looks bare minimum and ugly. But you can go ahead and make it look more professional. For brevity, I am going to keep things simple. I recommend you to always enter a file uname, other wise it will store the file on the with undefined.jpg name.
Updating the server to handle AJAX Request
Right now, we do not have in our server code to handle the POST request React app makes a request to. We will add the route in our app.js in our Express application where the default route is defined.
app.post('/upload', (req, res, next) => {
  // console.log(req);
  let imageFile = req.files.file;

  imageFile.mv(`${__dirname}/public/${req.body.filename}.jpg`, err => {
    if (err) {
      return res.status(500).send(err);
    }

    res.json({ file: `public/${req.body.filename}.jpg` });
    console.log(res.json);
  });
});
npm startThis route gets triggered when a request is made to /upload/. The callback associated using the route contain req, res objects and access to next, a standard way of defining a middleware function in an Express application. The req object has the file and the filename that was uploaded during form submission from the client application. If any error occurs, we return the 500 server error code. Otherwise we return the path to the actual file and console the response object to check if everything is work as we expect it.
.mv file is promise-based and provided to us by the express-fileupload package we installed earlier. Try uploading an image file from the client now. Make sure both the client and server are running from different terminal tabs at this point. If you get a success message like this in your terminal:
POST /upload 200 98.487 ms - 25
GET /public/abc.jpg 200 6.231 ms - 60775
At the same time, the client is requesting to view the file on the front-end with a GET HTTP method. That means the route /upload from the browser is successfully called and everything is working fine. Once the file is uploaded on the server and it will be sent back to the client to reflect that the user has successfully uploaded the file.

You can find the complete code for this example at FileUpload-Example Github Repository.
