
This year, the React Native community has seen a lot of changes. Starting from community adaption of React Hooks, the official documentation having new domain, one of the most popular library react-navigation adopting a more dynamic and component-based approach to add routes to your apps and lastly, react-native-firebase the go-to package to use Firebase SDK, released its sixth version with some improvements.
In this tutorial series, I am going to use all of the latest version packages described previously to showcase how to build an app with React Native in 2020. You are going to learn a lot about these libraries while following along as well as build a chat app.
The purpose of this tutorial is to get you familiar with all the latest updates in React Native world and its libraries such as react-navigation and react-native-firebase that are often the choice. If you wish to add a new feature that is not covered in this tutorial, feel free to do that and follow along at your own pace.
Requirements
The following requirements are going to make sure you have a suitable development environment:
- Node.js above
10.x.xinstalled on your local machine - JavaScript/ES6 basics
- watchman the file watcher installed
react-native-cliinstalled through npm or access via npxreact-navigationFirebaseprojectreact-native-firebasereact-native-paper
For a complete walkthrough on how you can set up a development environment for React Native, you can go through official documentation here.
Also, do note that the following tutorial is going to use the react-native version 0.61.5. Please make sure you are using a version of React Native above 0.60.x.
Installing libraries
To begin, start by creating a new React Native project and installing libraries as described in the following steps. You are going to need to open a terminal window for this process.
npx react-native init ChatApp

# navigate inside the project directory
cd ChatApp

# install following libraries for navigationOptions
yarn add @react-navigation/native @react-navigation/stack react-native-reanimated
react-native-gesture-handler react-native-screens
react-native-safe-area-context
@react-native-community/masked-view
react-native-paper react-native-vector-icons
After installing the dependencies, please make sure to follow instructions given in their official documentation to configure their native binaries to make it work with React Native.
These instructions may change in the future, so it is better to follow the official documentation.
iOS users, make sure to install pods via cocoapods where ever necessary.
Creating reusable form elements
In this section, let us create some reusable form components such as FormInput and FormButton. These UI components are going to be used in two screens: Login and Signup.
The advantage these reusable form components are going to give is that you do not have to write the same common code again and again for both screen components.
At the root of this React Native app, create a new directory called src/ and inside it create a new directory called components/.
Inside this directory, create a new file called FormInput.js. This component is going to provide a Text Input field for the screen components to use and for the user to enter the credentials.
Start by importing the following statements.
import React from 'react';
import { StyleSheet, Dimensions } from 'react-native';
import { TextInput } from 'react-native-paper';
Dimensions from React Native core API, provides a way to get the screen width and height. Instead of giving the fix width and height to a text input field, let this API calculate it for us. You can get the application’s screen and height by adding the following snippet.
const { width, height } = Dimensions.get('screen');Next, export the default function FormInput that is going to have some props.
export default function FormInput({ labelName, ...rest }) {
  return (
    <TextInput
      label={labelName}
      style={styles.input}
      numberOfLines={1}
      {...rest}
    />
  );
}
The ...rest props must be the last prop passed as a parameter, otherwise, you are going to get an error. The purpose of passing this prop is to allow the component to have other props value.
Lastly, define the corresponding styles for this reusable component.
const styles = StyleSheet.create({
  input: {
    marginTop: 10,
    marginBottom: 10,
    width: width / 1.5,
    height: height / 15
  }
});
The next reusable component is going to be in a separate file called FormButton.js. It is similar to FormInput except that this component is going to be used to display a button on the screen.
It is also going to use the width and height of the screen using Dimensions from React Native.
Here is the complete code snippet:
import React from 'react';
import { StyleSheet, Dimensions, Text } from 'react-native';
import { Button } from 'react-native-paper';

const { width, height } = Dimensions.get('screen');

export default function FormButton({ title, modeValue, ...rest }) {
  return (
    <Button
      mode={modeValue}
      {...rest}
      style={styles.button}
      contentStyle={styles.buttonContainer}
    >
      {title}
    </Button>
  );
}

const styles = StyleSheet.create({
  button: {
    marginTop: 10
  },
  buttonContainer: {
    width: width / 2,
    height: height / 15
  }
});
The react-native-paper UI library, has three modes to display a button.
text: a flat button without background or outlineoutlined: a button with the outlinecontained: a button with background color and elevation shadow
For different purposes, you are going to make use of different button modes. You will see them in screen components later. That is why it is better to accept the value as a prop (as mentioned in the above snippet: modeValue).
Create a login screen
To being implementing screens in the current app, start by creating the most essential screen called LoginScreen. This is going to be the initial route when the user is not authenticated or authorized to enter the app and use its features.
Here is a demo of the screen you are going to achieve in this section.
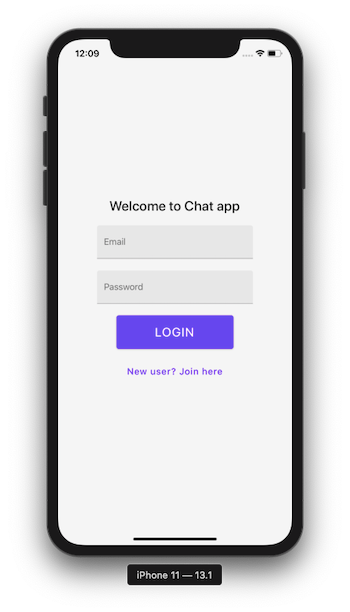
Inside src/, create another directory called screens/. In this directory, we are going to store all screen components. Inside it, also create LoginScreen.js.
The Login screen is going to have four main UI elements:
- two text input fields for user’s email and password
- one login button and one button to navigate to sign up screen (in case the end-user is not registered to use the app)
Start by importing the following statements.
import React, { useState } from 'react';
import { View, StyleSheet } from 'react-native';
import { Title } from 'react-native-paper';
import FormInput from '../components/FormInput';
import FormButton from '../components/FormButton';
Inside the LoginScreen functional component, define two state variables:
emailpassword
Both of these variables are going to be used with the FormInput component to obtain the value of the user credentials. By default, they are going to have an empty string as its value.
export default function Login() {
  const [email, setEmail] = useState('');
  const [password, setPassword] = useState('');

  return (
    <View style={styles.container}>
      <Title style={styles.titleText}>Welcome to Chat app</Title>
      <FormInput
        labelName="Email"
        value={email}
        autoCapitalize="none"
        onChangeText={userEmail => setEmail(userEmail)}
      />
      <FormInput
        labelName="Password"
        value={password}
        secureTextEntry={true}
        onChangeText={userPassword => setPassword(userPassword)}
      />
      <FormButton
        title="Login"
        modeValue="contained"
        labelStyle={styles.loginButtonLabel}
      />
      <FormButton
        title="New user? Join here"
        modeValue="text"
        uppercase={false}
        labelStyle={styles.navButtonText}
      />
    </View>
  );
}
Do note that each of the FormInput elements has different props being passed. For example, The email component has autoCapitalize set to none. The password component has secureTextEntry set to boolean true. Including others, this is where ...rest becomes helpful (as you have seen in the previous section).
The onChangeText prop accepts a callback that is invoked whenever the text of the input field changes.
Lastly, here are the styles.
const styles = StyleSheet.create({
  container: {
    backgroundColor: '#f5f5f5',
    flex: 1,
    justifyContent: 'center',
    alignItems: 'center'
  },
  titleText: {
    fontSize: 24,
    marginBottom: 10
  },
  loginButtonLabel: {
    fontSize: 22
  },
  navButtonText: {
    fontSize: 16
  }
});
Do notice that, you are using a JavaScript object to define styles for each component so far. StyleSheet in React Native provides an API to create styles inside the component file. It takes a JavaScript object as it does above, and returns a new Stylesheet object from it. There are no classes or ids in React Native like in web development. To create a new style object you use StyleSheet.create() method.
The way you have defined styles by creating an object is the preferred way. Not only it helps you organize styles and keep them separate, but these styles when defined in this manner are also sent through the native render bridge only once (unlike inline styles).
Create a signup screen
If the user is not registered to use the app but wants to make a new account to get authorized, this where the signup screen becomes useful.

Create a new file called SignupScreen.js inside src/screens/ directory. It is going to be similar to the login screen that you created in the previous section in many ways. I am going to leave it to you to find similarities and differences between the two screens. Take a look at the code snippet for the signup screen below.
import React, { useState } from 'react';
import { View, StyleSheet } from 'react-native';
import { Title, IconButton } from 'react-native-paper';
import FormInput from '../components/FormInput';
import FormButton from '../components/FormButton';

export default function SignupScreen({ navigation }) {
  const [email, setEmail] = useState('');
  const [password, setPassword] = useState('');

  return (
    <View style={styles.container}>
      <Title style={styles.titleText}>Register to chat</Title>
      <FormInput
        labelName="Email"
        value={email}
        autoCapitalize="none"
        onChangeText={userEmail => setEmail(userEmail)}
      />
      <FormInput
        labelName="Password"
        value={password}
        secureTextEntry={true}
        onChangeText={userPassword => setPassword(userPassword)}
      />
      <FormButton
        title="Signup"
        modeValue="contained"
        labelStyle={styles.loginButtonLabel}
      />
      <IconButton
        icon="keyboard-backspace"
        size={30}
        style={styles.navButton}
        color="#6646ee"
        onPress={() => navigation.navigate('Login')}
      />
    </View>
  );
}

const styles = StyleSheet.create({
  container: {
    backgroundColor: '#f5f5f5',
    flex: 1,
    justifyContent: 'center',
    alignItems: 'center'
  },
  titleText: {
    fontSize: 24,
    marginBottom: 10
  },
  loginButtonLabel: {
    fontSize: 22
  },
  navButtonText: {
    fontSize: 18
  },
  navButton: {
    marginTop: 10
  }
});
The major difference in the above component snippet is that you are going to use an IconButton to navigate from the signup screen to log in screen. This is provided by react-native-paper and is actually a button that displays an icon without any label.
Create an auth stack navigator
There are going to be two stack navigators in the current app. The first navigator is going to be called AuthStack.
It is going to contain only those screens which allow the user to add their credentials or create credentials. Thus, login screen and sign up screen as routes, where the login screen is going to the initial route. You will learn more about the second stack later.
Create a new directory src/navigation/. This directory is going to contain all the routes and other necessary components to build the navigation in the app.
Inside this directory, create a new file called AuthStack.js. This file is going to have a stack navigator.
Start by importing the following statements including both screen components.
import React from 'react';
import { createStackNavigator } from '@react-navigation/stack';
import SignupScreen from '../screens/SignupScreen';
import LoginScreen from '../screens/LoginScreen';
A Stack Navigator provides the React Native app to transit between different screens similar to how the navigation in a web browser works. It pushes or pops a screen when in the navigational state.
Next, create an instance of a stack navigator as below.
const Stack = createStackNavigator();Navigators are defined declaratively using version 5 of react-navigation. It follows a more component based approach, similar to that of react-router in web development using Reactjs (if you are familiar with it).
The createStackNavigator is a function used to implement a stack navigation pattern. This function returns two React components: Screen and Navigator, that help us configure each component screen as shown below.
export default function AuthStack() {
  return (
    <Stack.Navigator initialRouteName="Login" headerMode="none">
      <Stack.Screen name="Login" component={LoginScreen} />
      <Stack.Screen name="Signup" component={SignupScreen} />
    </Stack.Navigator>
  );
}
The Stack.Navigator takes those prop values that are common to each screen route. For example, generally, the stack navigator adds a header to each screen inside it. For the current stack, you are not going to require a header on each screen. Thus, setting headerMode to the value of none fulfills it.
The headerMode prop specifies how the header should be rendered for each screen in the stack. Setting it to none, specifies that it should not be rendered at all. You can find the other values for this mode here.
The initialRouteName is the name of the route to render on the first load of the navigator.
You can learn more Stack Navigator and its common properties in the post here.
To make the navigation between Login to sign up screen work, you have to add the navigation prop to each component. Go to the LoginScreen.js file and pass the navigation prop reference as a parameter.
export default function LoginScreen({ navigation }) {
  // ...
}
This prop reference provides a set of functions ready to dispatch as actions for each screen component. Do note that, you can only pass it those screen components that are routes for one of the navigators.
For example, in the login screen component, to navigate to sign up screen, add the onPress prop to the last FormButton. The navigation.navigate accepts the value of the screen to navigate to, from the current screen.
<FormButton
  title="New user? Join here"
  modeValue="text"
  uppercase={false}
  labelStyle={styles.navButtonText}
  onPress={() => navigation.navigate('Signup')}
/>
Similarly, open SignupScreen.js screen file, and pass the prop reference for navigation.
export default function SignupScreen({ navigation }) {
  // ...
}
Next, add the onPress prop to the IconButton.
<IconButton
  icon="keyboard-backspace"
  size={30}
  style={styles.navButton}
  color="#6646ee"
  onPress={() => navigation.goBack()}
/>
The goBack() action closes the active screen (Signup screen) and moves back in the stack (Login screen).
For more information on the navigation prop, check out the official reference here.
Add a navigation container
Both of our screen components are now configured for the navigation to work. In this section, let us add the missing piece called NavigationContainer to make sure the current navigation in the auth stack works.
Create a new file called Routes.js inside src/navigation/ directory. This file is going to contain all the stacks that the app is going to have, but for now, the auth stack.
import React from 'react';
import { NavigationContainer } from '@react-navigation/native';
import AuthStack from './AuthStack';

export default function Routes() {
  return (
    <NavigationContainer>
      <AuthStack />
    </NavigationContainer>
  );
}
The NavigationContainer is a component that manages the navigation tree. It also allows the screen components to refer to the navigation prop reference. This is done by wrapping all the navigator’s structure.
Wrapping with the paper provider
Create a file called index.js inside src/navigation/ directory.
To make UI components from react-native-paper to work, you have to wrap all the routes inside PaperProvider as shown below.
import React from 'react';
import { Provider as PaperProvider } from 'react-native-paper';
import Routes from './Routes';

/**
 * Wrap all providers here
 */

export default function Providers() {
  return (
    <PaperProvider>
      <Routes />
    </PaperProvider>
  );
}
The PaperProvider component provides the theme to all the components in the framework. It also acts as a portal to components that need to be rendered at the top level.
This is a mandatory step. The reason to create a separate Providers component and wrap Routes and not wrap the App component (as mentioned in official docs here) is that there going to be some custom providers later in this app. So to manage all the providers, it is better if you create a separate file.
Conclusion
The form of screen components is now complete. To make sure they are working as desired, open up a terminal window and build the app for a specific mobile platform.
# for ios
npx react-native run-ios

# for android
npx react-native run-android
Then, go to the simulator and you are going to get the following result.

What’s Next?
In part one of this tutorial series, you’ve successfully built a navigation flow using the react-navigation library, set up a stack navigator, and learned how to use pre-defined UI components from react-native-paper to create reusable custom form components.
In the next part of this series, we’ll learn how to install the Firebase SDK, how to generate and add Firebase credentials and API keys for iOS apps, implement an email sign-in provider with Firebase, and thus, use the navigation flow with a real-time backend service.
You can find the complete source code for this project at this Github repo.
👉 Here is a list of resources used in this tutorial.
- Learn more about
navigation prop reference DimensionsAPI in React Native- Getting started with stack navigator using
react-navigationv5 here
💙 To learn more about React Native, check out these resources:
Originally published at Heartbeat.Fritz.Ai
