
Mobile apps are made of screens that in number can vary depending on the app you are developing. Handling user navigation can be tricky to learn and do in mobile apps, but with dedicated open-source libraries like react-navigation do make the process a lot easier.
React Navigation library is common among React Native developers. It is built with JavaScript, and you can create React components and apply any navigation pattern. On the device, it will give the natural look and feel.
It is up to the developer now, on how to make the best use of navigation between different screens in a React Native app. There are more than one navigation patterns available. If you are starting in the React Native ecosystem, this post will guide you through to use different the patterns of navigation such as Stack and Switch navigation using react-navigation library’s latest 4.x.x version.
Table of Contents
Open Table of Contents
Requirements
If you are going to code along, make sure you have already installed the following:
- Nodejs (>=
10.x.x) with npm/yarn installed. - expo-cli (>=
3.x.x), previously known ascreate-react-native-app. - Mac users must be running an iOS simulator.
- Windows/Linux users must be running an Android emulator.
To know more about how to setup and run the simulator or the emulator on your local development environment visit React Native’s official documentation here.
Installing navigation library
To get started, create a new Expo app using expo-cli with the following command from a terminal window. When asked, choose the blank template.
expo init expo-example

# navigate inside the project directory
cd expo-example
Once inside the project directory, install the following dependencies.
yarn add react-navigation react-navigation-stack

expo install react-native-gesture-handler
react-native-screens
As compared to previous versions of react-navigation, all three navigation patterns have been modularised in their own dependencies. If you are using:
- stack navigation, then install
react-navigation-stack - for tabs install
react-navigation-tabs - for drawer install
react-navigation-drawer - switch navigation pattern is still under
react-navigationand is only used for specific use cases such as authentication flow
More appropriate information about each dependency related to its own navigation pattern can be found in the official docs here.
After installing these dependencies, you can verify that they have been installed by opening the package.json file.
"dependencies": {
    "expo": "^34.0.1",
    "react": "16.8.3",
    "react-dom": "^16.8.6",
    "react-native": "https://github.com/expo/react-native/archive/sdk-34.0.0.tar.gz",
    "react-native-gesture-handler": "~1.3.0",
    "react-native-reanimated": "~1.1.0",
    "react-native-screens": "1.0.0-alpha.22",
    "react-native-web": "^0.11.4",
    "react-navigation": "4.0.0",
    "react-navigation-stack": "1.5.1"
  },
Create App Screens
I like to arrange different setups and related files under the folder structure. Here is how it is going to look like at the end of this tutorial. It is also a good practice to organize or give structure to your project.

The three files inside the screens folder are going to be functional components for now, with some dummy text to display. Create these files with the following code snippets.
For Home.js:
import React from 'react';
import { StyleSheet, Text, View } from 'react-native';

export default function Home() {
  return (
    <View style={styles.container}>
      <Text>Home</Text>
    </View>
  );
}

const styles = StyleSheet.create({
  container: {
    flex: 1,
    backgroundColor: '#fff',
    alignItems: 'center',
    justifyContent: 'center'
  }
});
For Login.js:
import React from 'react';
import { StyleSheet, Text, View } from 'react-native';

export default function Login() {
  return (
    <View style={styles.container}>
      <Text>Login</Text>
    </View>
  );
}

const styles = StyleSheet.create({
  container: {
    flex: 1,
    backgroundColor: '#fff',
    alignItems: 'center',
    justifyContent: 'center'
  }
});
For Signup.js:
import React from 'react';
import { StyleSheet, Text, View } from 'react-native';

export default function Signup() {
  return (
    <View style={styles.container}>
      <Text>Signup</Text>
    </View>
  );
}

const styles = StyleSheet.create({
  container: {
    flex: 1,
    backgroundColor: '#fff',
    alignItems: 'center',
    justifyContent: 'center'
  }
});
The idea here is to create a foundation of three different screens and mock a login/signup and main (in the current case, the home screen) screen navigation pattern. This is a common pattern in most mobile apps where the user has to either signup or login before accessing the rest of the application.
Setup Navigation
After creating these three screens, create a new directory called navigation. Inside this, create three new files:
index.jsAppNavigation.jsAuthNavigation.js
Let us setup the AppNavigation first since it will contain only one screen. Open up the file and add the following code.
//AppNavigation.js
import { createStackNavigator } from 'react-navigation-stack';
import Home from '../screens/Home';

const AppNavigation = createStackNavigator(
  {
    Home: { screen: Home }
  },
  {
    initialRouteName: 'Home'
  }
);

export default AppNavigation;
Stack Navigation provides your app to navigate between screens, where each new screen is placed on the top of the previous one. It is literally like a stack and hence the name. This is done by createStackNavigator function. A route configuration object is passed to this function. The Home route corresponds to the Home.js component.
On an iOS device, a new screen slides from the right, and on Android, it fades from the bottom.
Next, edit AuthNavigation.js file.
//AuthNavigation.js
import { createStackNavigator } from 'react-navigation-stack';
import Login from '../screens/Login';
import Signup from '../screens/Signup';

const AuthNavigation = createStackNavigator(
  {
    Login: { screen: Login },
    Signup: { screen: Signup }
  },
  {
    initialRouteName: 'Login'
  }
);

export default AuthNavigation;
Similarly, in AuthNavigation two screens, login and signup are passed. In the second object that is passed to createStackNavigator function, the initialRouteName indicates that when this navigation file runs, the first screen that will be shown is going to be Login. In other words, it is used to set a default screen to whatever the value initialRouteName is set to.
In AppNavigation since there is only one screen, so it will always show Home screen whether to pass the initialRouteName in that file or not. Next, open index.js file in the same directory and add the following code.
//index.js
import { createAppContainer } from 'react-navigation';
import AuthNavigation from './AuthNavigation';

const AppContainer = createAppContainer(AuthNavigation);

export default AppContainer;
The createAppContainer function is responsible for managing the navigation state of the app and links the app to the top-level navigator. The navigation state comes in handy when you are passing data between two screens.
Lastly, open the App.js file and use AppContainer to be the top-level component.
//App.js
import React from 'react';
import AppContainer from './navigation';

export default function App() {
  return <AppContainer />;
}
Now open your app in a simulator device by executing the command expo start from a terminal window. You will see that it shows only the Login screen.

Notice the empty space at the top of the screen? That is the header section. When using Stack Navigation pattern, each screen is assigned a header automatically. If you do not require to use it, you can set the headerMode property to the value of none to createStackNavigator function. Open AuthNavigation.js to edit.
// AuthNavigation.js
const AuthNavigation = createStackNavigator(
  {
    Login: { screen: Login },
    Signup: { screen: Signup }
  },
  {
    initialRouteName: 'Login',
    headerMode: 'none'
  }
);
You can read more about app containers here.
Navigating between two screens
Right now, there is no way you can navigate from the Login to the Signup screen. To do so, let us use this.props.navigation. Each screen component in the app using react-navigation library is automatically provided with the navigation prop. It further has different reference values to navigate between different screens directly from a screen.
To transit between login to signup, create a button like below and pass an onPress prop to it in Login.js file. The value of this prop is going to hold the navigation prop reference.
//Login.js
//import Button
import { StyleSheet, Text, View, Button } from 'react-native';
export default class Login extends React.Component {
render() {
return (
<View style={styles.container}>
<Text>Login</Text>
<Button
title="Go to Signup"
onPress={() => this.props.navigation.navigate('Signup')}
/>
</View>
);
}
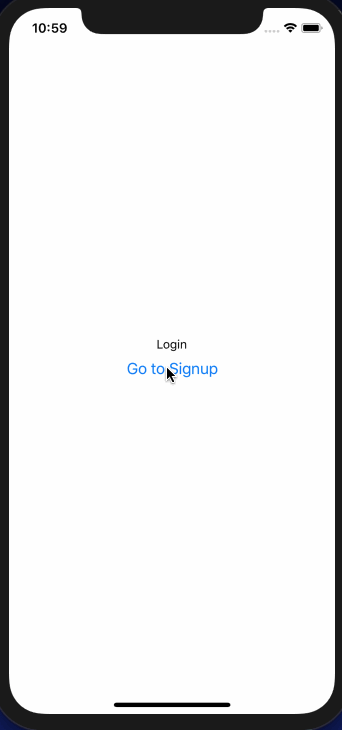
}Passing the name of the route as the first parameter to navigation.navigate() is necessary. Now go back to the simulator, and you will find a new button. Press the button, and it will take you to the Signup screen component.

Similarly, you can add a way to navigate back to the login screen component from the signup.
//Signup.js

export default class Signup extends React.Component {
  goToLogin = () => this.props.navigation.navigate('Login');
  render() {
    return (
      <View style={styles.container}>
        <Text>Signup</Text>
        <Button title="Go to Login" onPress={this.goToLogin} />
      </View>
    );
  }
}
Here is the output.
Managing Authentication Flow
In React Navigation, to manage authentication flow, Switch Navigator is used. This navigation pattern only loads one screen at a time, and there is no back functionality by default. It resets the initial route when switching between the screens. To get started open index.js file, import createSwitchNavigator from react-navigation and add the following code.
//index.js
import { createSwitchNavigator, createAppContainer } from 'react-navigation';
import AuthNavigation from './AuthNavigation';
import AppNavigation from './AppNavigation';

const SwitchNavigator = createSwitchNavigator(
  {
    Auth: AuthNavigation,
    App: AppNavigation
  },
  {
    initialRouteName: 'Auth'
  }
);

const AppContainer = createAppContainer(SwitchNavigator);

export default AppContainer;
Note that, the AppContainer is still being exported from the file, but it now accepts SwitchNavigator as the parameter. Like the createStackNavigator, createSwitchNavigator also accepts route config as the first parameter and the configuration values as the second. The route config is going to be done between the authentication navigation screens and the other screens related to the app.
Import both AuthNavigation and AppNavigation and set the Auth as the initial route. This means that the login screen is going to be shown for the when apps load for the first time.
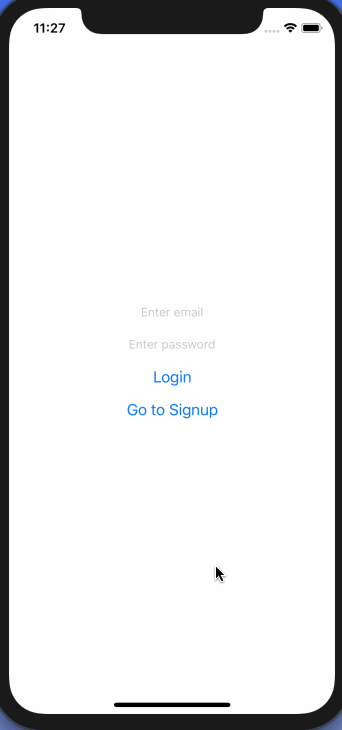
Let us mock the behavior of logging into the app and see what happens when the user successfully logs in. Open Login.js file, define an initial state with two properties: email and password.
//Login.js
import React from 'react';
import { StyleSheet, View, Button, TextInput } from 'react-native';

export default class Login extends React.Component {
  state = {
    email: '',
    password: ''
  };

  handleEmailChange = email => {
    this.setState({ email });
  };

  handlePasswordChange = password => {
    this.setState({ password });
  };

  onLogin = async () => {
    const { email, password } = this.state;
    try {
      if (email.length > 0 && password.length > 0) {
        this.props.navigation.navigate('App');
      }
    } catch (error) {
      alert(error);
    }
  };

  goToSignup = () => this.props.navigation.navigate('Signup');
  render() {
    const { email, password } = this.state;

    return (
      <View style={styles.container}>
        <View style={{ margin: 10 }}>
          <TextInput
            name="email"
            value={email}
            placeholder="Enter email"
            autoCapitalize="none"
            onChangeText={this.handleEmailChange}
          />
        </View>
        <View style={{ margin: 10 }}>
          <TextInput
            name="password"
            value={password}
            placeholder="Enter password"
            secureTextEntry
            onChangeText={this.handlePasswordChange}
          />
        </View>
        <Button title="Login" onPress={this.onLogin} />
        <Button title="Go to Signup" onPress={this.goToSignup} />
      </View>
    );
  }
}

const styles = StyleSheet.create({
  container: {
    flex: 1,
    backgroundColor: '#fff',
    alignItems: 'center',
    justifyContent: 'center'
  }
});
The onLogin handler function allows the user to navigate to the Home screen only if the email and the password fields are not empty. It is used on the onPress prop for the following button.
<Button title="Login" onPress={this.onLogin} />Look at the complete demo below.
Conclusion
The authentication flow works! By following this tutorial, you have learned how to use the latest react-navigation library to manage and mimic an authentication flow in a React Native app. Using the current knowledge, in the next post, you are going to build some actual forms in React Native apps with proper styling and validation using awesome libraries like Formik and Yup. I hope this post works as fundamental for the next one.
You can find the complete code used in this tutorial at the Github repo here.
Important resources from this post:
react-navigationlibrary docs- Stack Navigator
- Switch Navigator
navigationprops