How to build a xylophone app with Audio API, React Native, and Expo
React Native when used with Expo as a toolchain eases out the common pain to manage ios and android applications. After saying that, I realized that there is a delight to use this ever-growing open source mobile application framework. Expo has gained a lot of credibility as a framework to provide collective solutions to build React Native applications by lowering the time and effort of the developer using it. They are continuing to enhance it from time to time and keeping up with the latest changes in React Native community. That said, Expo SDK33 is a blast.
That being said, let us dive into one of the Expo's API. In this tutorial, you are going to build an application using Expo's Audio API. You are going to develop the following app (a toy xylophone app) step-by-step.
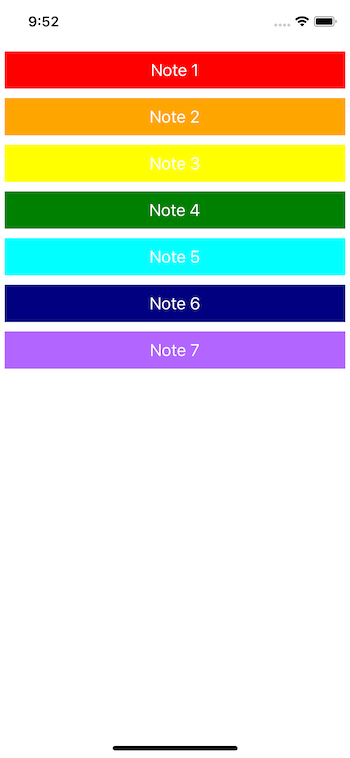
Table of Contents
Requirements
🔗To follow this tutorial, please make sure you have the following installed on your local development environment and have access to the services mentioned below:
- Nodejs (>=
8.x.x) with npm/yarn installed. expo-cli(>=2.19.4), previously known as create-react-native-app.watchmanis the file change watcher for React Native projects.
Getting Started
🔗To create a new Expo project, the only requirement is to have expo-cli installed. Then, execute the following command to create a new project directory.
expo init rn-xylophone-app# navigate inside the app foldercd rn-xylophone-app# install the following dependencyyarn add expo-av
Once the project directory is generated, navigate inside it as shown in the above command. Then install the required dependency to add the functionality of playing an Audio file inside the React Native app. The dependency expo-av will help you use Audio API and its promise based asynchronous methods to play the audio files. You are going to implement this functionality later.
The last step needed is to have some sound files saved in your assets folder. You can, of course, use your audio files but if you want to use the same audio files used in this tutorial, you can download them at the link given below.
[add assets folder download link]
You might have got the idea of what the user interface is going to look while having a glimpse at the demo in the previous section. For each button, you are going to need a different color. Hence, create a new file called contants/Colors.js and add the following code.
1export const NoteOne = 'red';2export const NoteTwo = 'orange';3export const NoteThree = 'yellow';4export const NoteFour = 'green';5export const NoteFive = '#00FFFF ';6export const NoteSix = '#000080';7export const NoteSeven = '#B266FF';
Require this file and all the Color codes inside App.js file after other imports.
1// ...after other imports23import {4 NoteOne,5 NoteTwo,6 NoteThree,7 NoteFour,8 NoteFive,9 NoteSix,10 NoteSeven11} from './constants/Colors';
The color names are specified to mark each audio file which is named and numbered similarly. To import all the sounds file needed to build the application from the assets folder. Add the below object before the App component as shown.
1const xyloSounds = {2 one: require('./assets/note1.wav'),3 two: require('./assets/note2.wav'),4 three: require('./assets/note3.wav'),5 four: require('./assets/note4.wav'),6 five: require('./assets/note5.wav'),7 six: require('./assets/note6.wav'),8 seven: require('./assets/note7.wav')9};
The above object xyloSounds consist of the path to each sound file. This will be helpful when you are writing business logic to play these audio files and have to detect which audio file to play for the specific note.
Building the first UI button
🔗In this section, you are going to create a button using TouchableOpacity that is going to play the sound for the note when pressed. To start, make sure in the file App.js you have imported the following APIs from the react-native core.
1import { StyleSheet, Text, View, TouchableOpacity } from 'react-native';
Then, you have to modify the contents of the render function from the default, boilerplate text that any Expo application comes with. This is going to be done by creating a View container for each button, which will have a fixed height and margin of value 5 to add some spacing between the buttons.
1<View style={styles.container}>2 <View style={styles.buttonContainer}>3 <TouchableOpacity4 style={[styles.button, { backgroundColor: NoteOne }]}5 onPress={() => this.handlePlaySound('one')}6 >7 <Text style={styles.buttonText}>Note 1</Text>8 </TouchableOpacity>9 </View>10</View>
Notice that each button will have its background color specified in the file constants/Colors.js. This is done by inline styling method. To combine multiple styles in React Native, you can use an array notation like above. The button has one onPress method that is going to be responsible for playing the correct sound associated with the note. You will be creating the method handlePlaySound in the next section. However, do note that the value one being passed to this method is coming from the path you specified earlier for each audio file. Lastly, the button is going to have a text to display the correct audio file number.
The above snippet is followed by the styles that are created using StyleSheet.create() method.
1const styles = StyleSheet.create({2 container: {3 flex: 1,4 backgroundColor: '#fff',5 marginTop: 506 },7 buttonContainer: {8 height: 40,9 margin: 510 },11 button: {12 flex: 1,13 alignItems: 'center',14 justifyContent: 'center'15 },16 buttonText: {17 color: '#fff',18 fontSize: 1819 }20});
To see the current state of the application in action, go back to the terminal window and run the command yarn start or expo start if you do not have yarn installed. In the simulator screen, you are going to be welcomed, as shown in the below image.

Adding the Audio functionality
🔗To play a sound in an Expo application, you are required to first the API for the Audio from expo-av. So at the top of the App.js file and after other imports, you can add the following line.
1import { Audio } from 'expo-av';
Next, you have to add the method handlePlaySound inside the App function and before the render() method. Inside this function, create a new sound object. Whenever you are required to play sound using expo-av library, you have to create a new object. This object is going to represent the instance of the class Audio.sound.
1handlePlaySound = async note => {2 const soundObject = new Audio.Sound();34 try {5 let source = require('./assets/note1.wav');6 await soundObject.loadAsync(source);7 await soundObject8 .playAsync()9 .then(async playbackStatus => {10 setTimeout(() => {11 soundObject.unloadAsync();12 }, playbackStatus.playableDurationMillis);13 })14 .catch(error => {15 console.log(error);16 });17 } catch (error) {18 console.log(error);19 }20};
In the above snippet, you can notice that the method handlePlaySound is going to accept one parameter. This parameter is going to be the note's number, hence the name of the parameter being passed in the above snippet is called note. Inside that, the first line creates the instance of the class Audio.Sound().
Since JavaScript syntax of async/await is being used, it is better to create a try/catch block such that this Expo app does not give us any error when running the application. Inside this block, the first method loadAsync is used to create and load the sound from the source. Hence, the variable source defined explicitly is passed and contains the path of the first audio file from the assets folder.
To play the sound, playAsync() method is used. This method is, however, further extends using a promise that takes one object called playbackStatus object. This object uses playableDurationMillis to identify the position until the audio file should run from the memory. Once the audio file is played, the soundObject calls the method unloadAsync() which unloads the media file from memory. This allows the media file to be played again and again. The setTimeout function's value depends on the duration of the media file being played from memory.
Go back to the simulator or the device the current app is running and try to press the first button. You will hear the sound of the first note.
Finishing the App
🔗To complete building the application, you have to read the path of each file from the object xyloSounds. Edit the the value of source inside the method handlePlaySound().
Also, add the button for each note and do not forget to pass the correct source value inside the onPress() method. For your reference, here is the complete code of the file App.js.
1import React from 'react';2import { StyleSheet, Text, View, TouchableOpacity } from 'react-native';3import { Audio } from 'expo-av';45import {6 NoteOne,7 NoteTwo,8 NoteThree,9 NoteFour,10 NoteFive,11 NoteSix,12 NoteSeven13} from './constants/Colors';1415const xyloSounds = {16 one: require('./assets/note1.wav'),17 two: require('./assets/note2.wav'),18 three: require('./assets/note3.wav'),19 four: require('./assets/note4.wav'),20 five: require('./assets/note5.wav'),21 six: require('./assets/note6.wav'),22 seven: require('./assets/note7.wav')23};2425export default function App() {26 handlePlaySound = async note => {27 const soundObject = new Audio.Sound();2829 try {30 let source = xyloSounds[note];31 // let source = require('./assets/note1.wav')32 await soundObject.loadAsync(source);33 await soundObject34 .playAsync()35 .then(async playbackStatus => {36 setTimeout(() => {37 soundObject.unloadAsync();38 }, playbackStatus.playableDurationMillis);39 })40 .catch(error => {41 console.log(error);42 });43 } catch (error) {44 console.log(error);45 }46 };4748 return (49 <View style={styles.container}>50 <View style={styles.buttonContainer}>51 <TouchableOpacity52 style={[styles.button, { backgroundColor: NoteOne }]}53 onPress={() => this.handlePlaySound('one')}54 >55 <Text style={styles.buttonText}>Note 1</Text>56 </TouchableOpacity>57 </View>58 <View style={styles.buttonContainer}>59 <TouchableOpacity60 style={[styles.button, { backgroundColor: NoteTwo }]}61 onPress={() => this.handlePlaySound('two')}62 >63 <Text style={styles.buttonText}>Note 2</Text>64 </TouchableOpacity>65 </View>66 <View style={styles.buttonContainer}>67 <TouchableOpacity68 style={[styles.button, { backgroundColor: NoteThree }]}69 onPress={() => this.handlePlaySound('three')}70 >71 <Text style={styles.buttonText}>Note 3</Text>72 </TouchableOpacity>73 </View>74 <View style={styles.buttonContainer}>75 <TouchableOpacity76 style={[styles.button, { backgroundColor: NoteFour }]}77 onPress={() => this.handlePlaySound('four')}78 >79 <Text style={styles.buttonText}>Note 4</Text>80 </TouchableOpacity>81 </View>82 <View style={styles.buttonContainer}>83 <TouchableOpacity84 style={[styles.button, { backgroundColor: NoteFive }]}85 onPress={() => this.handlePlaySound('five')}86 >87 <Text style={styles.buttonText}>Note 5</Text>88 </TouchableOpacity>89 </View>90 <View style={styles.buttonContainer}>91 <TouchableOpacity92 style={[styles.button, { backgroundColor: NoteSix }]}93 onPress={() => this.handlePlaySound('six')}94 >95 <Text style={styles.buttonText}>Note 6</Text>96 </TouchableOpacity>97 </View>98 <View style={styles.buttonContainer}>99 <TouchableOpacity100 style={[styles.button, { backgroundColor: NoteSeven }]}101 onPress={() => this.handlePlaySound('seven')}102 >103 <Text style={styles.buttonText}>Note 7</Text>104 </TouchableOpacity>105 </View>106 </View>107 );108}109110const styles = StyleSheet.create({111 container: {112 flex: 1,113 backgroundColor: '#fff',114 marginTop: 50115 },116 buttonContainer: {117 height: 40,118 margin: 5119 },120 button: {121 flex: 1,122 alignItems: 'center',123 justifyContent: 'center'124 },125 buttonText: {126 color: '#fff',127 fontSize: 18128 }129});
Now run the application in the simulator, and you will get the following screen.
Conlusion
🔗You have reached the end of this tutorial. I hope you have learned how to integrate the expo-av library to use Audio class to create functionality in your cross-platform applications and play audio media files. Important things to notice in this demo application is how to use available methods like loadAsync(), unloadAsync() and leverage the duration of the playing media using the object playplaybackStatus.
Originally published at Heartbeat
More Posts
Browse all posts
I'm a software developer and a technical writer. On this blog, I write about my learnings in software development and technical writing.
Currently, working maintaining docs at 𝝠 Expo. Read more about me on the About page.